Sep 07, 2025
On this page
- 1. HP 15-dy2172wm Pre-Repair Assessment: Maximizing Your Laptop's Resale Value
- 💰 Laptop Resale Valuation Guide
- 📊 Repair Cost vs. Value Analysis
- 🔍 Model Verification & Compatibility
- ⚠️ Damage Assessment Checklist
- 📸 Pre-Repair Documentation
- 📈 Market Research & Pricing Strategy
- ⚖️ Repair Decision Factors
- 2. Essential Tools & Workspace Setup for Successful HP 15-dy2172wm LCD Repair
- 🛠️ Basic Repair Toolkit
- 🔧 Specialized Tools for Display Repair
- 🏗️ Professional Workspace Setup
- ⚠️ Safety Equipment & Precautions
- 📦 Recommended Replacement Parts
- 💡 Budget-Friendly Tool Alternatives
- ✅ Pre-Repair Preparation Checklist
- 💰 Tool Investment vs. Value Analysis
- 3. Safe Display Removal Process & Component Handling for HP 15-dy2172wm
- ⚠️ Safety First: Critical Precautions
- 🔧 Step-by-Step Display Removal Process
- 📱 Bezel Removal Techniques
- 🖥️ LCD Separation from Bezel
- 👐 Safe Component Handling
- ❌ Common Mistakes to Avoid
- 🛡️ Damage Prevention Techniques
- 🔍 Troubleshooting Common Issues
- 4. HP 15-dy2172wm LCD Screen Replacement & Compatibility Guide
- 🔌 Display Compatibility Specifications
- 🔄 Replacement Display Options
- 🔍 Compatibility Verification Process
- 🔧 Installation Process
- 🔗 Display Connector Types
- ✅ Pre-Installation Quality Testing
- ⚠️ Common Compatibility Issues
- 🏪 Recommended Vendors
- 5. Professional Reassembly & Quality Testing for HP 15-dy2172wm LCD Repair
- 🛠️ Reassembly Preparation
- 🔧 Step-by-Step Reassembly Process
- 📋 Screw Management Guide
- 🔍 Initial Power-On Testing
- 🖥️ Comprehensive Display Testing
- ⚡ Full System Testing
- ✅ Quality Assurance Checklist
- ✨ Final Preparation for Sale
- 6. Display Performance Testing & Calibration for HP 15-dy2172wm
- 🛠️ Essential Testing Tools & Software
- 🔍 Basic Display Quality Tests
- 🎨 Display Calibration Process
- ⚡ Advanced Performance Testing
- 🎯 Real-World Usage Testing
- ✅ Quality Standards & Acceptance Criteria
- 📊 Testing Documentation Protocol
- 💰 Value Enhancement Through Testing
- 7. Preparing Your Repaired HP 15-dy2172wm for Maximum Cash Value
- 💰 Competitive Pricing Strategy
- ✨ Professional Presentation Standards
- 💻 Software Optimization & Preparation
- 📋 Professional Documentation Package
- 🎁 Accessory & Packaging Preparation
- 📈 Sales Listing Optimization
- ⏰ Optimal Market Timing
- 🚀 Maximum Value Strategies
- 8. Where to Get the Best Cash for Your Repaired HP 15-dy2172wm Laptop
- 📊 Marketplace Comparison Guide
- 🏆 Specialized Electronics Buyback Services
- 🌐 Private Marketplaces
- 👥 Specialized Communities
- 🔄 Manufacturer & Retailer Trade-In
- 💡 Maximizing Your Cash Return
- 🛡️ Safety & Security
- 🚀 Success Tips for Maximum Cash
- Need to Sell Your HP Laptop? Get Instant Cash!
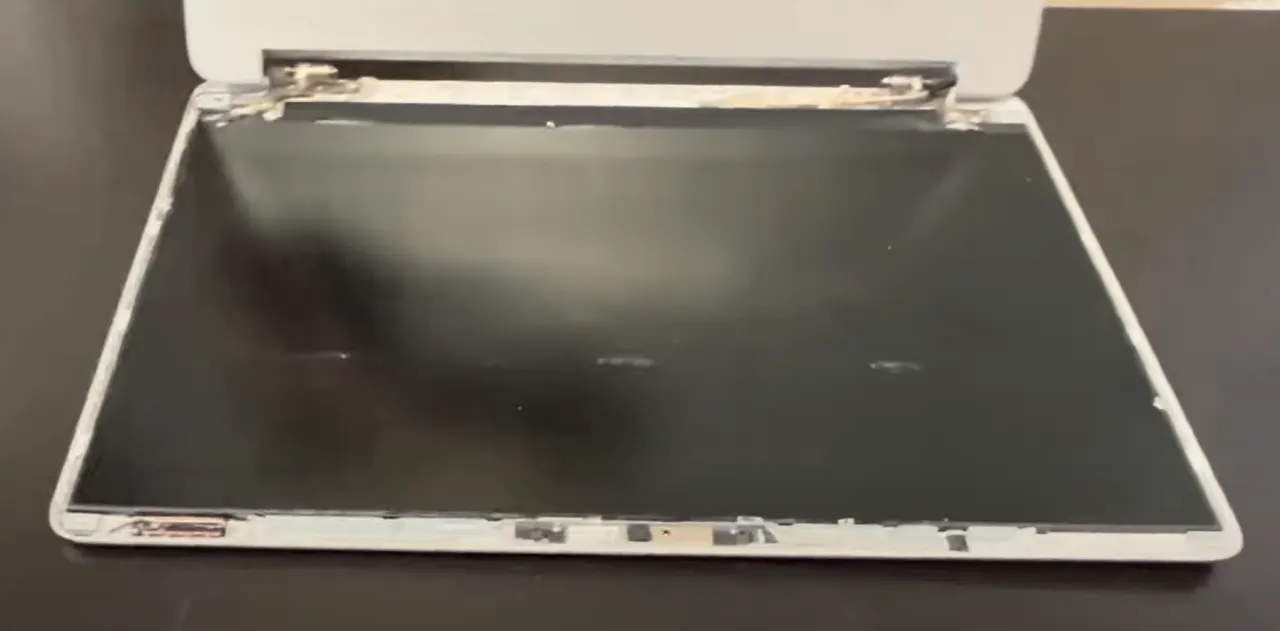
1. HP 15-dy2172wm Pre-Repair Assessment: Maximizing Your Laptop's Resale Value
💰 Laptop Resale Valuation Guide
| Condition | Display Status | Average Market Value | Potential After Repair |
|---|---|---|---|
| Broken Display | Cracked, not functional | $80-$120 | $200-$250 |
| Faulty Display | Flickering, lines, partial view | $100-$150 | $220-$280 |
| Good Condition | Working perfectly | $200-$280 | N/A (No repair needed) |
📊 Repair Cost vs. Value Analysis
- Replacement Display Cost:
- New LCD panel: $50-$80
- Used LCD panel: $30-$60
- Full display assembly: $70-$110
- Tools and materials: $15-$30
- Value Enhancement:
- Average value increase: $120-$160
- ROI on repair investment: 140-220%
- Faster sale completion
- Broader buyer appeal
🔍 Model Verification & Compatibility
- Locate model number on bottom casing (15-dy2172wm)
- Verify specifications on HP official support page
- Check current display specifications:
- 15.6-inch diagonal HD SVA BrightView micro-edge WLED-backlit
- 1366 x 768 resolution
- 220 nits brightness
- Non-touch display
- Confirm compatible replacement parts
⚠️ Damage Assessment Checklist
- Display Damage:
- Cracks or physical damage to screen
- Flickering or intermittent display
- Lines or discoloration on screen
- Backlight issues
- Frame & Hinge Assessment:
- Bezel damage or warping
- Hinge functionality and smoothness
- Case cracks around display area
- Webcam and microphone functionality
📸 Pre-Repair Documentation
- Visual Documentation:
- Photograph laptop from all angles
- Close-ups of display damage
- Serial numbers and model information
- Existing wear and tear documentation
- Functional Testing:
- Verify keyboard and touchpad functionality
- Test USB ports and other connections
- Check battery health and charging capability
- Document any additional issues
📈 Market Research & Pricing Strategy
- Competitive Analysis:
- Check sold listings for similar models on eBay
- Research local market prices on Facebook Marketplace
- Compare prices with working displays vs. broken
- Note premium prices for excellent condition units
- Target Buyer Profiles:
- Students needing affordable laptops
- Home users for basic computing needs
- Small businesses seeking budget systems
- Secondary device users
⚖️ Repair Decision Factors
- Proceed with Repair If:
- Repair cost is less than 60% of potential value increase
- No additional major issues are present
- You have the necessary skills and tools
- Market demand for this model is good
- Consider Alternatives If:
- Multiple major issues beyond display damage
- Repair costs exceed value increase
- Extensive case or structural damage exists
- Very low market demand for this model
2. Essential Tools & Workspace Setup for Successful HP 15-dy2172wm LCD Repair
🛠️ Basic Repair Toolkit
- Screwdrivers:
- Phillips #00 precision screwdriver
- Phillips #0 standard screwdriver
- Magnetic tip recommended for easier handling
- Spudger or plastic opening tool set
- Essential Tools:
- Plastic guitar picks or opening cards
- Tweezers (non-magnetic, anti-static)
- Anti-static wrist strap
- Microfiber cleaning cloth
- Isopropyl alcohol (90%+) for cleaning
🔧 Specialized Tools for Display Repair
- Display-Specific Tools:
- Suction cup for screen handling
- Plastic pry tools of various sizes
- Double-sided adhesive tape for reassembly
- Razor blade or scalpel for adhesive removal
- Optional but Helpful:
- Magnetic project mat for screw organization
- Magnifying lamp or head-mounted magnifier
- Heat gun or hair dryer for adhesive softening
- ESD-safe work surface
🏗️ Professional Workspace Setup
| Workspace Element | Recommendation | Importance Level |
|---|---|---|
| Work Surface | Clean, flat, static-free surface | Critical |
| Lighting | Bright, shadow-free illumination | Critical |
| Organization | Small containers for screw organization | High |
| ESD Protection | Anti-static mat and wrist strap | High |
| Comfort | Ergonomic seating and proper height | Medium |
⚠️ Safety Equipment & Precautions
- ESD Protection:
- Anti-static wrist strap (properly grounded)
- ESD-safe work mat
- Avoid working on carpeted surfaces
- Remove jewelry and static-producing clothing
- Personal Safety:
- Safety glasses for glass handling
- Cut-resistant gloves for sharp edges
- Proper ventilation if using chemicals
- First aid kit readily available
📦 Recommended Replacement Parts
- Display Options:
- Genuine HP replacement screen
- Compatible third-party LCD panel
- Full display assembly (easier installation)
- Verify compatibility: 30-pin LVDS connector, 1366x768 resolution
- Additional Materials:
- Replacement adhesive strips for bezel
- Rubbing alcohol for cleaning
- Microfiber cloths for screen cleaning
- Compressed air for dust removal
💡 Budget-Friendly Tool Alternatives
- Professional Tools:
- Plastic spudger set ($10-$20)
- Precision screwdriver kit ($15-$30)
- Anti-static wrist strap ($5-$10)
- Suction cup handle ($8-$15)
- Household Alternatives:
- Old credit card instead of plastic opening tools
- Guitar picks instead of plastic pry tools
- Small containers for screw organization
- Hair dryer instead of heat gun (low heat setting)
✅ Pre-Repair Preparation Checklist
- Workspace Setup:
- Clear, clean, well-lit work area
- ESD protection implemented
- All tools organized and accessible
- Containers ready for screw organization
- Safety Preparation:
- Safety glasses and gloves available
- Power completely disconnected
- Battery removed from laptop
- First aid kit accessible
- Documentation Ready:
- Camera or phone for photos
- Notebook for taking notes
- Guide or instructions available
- Reference materials handy
💰 Tool Investment vs. Value Analysis
| Tool Investment | Cost Range | Value Added to Repair | ROI Potential |
|---|---|---|---|
| Basic Tool Set | $25-$50 | Professional quality repair | 300-500% |
| Premium Tools | $75-$150 | Faster, safer repairs | 200-300% |
| Minimum Tools | $10-$20 | Adequate for basic repair | 400-600% |
0:10 Test 0:21 Front bezel 2:07 Hinge Cover 2:40 Hinges 3:20 Pull Our Adhesive Strips 4:18 Lift LCD 4:25 Unplug Video Cable 4:55 Connect New scree 4:52 Test 5:50 Install Hinges 7:17 Install Adhesive Strips 7:33 Install LCD 7:48 Install Front Bezel 8:42 Install Hinge Cover
3. Safe Display Removal Process & Component Handling for HP 15-dy2172wm
⚠️ Safety First: Critical Precautions
Before starting display removal:
- Power off completely and disconnect AC adapter
- Remove battery to eliminate power risk
- Use anti-static wrist strap properly grounded
- Work on clean, static-free surface
- Have proper lighting and organization system
🔧 Step-by-Step Display Removal Process
- Battery and Power Disconnection:
- Flip laptop over and remove battery release latches
- Slide battery out of compartment
- Press power button for 10 seconds to discharge capacitors
- Disconnect AC adapter and any peripherals
- Bottom Cover Removal:
- Remove 10+ Phillips screws from bottom case
- Use plastic spudger to release plastic clips around perimeter
- Lift bottom cover straight up once all clips are released
- Set aside carefully to avoid damaging internal components
- Display Cable Disconnection:
- Locate display cable connector on motherboard
- Gently lift locking mechanism (usually black tape or latch)
- Pull cable straight out without bending pins
- Note orientation for reassembly
- Display Hinge Removal:
- Remove 4-6 screws securing display hinges to chassis
- Support display assembly during removal
- Note screw lengths and locations for reassembly
- Lift display assembly away from base
📱 Bezel Removal Techniques
| Technique | Tools Needed | Risk Level | Success Rate |
|---|---|---|---|
| Plastic Spudger Method | Plastic spudger, guitar picks | Low | 95% |
| Suction Cup Method | Suction cups, plastic cards | Medium | 85% |
| Heat Application | Hair dryer, plastic tools | Medium-High | 90% |
🖥️ LCD Separation from Bezel
- Adhesive Release:
- Use plastic opening tools to gently separate bezel
- Work around all four sides gradually
- Apply even pressure to avoid cracking bezel or LCD
- Use isopropyl alcohol to soften adhesive if needed
- Display Removal:
- Once bezel is removed, locate LCD mounting screws
- Remove 4-8 screws securing LCD panel to cover
- Lift LCD panel carefully using suction cups
- Disconnect any remaining cables (webcam, WiFi antennas)
- Cable Management:
- Note routing of all cables and connectors
- Take photos for reassembly reference
- Label connectors if necessary
- Handle ribbon cables by edges only
👐 Safe Component Handling
- LCD Panel Handling:
- Always hold by edges or frame
- Never press on the screen surface
- Use suction cups for safe lifting
- Store on soft, clean surface
- Cable and Connector Safety:
- Disconnect by pulling straight out, not at angles
- Use tweezers for small connectors
- Avoid touching gold contacts with fingers
- Check for locking mechanisms before disconnecting
- Screw Management:
- Use magnetic mat or pill organizer for screws
- Note screw lengths and locations
- Take photos before removal
- Keep screws from different components separate
❌ Common Mistakes to Avoid
- Physical Damage Risks:
- Using metal tools on plastic components
- Applying excessive force to release clips
- Prying near fragile display edges
- Not supporting hinges during removal
- Technical Errors:
- Forgetting to disconnect battery first
- Not discharging static electricity
- Mixing up screw lengths and types
- Forgetting cable routing paths
- Preparation Oversights:
- Inadequate workspace organization
- Poor lighting causing missed details
- Not having proper tools ready
- Rushing through the process
🛡️ Damage Prevention Techniques
- Tool Selection:
- Use plastic tools instead of metal
- Select appropriate tool size for each task
- Keep tools clean and in good condition
- Have multiple tool options available
- Working Techniques:
- Apply steady, even pressure
- Work slowly and methodically
- Stop and reassess if resistance is encountered
- Use magnification for small components
- Documentation Practices:
- Take photos at each stage
- Label components and screws
- Note orientation of connectors
- Create reassembly reference materials
🔍 Troubleshooting Common Issues
- Stuck Components:
- Apply isopropyl alcohol to soften adhesive
- Use plastic tools to gently work through resistance
- Apply minimal heat with hair dryer if necessary
- Never force components that won't budge
- Difficult Connectors:
- Check for hidden locking mechanisms
- Use tweezers for better grip and control
- Consult technical documentation if available
- Seek professional help if unsure
4. HP 15-dy2172wm LCD Screen Replacement & Compatibility Guide
🔌 Display Compatibility Specifications
| Specification | Original Display | Compatible Replacements | Importance |
|---|---|---|---|
| Size | 15.6 inches | 15.6 inches only | Critical |
| Resolution | 1366 x 768 (HD) | 1366 x 768 required | Critical |
| Connector | 30-pin LVDS | 30-pin LVDS only | Critical |
| Thickness | 3.0mm | 2.8-3.2mm acceptable | High |
| Mounting | Standard bracket | Standard bracket required | High |
🔍 Compatibility Verification Process
- Physical Inspection:
- Measure diagonal screen size (15.6 inches)
- Check connector type and pin count (30-pin LVDS)
- Verify mounting hole alignment
- Confirm thickness matches original
- Technical Specifications:
- Check resolution matches (1366x768)
- Confirm brightness rating (200+ nits)
- Verify backlight type (LED)
- Ensure interface compatibility (LVDS)
- Vendor Verification:
- Purchase from reputable suppliers
- Check customer reviews and ratings
- Confirm return policy
- Verify warranty terms
🔧 Installation Process
- Preparation:
- Clean work area and organize tools
- Ground yourself with anti-static wrist strap
- Have new display ready and protected
- Review photos from disassembly
- Display Installation:
- Place new LCD into display lid
- Align mounting holes carefully
- Secure with original screws (don't overtighten)
- Connect display cable (ensure proper orientation)
- Cable Management:
- Route cables exactly as original
- Secure with original adhesive or tape
- Avoid sharp bends in ribbon cables
- Ensure no cables are pinched or stretched
- Bezel Reattachment:
- Clean bezel and apply new adhesive if needed
- Align bezel carefully with display
- Press firmly to engage clips and adhesive
- Ensure even gap around entire perimeter
🔗 Display Connector Types
| Connector Type | Pin Count | Compatibility | Visual Identification |
|---|---|---|---|
| 30-pin LVDS | 30 pins | Required for HP 15-dy2172wm | Single connector, white or brown |
| 40-pin LVDS | 40 pins | Not compatible | Wider connector, more pins |
| eDP | 30-40 pins | Not compatible | Smaller, denser pin arrangement |
✅ Pre-Installation Quality Testing
- Basic Function Test:
- Connect display before full assembly
- Power on briefly to verify functionality
- Check for dead pixels or abnormalities
- Test brightness controls
- Visual Inspection:
- Examine for physical damage or defects
- Check connector pins for straightness
- Verify mounting points are undamaged
- Ensure protective film is removed
- Compatibility Verification:
- Compare with original display specifications
- Test fit in display lid before final installation
- Verify cable reaches without tension
- Check mounting screw alignment
⚠️ Common Compatibility Issues
- Physical Fit Problems:
- Wrong thickness preventing proper closure
- Incorrect mounting hole alignment
- Bezel not fitting properly
- Cable length issues
- Technical Compatibility:
- Wrong connector type
- Resolution mismatch
- Backlight compatibility issues
- Interface protocol differences
- Quality Issues:
- Dead or stuck pixels
- Backlight bleeding
- Color consistency problems
- Brightness uniformity issues
🏪 Recommended Vendors
- OEM Suppliers:
- HP Parts Store (genuine parts)
- Authorized HP service centers
- Certified HP parts distributors
- Reputable Third-Party:
- LCD parts specialty websites
- Established eBay sellers with high ratings
- Amazon certified refurbished sellers
- Local computer repair shops
- What to Avoid:
- Unbranded or no-name displays
- Sellers with poor reviews
- Parts without return policies
- Extremely low-priced options
5. Professional Reassembly & Quality Testing for HP 15-dy2172wm LCD Repair
🛠️ Reassembly Preparation
- Workspace Organization:
- Clean all components with compressed air
- Organize screws according to original locations
- Verify all connectors are accessible and undamaged
- Check for any leftover tools or components
- Component Inspection:
- Verify new display is properly installed
- Check for any damaged connectors or cables
- Ensure all cables are properly routed
- Confirm all screws and fasteners are accounted for
🔧 Step-by-Step Reassembly Process
- Display Assembly Reinstallation:
- Carefully align display hinges with chassis mounting points
- Secure with original screws in correct locations
- Reconnect display cable to motherboard
- Verify locking mechanism is fully engaged
- Cable Management:
- Route all cables exactly as original configuration
- Secure cables with original adhesive or tape
- Ensure no cables are pinched or under tension
- Verify WiFi antenna connections if disconnected
- Bottom Cover Installation:
- Align cover properly with chassis
- Press gently to engage all clips around perimeter
- Install screws in correct locations
- Verify even gap around entire perimeter
- Final Assembly Checks:
- Install battery and ensure it locks securely
- Check all ports and connectors for proper alignment
- Verify display opens and closes smoothly
- Ensure no loose parts or rattling sounds
📋 Screw Management Guide
| Screw Type | Quantity | Location | Torque Recommendation |
|---|---|---|---|
| M2x4mm Phillips | 10 | Bottom cover | Finger tight + ¼ turn |
| M2.5x6mm Phillips | 4 | Display hinges | Finger tight + ½ turn |
| M2x3mm Phillips | 8 | Display bezel | Finger tight only |
| M2.5x5mm Phillips | 2 | Battery compartment | Finger tight + ¼ turn |
🔍 Initial Power-On Testing
- Pre-Power Safety Checks:
- Verify battery is properly installed
- Ensure all connections are secure
- Check for any visible damage or issues
- Confirm no tools or debris inside laptop
- First Boot Procedure:
- Connect power adapter first
- Press power button briefly
- Observe boot process and listen for beeps
- Check for display output immediately
- BIOS Verification:
- Enter BIOS (F10 during boot)
- Verify hardware recognition
- Check temperatures and fan operation
- Save settings and exit
🖥️ Comprehensive Display Testing
- Visual Quality Tests:
- Display solid colors (red, green, blue, white, black)
- Check for dead or stuck pixels
- Test for backlight bleeding
- Verify color uniformity
- Functionality Tests:
- Test brightness controls at all levels
- Verify display resolution is correct
- Check viewing angles
- Test touchpad and keyboard functionality
- Performance Tests:
- Play video content to check motion handling
- Display fine text to check sharpness
- Test gradient displays for banding
- Check for image retention
⚡ Full System Testing
- Hardware Verification:
- Test all USB ports with devices
- Check audio input and output
- Verify WiFi and Bluetooth connectivity
- Test webcam and microphone
- Performance Benchmarks:
- Run system diagnostics
- Check temperatures under load
- Verify fan operation at different speeds
- Test battery charging and health
- Stress Testing:
- Run extended stability tests
- Monitor for overheating issues
- Check for any intermittent problems
- Verify consistent performance
✅ Quality Assurance Checklist
- Physical Inspection:
- No loose screws or components
- All covers properly seated and aligned
- No gaps or misalignments
- All ports and connectors functional
- Performance Verification:
- Display functioning perfectly
- Temperature levels within normal range
- No abnormal noises or behaviors
- Stable under extended use
- Documentation:
- Performance test results saved
- Temperature logs documented
- Quality assurance verification completed
- Before/after comparisons prepared
✨ Final Preparation for Sale
- Cleaning and Presentation:
- Thorough cleaning of exterior and keyboard
- Screen cleaning for streak-free display
- Port cleaning and verification
- Overall aesthetic enhancement
- Software Preparation:
- Fresh Windows installation
- Latest drivers and updates installed
- Essential software pre-installed
- Proper deauthorization of accounts
- Documentation Package:
- Repair documentation and photos
- Performance test results
- Quality assurance verification
- Warranty information if applicable
6. Display Performance Testing & Calibration for HP 15-dy2172wm
🛠️ Essential Testing Tools & Software
- Free Online Testing Tools:
- Lagom LCD Test Pages - Comprehensive display tests
- EIZO Monitor Test - Professional-grade testing
- Dead Pixel Test - Simple pixel checking
- Browser-based color gradient tests
- Desktop Software:
- NVIDIA Control Panel (if applicable)
- Windows built-in display calibration tool
- Intel Graphics Command Center color settings
- Open-source display testing utilities
🔍 Basic Display Quality Tests
| Test Type | Purpose | Acceptable Standards | Documentation Method |
|---|---|---|---|
| Dead Pixel Test | Identify non-functioning pixels | 0 dead pixels (industry standard) | Photos of solid color screens |
| Backlight Uniformity | Check even backlight distribution | Minimal clouding, no major spots | Gray screen photos, visual assessment |
| Color Uniformity | Verify consistent color across screen | No major color shifts | Solid color screen comparison |
| Viewing Angles | Test visibility from different angles | Reasonable viewing without major washout | Angled viewing notes |
🎨 Display Calibration Process
- Brightness Calibration:
- Set to 120-150 nits for general use (40-60% brightness)
- Adjust based on ambient lighting conditions
- Ensure comfortable viewing without eye strain
- Document final brightness setting
- Color Temperature:
- Target 6500K for standard color temperature
- Use Windows color calibration tool
- Adjust RGB balance if available
- Aim for neutral whites without color cast
- Contrast Adjustment:
- Set contrast to 70-80% typically
- Ensure detail visibility in dark and light areas
- Use gradient tests to verify smooth transitions
- Avoid crushed blacks or blown-out whites
- Gamma Correction:
- Target 2.2 gamma for standard content
- Use gamma test patterns for verification
- Adjust through graphics control panel
- Ensure smooth tonal transitions
⚡ Advanced Performance Testing
- Response Time Testing:
- Use moving object tests
- Check for ghosting or smearing
- Test different overdrive settings if available
- Document any motion artifacts
- Refresh Rate Verification:
- Confirm 60Hz refresh rate operation
- Use UFO test or similar motion tests
- Check for frame skipping
- Verify smooth motion handling
- Color Accuracy Assessment:
- Use online color accuracy tests
- Check skin tone reproduction
- Test color gradient smoothness
- Verify natural-looking colors
🎯 Real-World Usage Testing
- Content Consumption Tests:
- Play various video content (SD, HD, streaming)
- Test different video players and browsers
- Check subtitle visibility and clarity
- Verify smooth video playback
- Productivity Application Tests:
- Test text clarity in word processors
- Verify spreadsheet visibility
- Check web browsing experience
- Test email application readability
- Gaming Performance:
- Test motion handling in games
- Check for input lag perception
- Verify color vibrancy in games
- Test different game genres
✅ Quality Standards & Acceptance Criteria
| Quality Aspect | Excellent | Acceptable | Unacceptable |
|---|---|---|---|
| Dead Pixels | 0 | 1-2 stuck pixels | 3+ dead pixels or clusters |
| Backlight Bleeding | Minimal, even | Minor corner bleeding | Major bleeding affecting usage |
| Color Uniformity | Perfect consistency | Minor variations | Visible color shifts |
| Brightness Uniformity | Even across screen | Minor falloff at edges | Visible dark spots |
📊 Testing Documentation Protocol
- Visual Documentation:
- Photos of all test screens
- Video of motion tests
- Close-ups of potential issues
- Angled viewing demonstrations
- Performance Records:
- Brightness and contrast settings used
- Color calibration values
- Test results and observations
- Any issues found and addressed
- Quality Assurance Certificate:
- Create simple QA pass document
- Include testing date and results
- List all tests performed
- Provide to buyer as value-added
💰 Value Enhancement Through Testing
- Premium Pricing Justification:
- Documented perfect display quality
- Professional calibration verification
- Comprehensive testing proof
- Quality assurance guarantee
- Buyer Confidence Building:
- Transparent testing documentation
- Before/after comparison evidence
- Professional presentation of results
- Quality assurance commitment
- Market Differentiation:
- Stand out from untested devices
- Justify premium pricing
- Build reputation for quality work
- Create trust with potential buyers
7. Preparing Your Repaired HP 15-dy2172wm for Maximum Cash Value
💰 Competitive Pricing Strategy
| Condition Grade | Display Quality | Price Range | Target Buyer |
|---|---|---|---|
| Excellent | Perfect display, like-new condition | $250-$320 | Quality-conscious buyers |
| Very Good | Minor cosmetic wear, perfect display | $220-$280 | Value seekers |
| Good | Visible wear, fully functional | $180-$240 | Budget buyers |
| Fair | Multiple issues, working display | $140-$200 | Project enthusiasts |
✨ Professional Presentation Standards
- Physical Cleaning:
- Thorough exterior cleaning with appropriate cleaners
- Keyboard deep cleaning (compressed air + isopropyl)
- Screen cleaning for streak-free perfection
- Port cleaning and verification
- Cosmetic Enhancement
- Minor scratch reduction techniques
- Replacement of heavily worn keycaps if needed
- Rubber foot replacement if missing/damaged
- Overall aesthetic improvement
💻 Software Optimization & Preparation
- Fresh Operating System Installation:
- Clean Windows 10/11 installation from official media
- Latest updates and security patches installed
- All necessary drivers from HP Support
- De-bloated for optimal performance
- Essential Software Package:
- Web browser (Chrome/Firefox) with basic configuration
- Office compatibility pack or LibreOffice
- Media player and basic utilities
- Security software (Windows Defender configured)
- User Experience Optimization:
- Proper display calibration applied
- Power settings optimized for battery life/performance
- Desktop organized with helpful shortcuts
- All accounts properly signed out
📋 Professional Documentation Package
- Repair Documentation:
- Before/after photos of display repair
- Receipt for replacement display component
- Repair process photos showing professional work
- Testing and calibration results
- Performance Verification:
- Display quality test results
- Battery health report (if applicable)
- System performance benchmarks
- Hardware functionality checklist
- Quality Assurance:
- Quality assurance certificate
- Functional testing verification
- Warranty information (if offered)
- Contact information for support
🎁 Accessory & Packaging Preparation
- Original Accessories:
- Genuine HP power adapter and cable
- Original battery (if replaced, include old one)
- Any original documentation or recovery media
- Original packaging if available
- Value-Added Extras:
- Quality laptop bag or sleeve ($15-25 value)
- USB mouse or basic peripherals
- Cleaning cloth and basic care kit
- Printed quick-start guide
- Packaging Standards:
- Professional packaging materials
- Adequate padding for shipping protection
- Clear labeling and handling instructions
- Insurance for full value when shipping
📈 Sales Listing Optimization
- Title Optimization:
- "Professionally Repaired HP 15-dy2172wm Laptop - Like New Display"
- Include key specs: "15.6" HD, Intel i3/i5, 8GB RAM, SSD"
- Add value points: "Fresh Windows, Warranty, Ready to Use"
- Description Best Practices:
- Start with 3-5 key benefits in bullet points
- Detailed repair documentation section
- Complete specifications list
- Professional repair story and quality commitment
- Visual Presentation:
- High-quality photos from all angles
- Display quality demonstration shots
- Repair documentation photos
- Video demonstration of functionality
⏰ Optimal Market Timing
| Time Period | Market Conditions | Price Premium | Target Audience |
|---|---|---|---|
| Back-to-School (Aug-Sept) | High demand from students and parents | 15-25% | Students, parents |
| January Refresh | Post-holiday upgrade cycle | 10-20% | Budget upgraders |
| Spring Semester | College needs, financial aid disbursement | 10-15% | College students |
| Year-Round | Consistent budget market | Base pricing | General users |
🚀 Maximum Value Strategies
- Premium Positioning:
- Emphasize professional repair quality
- Highlight comprehensive testing
- Offer limited warranty (30-90 days)
- Provide superior customer service
- Bundle Opportunities:
- Include basic peripherals package
- Offer setup assistance or tutorial
- Provide extended warranty options
- Create ready-to-work packages
- Marketing Angles:
- "Perfect student laptop" positioning
- "Small business ready" messaging
- "Remote work capable" emphasis
- "Eco-friendly repair" story
8. Where to Get the Best Cash for Your Repaired HP 15-dy2172wm Laptop
📊 Marketplace Comparison Guide
| Platform Type | Average Price | Speed of Sale | Effort Required | Best For |
|---|---|---|---|---|
| Specialized Buyback | $$$ (Highest) | 1-3 days | Low | Quick, guaranteed sales |
| Private Marketplaces | $$$$ (Premium) | 1-4 weeks | High | Maximum value seekers |
| Trade-In Programs | $$ (Good) | 2-7 days | Low | Convenience, store credit |
| Auction Sites | $$$ (Variable) | 3-10 days | Medium | Market price discovery |
🏆 Specialized Electronics Buyback Services
- SellLaptopBack:
- Specializes in repaired and refurbished laptops
- Offers competitive quotes for professionally repaired devices
- Free shipping labels and quick payment processing
- Appreciates documented repair work
- SellLaptopBack:
- Focuses on recent models with repairs and upgrades
- Provides fair market value assessments
- Fast turnaround time (24-48 hour payments)
- Good customer service for repaired devices
- Other Reputable Services:
- Gazelle (established reputation)
- BuyBackWorld (comprehensive offers)
- Decluttr (quick process)
- ItsWorthMore (refurbished device specialist)
🌐 Private Marketplaces
- eBay:
- Largest audience reach for repaired devices
- Premium prices for documented professional repairs
- International buyer potential
- Seller protection programs available
- Facebook Marketplace:
- No selling fees
- Local cash transactions
- Quick local sales
- Good for demonstrating repair quality in person
- OfferUp:
- Local and shipping options
- User-friendly interface
- Rating system for trust
- Growing user base
👥 Specialized Communities
- Reddit Communities:
- r/hardwareswap - Tech enthusiasts who appreciate repairs
- r/LaptopDeals - Value-conscious buyers
- r/buildapcsales - Budget-focused shoppers
- High appreciation for documented professional work
- Educational Channels:
- .edu classifieds and student portals
- University surplus sales and marketplaces
- Student buy/sell groups on social media
- Faculty/staff marketplace listings
- Local Communities:
- Community college bulletin boards
- Local library classifieds
- Community center marketplaces
- Small business networks
🔄 Manufacturer & Retailer Trade-In
- HP Official Program:
- Direct manufacturer buyback
- Often includes bonus for working devices
- Brand-specific value recognition
- Easy process with shipping included
- Retail Programs:
- Best Buy Trade-In
- Amazon Trade-In
- Staples/Office Depot
- Walmart Electronics Trade-In
- Advantages:
- Guaranteed offers
- No negotiation required
- Often include store credit bonuses
- Simple, straightforward process
💡 Maximizing Your Cash Return
- Multiple Quote Strategy:
- Get quotes from 3-5 different services
- Compare cash offers vs. trade-in values
- Consider local vs. shipping options
- Factor in fees and shipping costs
- Timing Strategies:
- Sell during back-to-school season (August-September)
- Time with tax return season (February-April)
- Consider holiday shopping periods
- Watch for special promotion periods
- Presentation Matters:
- Professional photos increase value by 15-25%
- Detailed documentation justifies premium pricing
- Complete accessories boost appeal
- Cleanliness affects perceived value significantly
🛡️ Safety & Security
- Payment Methods:
- Escrow services for high-value transactions
- Platform-protected payments (eBay, PayPal)
- Cash for local meetups in safe locations
- Bank transfers with proper verification
- Transaction Safety:
- Meet in police station parking lots for local sales
- Use platform messaging for documentation
- Verify buyer profiles and history
- Provide clear return policy and terms
- Data Security:
- Complete data wipe before sale (DBAN if necessary)
- Remove all accounts and licenses
- Provide factory reset documentation
- Offer data security guarantee
🚀 Success Tips for Maximum Cash
- Document Everything:
- Photograph repair process and quality results
- Save component receipts and documentation
- Record performance benchmarks and test results
- Provide warranty information and support details
- Pricing Strategy:
- Start 10-15% above target price for negotiation room
- Include "or best offer" option to attract buyers
- Price competitively based on recent sold listings
- Consider bundle pricing with accessories
- Marketing Approach:
- Highlight professional repair quality in title
- Emphasize display replacement benefits
- Use professional photography
- Create compelling description focusing on value
Need to Sell Your HP Laptop? Get Instant Cash!
If your HP 15-dy2172wm (or other HP 15 series model) has performance issues or you're upgrading to a newer laptop, we offer competitive cash payouts for your device. We buy broken, used, and refurbished HP laptops—including all 15-dy2172wm configurations—with free insured shipping and no-hassle evaluations.
Sell Popular HP Models Now: