On this page
- 1.
- 🔄 The Right to Repair Revolution
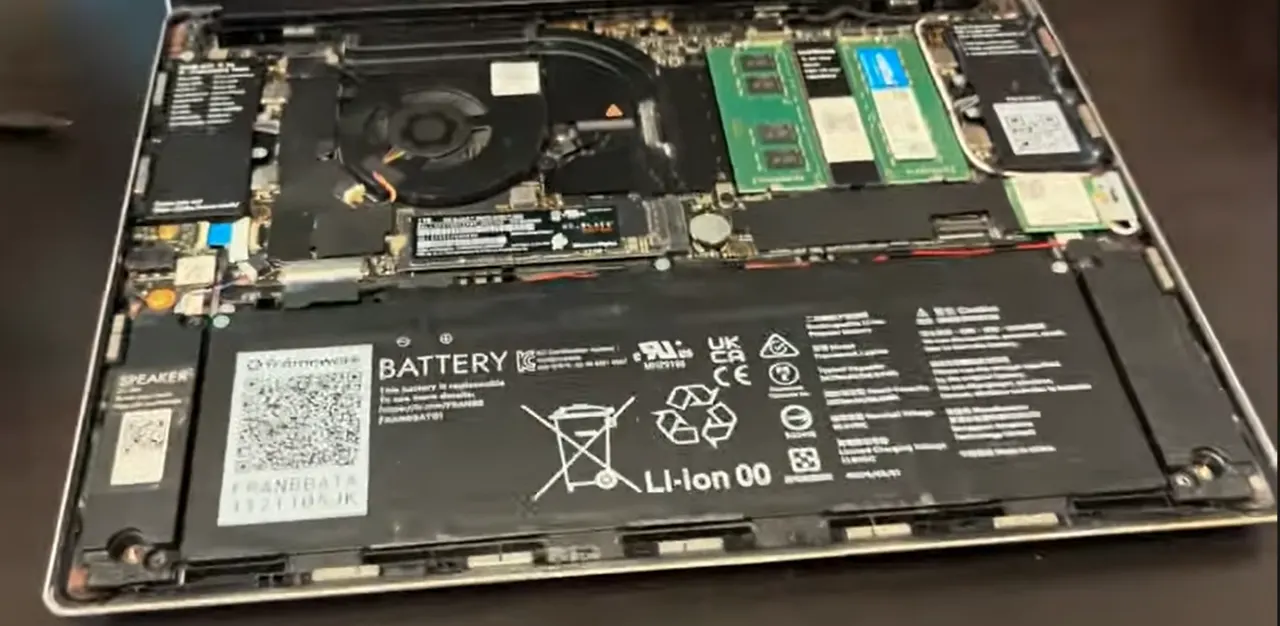
- 🧩 Modular Architecture Overview
- 🔄 Framework 13 Generation Compatibility
- 🌱 Environmental Impact & Sustainability
- ⚡ Advantages Over Traditional Laptops
- 🤝 Community & Support Resources
- 🎯 Ideal Users for Framework 13
- 💰 Resale Value Advantages
- 🚀 Getting Started with Framework Upgrades
- 2. Essential Toolkit for Framework 13 Upgrades
- 🛠️ Framework's Tool-Included Advantage
- 📦 Included with Your Framework 13
- 🔧 Essential Upgrade Toolkit
- ⚙️ Specialized Upgrade Tools
- 🏠 Household Alternatives
- 🎯 Framework-Specific Tool Tips
- 📦 Recommended Tool Kits
- ⚠️ Tool Safety & Best Practices
- 🛒 Where to Purchase Tools
- 🧰 Maintenance & Cleaning Tools
- 💰 Tool Investment Value
- 3. Pre-Disassembly Preparation & Data Backup for Framework 13
- ⚠️ Safety First: Essential Precautions
- 💾 Comprehensive Data Backup Strategies
- 🎯 Framework-Specific Backup Considerations
- 🔧 Recovery Media Preparation
- 📋 System Inventory & Documentation
- 🛡️ Physical Preparation Steps
- ⏰ Time Management & Planning
- 🚨 Contingency Planning
- ✅ Pre-Disassembly Verification Checklist
- 🔗 Framework Official Resources
- 📊 Resale Value Documentation
- 4. ramework 13 Bottom Cover Removal Process
- 🎯 Framework's User-Friendly Design
- 🔩 Bottom Cover Fastener System
- 🔧 Step-by-Step Removal Process
- ⚙️ Framework's Captive Screw Advantage
- 🚧 Common Challenges & Solutions
- 🔍 Immediately Accessible Components
- ⚠️ Safety Precautions
- 🔁 Reassembly Instructions
- 💡 Immediate Upgrade Opportunities
- 🔍 Troubleshooting Common Issues
- 🛠️ Maintenance Tips
- 🎥 Video Resources
- 5. Framework 13 RAM Installation & Compatibility Guide
- 💾 Framework 13 RAM Specifications
- 🔍 RAM Compatibility Chart
- 🏆 Recommended RAM Kits
- 🔧 Step-by-Step Installation
- ⚡ Dual-Channel Configuration
- 📊 Performance Testing & Validation
- 🔍 Troubleshooting Common Issues
- 🎮 Real-World Performance Impact
- 💰 Resale Value Impact
- 🎯 Framework-Specific Considerations
- ✅ Compatibility Verification
- 6. Framework 13 SSD Replacement & Storage Expansion Guide
- 💾 Framework 13 SSD Specifications
- 🔍 SSD Compatibility Chart
- 🏆 Recommended SSD Options
- 🔧 Step-by-Step Installation
- 📦 Data Migration Options
- ⚡ SSD Performance Optimization
- 🌡️ Thermal Management
- 🔍 Troubleshooting Common Issues
- 📊 Expected Performance
- 💰 Resale Value Impact
- 🎯 Framework-Specific Considerations
- ❤️ SSD Health Monitoring
- 7. Framework 13 LCD Screen & Bezel Replacement Guide
- 📺 Framework 13 Display Specifications
- 🔍 Display Compatibility Chart
- 🛒 Replacement Display Options
- 🛠️ Specialized Tools Needed
- 🔧 Step-by-Step Replacement Process
- 🔌 eDP Connector Details
- 📏 Adhesive Application Guide
- 🔍 Troubleshooting Common Issues
- 🧪 Post-Installation Testing
- 💰 Resale Value Impact
- ⚠️ Critical Safety Precautions
- 🔄 Alternative Upgrade Options
- 8. Framework 13 Motherboard Swap & CPU Upgrade Guide
- 🔄 The Ultimate Framework Upgrade
- 🔧 Available Mainboard Options
- 🤔 Upgrade Decision Factors
- 🛠️ Specialized Tools Needed
- 📋 Pre-Upgrade Preparation
- 🔧 Step-by-Step Replacement Process
- 🔌 Connector Guide
- 🌡️ Thermal System Management
- ⚙️ BIOS Configuration
- 📦 Driver Installation
- 🔍 Troubleshooting Common Issues
- 📊 Performance Validation
- 💰 Resale Value Impact
- ✅ Compatibility Notes
- 🤝 Community Resources
- 9. Framework 13 Input Cover & Keyboard Replacement Guide
- ⌨️ Modular Input System Design
- 🎨 Available Input Cover Options
- 🔧 Technical Specifications
- 🛒 Replacement & Upgrade Options
- 🔧 Step-by-Step Replacement Process
- ⌨️ Individual Keycap Replacement
- 🔌 Connection Details
- 🌈 RGB Lighting Customization
- 🔍 Troubleshooting Common Issues
- 🧹 Cleaning & Maintenance
- 🎨 Customization Ideas
- 💰 Resale Value Impact
- ✅ Compatibility Notes
- 🤝 Community Resources
- 10. Framework 13 Battery Removal & Replacement Guide
- 🔋 Framework 13 Battery Specifications
- 🔍 Battery Compatibility Chart
- 🛒 Replacement Battery Options
- ⚠️ Critical Safety Precautions
- 🔧 Step-by-Step Replacement Process
- 🔌 Battery Connection Details
- 📊 Battery Health Management
- ⚙️ New Battery Calibration
- 🔍 Troubleshooting Common Issues
- ⚡ Battery Performance Optimization
- ♻️ Proper Battery Disposal
- 💰 Resale Value Impact
- 📝 Warranty Considerations
- ❤️ Battery Health Monitoring
- 11. Maximizing Framework 13 Resale Value After Upgrades
- 📊 Framework 13 Resale Market Analysis 2024
- 💰 Strategic Pricing Framework
- 🚀 Upgrade Value Maximization Strategies
- 🌐 Recommended Sales Platforms
- 📈 Sales Listing Optimization
- 📋 Value-Added Documentation Package
- 🏫 Institutional Sales Strategy
- 🎯 Specialized Buyer Targeting
- 🎨 Premium Presentation Standards
- ⏰ Strategic Timing Considerations
- 💬 Value-Based Negotiation Framework
- 💸 Tax Advantage Strategies
- 🎯 Framework-Specific Value Factors
- 🔗 Additional Resources
- Need to Sell Your Framework Laptop? Get Instant Cash!
1.
🔄 The Right to Repair Revolution
Framework represents a fundamental shift in laptop design philosophy, prioritizing user repairability, upgradeability, and long-term sustainability over disposable technology. Unlike traditional laptops that become obsolete due to soldered components, the Framework 13 is designed to evolve with your needs.
🧩 Modular Architecture Overview
- Main Components:
- Hot-swappable Expansion Cards (USB-C, USB-A, HDMI, DisplayPort, etc.)
- User-replaceable RAM (standard SODIMM slots)
- Standard M.2 SSD storage (2280 size)
- Replaceable input cover with keyboard
- Modular display assembly
- Mainboard with socketed CPU (select models)
- Easy-access battery replacement
- Tool-Free Design Elements:
- Captive screws that don't fully remove
- Magnetic screwdriver included with laptop
- Color-coded connectors and ports
- QR codes linking to repair guides
- Standard Phillips #0 screws throughout
🔄 Framework 13 Generation Compatibility
| Component | 11th Gen Intel | 12th Gen Intel | 13th Gen Intel | AMD Ryzen | Upgrade Path |
|---|---|---|---|---|---|
| Mainboard | Yes | Yes | Yes | Yes (separate chassis) | Full mainboard swap possible |
| Expansion Cards | Yes | Yes | Yes | Yes | Fully compatible across generations |
| Input Cover | Yes | Yes | Yes | Yes | Fully compatible across generations |
| Display Assembly | Yes | Yes | Yes | Yes | Fully compatible across generations |
| Battery | Yes | Yes | Yes | Yes | Fully compatible across generations |
🌱 Environmental Impact & Sustainability
- Reduced E-Waste:
- Component-level upgrades instead of full device replacement
- Longer device lifespan (5-7+ years vs 3-4 industry average)
- Modular design allows repair instead of disposal
- Replacement parts available individually
- Repair Ecosystem:
- Framework Marketplace for new parts
- Second-hand component market developing
- Community repair guides and support
- Open-source design principles
⚡ Advantages Over Traditional Laptops
- Cost Efficiency:
- Upgrade components instead of entire system
- Self-repair eliminates labor costs
- Choose your own RAM/SSD for better pricing
- Resale value retention through upgradability
- Performance Flexibility:
- CPU upgrades via mainboard replacement
- RAM upgrades as needs increase
- Storage expansion without dongles or externals
- Port configuration customized to your workflow
- Future-Proofing:
- New technologies accessible via expansion cards
- Mainboard upgrades bring latest connectivity
- Display upgrades as panel technology improves
- Battery technology improvements accessible
🤝 Community & Support Resources
- Official Resources:
- Framework Repair Guides
- Framework Community Forum
- Framework Support Portal
- Framework Parts Store
- Community Resources:
- r/framework on Reddit (active user community)
- Framework Discord server
- Third-party upgrade guides and mods
- Custom expansion card projects
🎯 Ideal Users for Framework 13
- Technology Enthusiasts:
- Users who value customization and control
- DIYers who enjoy building and modifying
- Tech professionals who need specific configurations
- Environmentally Conscious Users:
- Those concerned about electronic waste
- Users wanting long-term device ownership
- Supporters of right-to-repair movement
- Cost-Conscious Professionals:
- Users who want to avoid full system replacements
- Businesses needing standardized, repairable devices
- Educational institutions with repair programs
💰 Resale Value Advantages
- Market Position:
- Framework devices maintain higher resale value
- Upgraded systems command premium prices
- Strong demand in environmentally conscious markets
- Collector interest in early generation models
- Documentation Benefits:
- Repair history increases buyer confidence
- Upgrade documentation justifies premium pricing
- Component quality can be verified
- Remaining warranty transferable
🚀 Getting Started with Framework Upgrades
- First Steps:
- Identify your current configuration
- Determine your upgrade goals and budget
- Research compatible components
- Gather necessary tools
- Recommended Initial Upgrades:
- RAM expansion for better multitasking
- SSD upgrade for faster storage
- Expansion cards tailored to your workflow
- Input cover customization
2. Essential Toolkit for Framework 13 Upgrades
🛠️ Framework's Tool-Included Advantage
Unlike traditional laptops, Framework includes the essential magnetic screwdriver with every laptop, embodying their commitment to repairability. This section covers both the included tools and recommended additions for comprehensive upgrades.
📦 Included with Your Framework 13
- Framework Magnetic Screwdriver:
- Custom-designed Phillips #0 bit
- Magnetic tip for easier screw handling
- Right-sized for all Framework screws
- Ergonomic handle for comfortable use
- Expansion Card Removal Tool:
- Small plastic tool for safe card removal
- Prevents damage to card connectors
- Stored in expansion card slots when not in use
🔧 Essential Upgrade Toolkit
| Tool | Purpose | Framework-Specific Notes | Recommended Product |
|---|---|---|---|
| Phillips #0 Screwdriver | All disassembly screws | Framework includes one, but having a spare is useful | Framework included or iFixit Phillips #0 |
| Spudger Set | Prying and connector removal | Plastic only to avoid damaging components | iFixit Spudger Set |
| Tweezers | Handling small connectors | Non-magnetic recommended | ESD-safe anti-magnetic tweezers |
| Anti-Static Wrist Strap | ESD protection | Critical for motherboard work | Any ESD-safe wrist strap |
| Magnetic Project Mat | Screw organization | Framework screws are similar but different lengths | iFixit Magnetic Project Mat |
⚙️ Specialized Upgrade Tools
- For Display Replacement:
- Suction cup for screen handling
- Plastic opening tools for bezel removal
- Isopropyl alcohol and microfiber cloths
- Double-sided adhesive tape
- For Thermal Management:
- High-quality thermal paste (Arctic MX-6, Thermal Grizzly)
- Isopropyl alcohol (90%+) for cleaning
- Lint-free wipes or coffee filters
- Thermal pad set (various thicknesses)
🏠 Household Alternatives
- Basic Disassembly:
- Standard Phillips #0 screwdriver (if Framework one missing)
- Guitar pick or old credit card for prying
- Tweezers or small pliers for connectors
- Small containers for screw organization
- Safety Notes:
- Avoid metal tools near circuitry
- Use minimal force with improvised tools
- When in doubt, wait for proper tools
- Never force components that resist
🎯 Framework-Specific Tool Tips
- Captive Screw System:
- Screws stay in chassis when loosened
- No risk of losing screws during disassembly
- Magnetic screwdriver highly recommended
- Prevents cross-threading during reassembly
- Connector Design:
- Color-coded connectors for easy identification
- Standard ZIF (Zero Insertion Force) connectors
- Latching mechanisms on all critical connections
- No proprietary connectors requiring special tools
📦 Recommended Tool Kits
- Beginner Kit (Basic Upgrades):
- Framework included screwdriver
- Plastic spudger set ($5-10)
- Anti-static wrist strap ($5-8)
- Total: ~$10-18 additional investment
- Advanced Kit (Full Upgrades):
- iFixit Essential Electronics Toolkit ($30-40)
- Additional Phillips #0 bits
- Magnetic project mat ($15-20)
- Total: ~$45-60 professional toolkit
⚠️ Tool Safety & Best Practices
- Always disconnect power before beginning work
- Use anti-static protection for electronic components
- Keep magnets away from storage devices
- Organize screws systematically using the magnetic mat
- Use appropriate force - Framework components are durable but not indestructible
- Work in a clean, well-lit area with ample space
- Keep tools organized and within reach
🛒 Where to Purchase Tools
- Official Sources:
- Framework Store (replacement screwdrivers)
- iFixit (premium repair kits)
- General Retailers:
- Amazon (wide selection of tool kits)
- Local electronics stores (Micro Center, Fry's)
- Hardware stores (Home Depot, Lowe's)
🧰 Maintenance & Cleaning Tools
- Cleaning Supplies:
- Compressed air for dust removal
- Isopropyl alcohol for contact cleaning
- Microfiber cloths for screen cleaning
- Soft brush for keyboard cleaning
- Preventative Maintenance:
- ESD-safe cleaning tools
- Proper storage for tools and components
- Labeling system for screws and parts
- Documentation tools (camera for photos)
💰 Tool Investment Value
- Cost Savings:
- Professional repair avoidance: $100-200 per incident
- DIY upgrades vs buying new: $500-1000+ savings
- Multiple device use: tools work on other electronics
- Long-term investment: quality tools last years
- Resale Value Impact:
- Professional-looking upgrades increase value
- No tool marks or damage from improper tools
- Ability to demonstrate upgrade quality to buyers
- Documentation of professional tool use builds confidence
0:27 USB Port Modules 0:50 HDMI Port Module 0:57 Bottom Case 1:40 Palmrest Assembly 1:47 Keyboard 1:51 Touchpad 2:00 Battery 2:38 Memory RAM 2:53 Storage SSD 3:17 WiFi Card 3:45 Heatsink and Cooling Fan 4:28 Processor 4:40 Speakers 5:31 Audio Port 6:06 Hinges 6:54 Front Bezel 7:15 Display Assembly 7:27 Motherboard 8:13 Case Bottom 9:25 LCD Panel 9:37 Screen Rails 10:57 Video Cable 11:08 WebCam
3. Pre-Disassembly Preparation & Data Backup for Framework 13
⚠️ Safety First: Essential Precautions
- Power Management:
- Shut down completely through operating system
- Disconnect all peripherals and charging cable
- Hold power button for 10 seconds to discharge capacitors
- Verify all lights are off before proceeding
- Workspace Setup:
- Clean, static-free surface large enough for laptop and parts
- Good lighting for seeing small components and connectors
- Anti-static mat if available (especially for motherboard work)
- Containers for screws and small components
💾 Comprehensive Data Backup Strategies
| Backup Type | Recommended Tools | Scope | Time Required |
|---|---|---|---|
| Full System Image | Macrium Reflect Free | Entire drive including OS, apps, settings | 30-60 minutes |
| File Backup | Veeam Agent or File History | Documents, photos, personal files only | 15-30 minutes |
| Cloud Sync | OneDrive, Google Drive, Dropbox | Critical files only | 5-15 minutes |
| Clone Drive | EaseUS Todo Backup | Direct copy to new drive | 45-90 minutes |
🎯 Framework-Specific Backup Considerations
- Expansion Card Configuration:
- Note which expansion cards are in which slots
- Document any custom configurations
- Consider removing cards during disassembly
- Take photos of your current setup
- BIOS Settings:
- Document current BIOS settings (photos recommended)
- Note boot order preferences
- Record any custom power management settings
- Check secure boot and TPM settings
🔧 Recovery Media Preparation
- Windows Recovery Media:
- Create Windows 11 Installation Media
- 16GB+ USB drive required
- Test boot from USB before disassembly
- Download Framework-specific drivers beforehand
- Driver Preparation:
- Download Framework Drivers
- Save to separate USB drive or cloud storage
- Include chipset, audio, and peripheral drivers
- Download latest BIOS updates
📋 System Inventory & Documentation
- Hardware Inventory:
- Current RAM configuration (capacity, speed)
- Storage drive details (capacity, type, health)
- Expansion card types and positions
- Battery health status
- Performance Baseline:
- Run UserBenchmark for system baseline
- Record boot times and system responsiveness
- Note current temperatures with HWiNFO
- Document any existing issues or quirks
🛡️ Physical Preparation Steps
- Clean Workspace:
- Clear, clean, static-free surface
- Adequate lighting for detailed work
- Space for organized parts placement
- No food, drinks, or liquids nearby
- Personal Preparation:
- Use anti-static wrist strap (especially in dry environments)
- Wear comfortable, non-static clothing
- Remove jewelry that might scratch surfaces
- Wash hands to remove oils and dirt
- Equipment Readiness:
- Verify all tools are available and organized
- Prepare containers for different screw types
- Have camera ready for documentation photos
- Keep Framework repair guide accessible
⏰ Time Management & Planning
- Realistic Time Estimates:
- RAM upgrade: 15-30 minutes
- SSD replacement: 20-40 minutes
- Display replacement: 45-90 minutes
- Mainboard swap: 60-120 minutes
- First-time disassembly: add 50% buffer
- Planning Considerations:
- Schedule uninterrupted time
- Have backup plan if issues arise
- Consider starting early in day
- Allow time for testing after reassembly
🚨 Contingency Planning
- Emergency Resources:
- Framework Community Forum
- Framework support contact information
- Local repair shop contacts
- Backup computer access
- Worst-Case Scenarios:
- Unexpected damaged components
- Compatibility issues with new parts
- Extended downtime requirements
- Data recovery needs
✅ Pre-Disassembly Verification Checklist
- Data backup completed and verified
- Recovery media created and tested
- Drivers downloaded and saved
- System inventory documented
- Workspace prepared and organized
- All necessary tools available
- Sufficient time allocated
- Power completely disconnected
- Expansion cards removed
- Photos taken of current configuration
🔗 Framework Official Resources
- Framework Official Repair Guides
- Framework Support Portal
- Framework Community Forum
- Framework Parts Store
📊 Resale Value Documentation
- Value-Adding Documentation:
- Before-and-after performance metrics
- Photos of clean, well-maintained internals
- Documentation of professional preparation
- Proof of proper data handling practices
- Buyer Confidence Factors:
- Evidence of careful, professional maintenance
- Documented upgrade process and preparation
- Proof of data privacy practices
- Professional presentation of the device
4. ramework 13 Bottom Cover Removal Process
🎯 Framework's User-Friendly Design
Unlike traditional laptops that require complete disassembly for basic upgrades, the Framework 13 features a dedicated bottom cover that provides direct access to the most commonly upgraded components: RAM, SSD, and WiFi card. This thoughtful design exemplifies Framework's commitment to repairability.
🔩 Bottom Cover Fastener System
| Screw Location | Type | Quantity | Special Features | Notes |
|---|---|---|---|---|
| Corner Screws | Phillips #0 | 4 | Captive design | Will not fully remove from chassis |
| Edge Screws | Phillips #0 | 4 | Captive design | Will not fully remove from chassis |
| Center Screw | Phillips #0 | 1 | Standard removal | Comes completely out |
🔧 Step-by-Step Removal Process
- Preparation:
- Ensure laptop is powered off and disconnected from power
- Remove all expansion cards from sides
- Place laptop on clean, soft surface
- Gather Framework screwdriver and plastic opening tools
- Screw Removal Sequence:
- Start with the center screw (only one that removes completely)
- Loosen the 8 captive screws in diagonal pattern
- Turn counterclockwise until screws stop turning (2-3 full turns)
- Do not force screws - they should stop naturally when fully loosened
- Cover Release:
- Start at front edge near touchpad
- Gently lift with plastic tool or fingernail
- Work around perimeter, releasing clips every 2-3 inches
- Lift cover straight up once all clips are released
⚙️ Framework's Captive Screw Advantage
- No Lost Screws:
- Screws remain in chassis when loosened
- Eliminates risk of losing small components
- Simplifies reassembly process
- Prevents incorrect screw placement
- Damage Prevention:
- Prevents over-tightening and strip damage
- Ensures proper alignment during reassembly
- Maintains consistent pressure distribution
- Reduces risk of cross-threading
🚧 Common Challenges & Solutions
- Stubborn Clips:
- Use plastic opening tool instead of metal
- Work slowly around perimeter
- Apply gentle, even pressure
- If stuck, check for missed screws
- Tight Screws:
- Ensure using proper Phillips #0 screwdriver
- Apply downward pressure while turning
- If stripped, use rubber band for extra grip
- Never force - seek help if resistance continues
- Alignment Issues:
- Check for obstructions or cables in the way
- Verify all screws are fully loosened
- Ensure expansion cards are removed
- Check for debris in screw holes
🔍 Immediately Accessible Components
- RAM Slots:
- Two DDR4 SODIMM slots
- Easy upgrade access
- No additional disassembly required
- Storage:
- M.2 2280 SSD slot
- Single screw retention
- Various SSD lengths supported
- Wireless Card:
- Intel AX210 WiFi 6E (typically)
- Two antenna connections
- Standard M.2 form factor
- Battery Connector:
- Easy access for disconnection
- Clearly marked connector
- Safety disconnect for further work
⚠️ Safety Precautions
- Disconnect battery before working on internal components
- Use anti-static precautions when handling components
- Handle components by edges only
- Keep screws organized for reassembly
- Avoid touching gold contacts on components
- Work in clean, dry environment
🔁 Reassembly Instructions
- Ensure all internal work is completed
- Verify no tools or debris left inside
- Align bottom cover properly with chassis
- Press down evenly until all clips engage
- Start with center screw and tighten securely
- Tighten captive screws in diagonal pattern
- Ensure cover sits flush with no gaps
- Reinstall expansion cards
💡 Immediate Upgrade Opportunities
- RAM Upgrades:
- Up to 64GB DDR4 (2x32GB)
- 3200MHz recommended speed
- No additional disassembly required
- Storage Upgrades:
- Single M.2 2280 slot
- PCIe 4.0 compatible
- Up to 4TB+ capacity supported
- WiFi Upgrades:
- Intel AX210 WiFi 6E standard
- Future WiFi 7 compatibility possible
- Easy antenna connection system
🔍 Troubleshooting Common Issues
- Cover Won't Sit Flush:
- Check for missed clips around perimeter
- Verify no cables are trapped under edges
- Ensure all screws are properly loosened
- Screw Won't Tighten:
- Check for stripped threads
- Verify correct screw type and length
- Ensure proper alignment with chassis
- Gaps After Reassembly:
- Check clip alignment around perimeter
- Verify all screws are proper tightness
- Ensure no damage to mating surfaces
🛠️ Maintenance Tips
- Cleaning Opportunity:
- Clean dust from fans and heatsinks while open
- Use compressed air for thorough cleaning
- Check for debris in ventilation areas
- Inspect thermal paste condition if visible
- Preventative Maintenance:
- Check battery health in BIOS
- Verify all connections are secure
- Inspect for signs of wear or damage
- Document component conditions for future reference
🎥 Video Resources
- Framework Official YouTube Channel
- Framework Official Repair Guides
- Framework Community Tutorials
5. Framework 13 RAM Installation & Compatibility Guide
💾 Framework 13 RAM Specifications
- Supported Standards:
- DDR4 SODIMM (260-pin)
- 3200MHz (JEDEC standard, no XMP support)
- 1.2V operating voltage
- Dual-channel architecture
- Capacity Limits:
- 11th/12th/13th Gen Intel: Up to 64GB (2x32GB)
- AMD Ryzen Edition: Up to 64GB (2x32GB)
- Minimum: 8GB (2x4GB)
- Recommended: 16GB-32GB for optimal performance
🔍 RAM Compatibility Chart
| Specification | 11th Gen Intel | 12th Gen Intel | 13th Gen Intel | AMD Ryzen | Notes |
|---|---|---|---|---|---|
| Max Speed | 3200MHz | 3200MHz | 3200MHz | 6400MHz | AMD supports faster RAM |
| Max Capacity | 64GB | 64GB | 64GB | 64GB | 2x32GB configuration |
| Voltage | 1.2V | 1.2V | 1.2V | 1.2V | JEDEC standard only |
| Timing Support | CL22 | CL22 | CL22 | CL38+ | Lower timings may not work |
| XMP Support | No | No | No | No | JEDEC profiles only |
🏆 Recommended RAM Kits
- Budget Options ($40-80):
- Crucial DDR4 3200MHz SODIMM
- Kingston ValueRAM 3200MHz
- SK Hynix OEM modules
- Samsung OEM modules
- Performance Options ($80-150):
- Corsair Vengeance 3200MHz
- G.Skill Ripjaws 3200MHz
- Team Group Elite 3200MHz
- Patriot Signature 3200MHz
- High-Capacity Options ($150-250):
- Crucial 64GB (2x32GB) 3200MHz kit
- Kingston 64GB (2x32GB) 3200MHz kit
- G.Skill 64GB (2x32GB) 3200MHz kit
🔧 Step-by-Step Installation
- Preparation:
- Remove bottom cover (refer to previous section)
- Disconnect battery connector for safety
- Ground yourself with anti-static wrist strap
- Have magnetic screwdriver ready
- Removal of Existing RAM:
- Push outward on side clips simultaneously
- Module will pop up at 45-degree angle
- Gently remove module straight out
- Handle by edges, avoid touching gold contacts
- Installation of New RAM:
- Align notch in module with ridge in slot
- Insert at 45-degree angle
- Press down firmly until clips snap into place
- Ensure both sides are securely locked
- Repeat for second module if installing pair
⚡ Dual-Channel Configuration
- Optimal Performance:
- Always install identical modules in both slots
- Same size, speed, and timing for best performance
- Enables dual-channel mode for 10-15% performance boost
- Required for integrated graphics performance
- Mixing RAM:
- Not recommended but possible
- System will run at slowest module's speed
- May cause stability issues
- Dual-channel may not work with mismatched modules
📊 Performance Testing & Validation
- Verification Tools:
- Benchmarking Tools:
- Cinebench R23 - CPU and memory performance
- 3DMark - Gaming performance impact
- UserBenchmark - System comparison
- AIDA64 Memory Benchmark
🔍 Troubleshooting Common Issues
- System Won't Boot:
- Reseat both RAM modules
- Try modules one at a time
- Test with known-good RAM if available
- Reset CMOS by disconnecting battery for 5 minutes
- RAM Not Detected:
- Ensure modules are fully seated
- Check for bent pins in slots
- Test modules in different slots
- Update BIOS to latest version
- System Instability:
- Run MemTest86 overnight
- Check for overheating issues
- Verify compatible speeds and timings
- Test with different module combinations
🎮 Real-World Performance Impact
| Use Case | 8GB RAM | 16GB RAM | 32GB RAM | 64GB RAM |
|---|---|---|---|---|
| Web Browsing | Good | Excellent | Overkill | Excessive |
| Office Work | Good | Excellent | Future-proof | Excessive |
| Photo Editing | Minimum | Good | Excellent | Overkill |
| Video Editing | Poor | Minimum | Good | Excellent |
| Gaming | Minimum | Recommended | Ideal | Overkill |
| Virtualization | Poor | Minimum | Good | Excellent |
💰 Resale Value Impact
- Value Enhancement:
- 16GB upgrade: +$80-$120 value
- 32GB upgrade: +$120-$180 value
- 64GB upgrade: +$150-$220 value
- Name-brand RAM: +$20-40 premium
- Buyer Preferences:
- 16GB considered minimum for serious users
- 32GB appeals to content creators and power users
- Matching kits preferred over mixed RAM
- Documented stability testing increases confidence
🎯 Framework-Specific Considerations
- BIOS Limitations:
- No XMP support - RAM runs at JEDEC speeds
- 3200MHz is maximum supported speed
- Timing adjustments not available in BIOS
- Voltage control not available
- Cooling Considerations:
- RAM is not actively cooled
- Low-profile heat spreaders recommended
- Avoid tall heat spreaders that might interfere
- Ensure proper airflow around modules
✅ Compatibility Verification
- Before Purchase:
- Check Framework Community for verified kits
- Ensure modules are DDR4 SODIMM 3200MHz
- Verify height clearance for heat spreaders
- Check return policy in case of incompatibility
- After Installation:
- Run MemTest86 for 4+ passes
- Check BIOS recognizes correct capacity and speed
- Verify dual-channel operation in CPU-Z
- Test with your typical workloads
6. Framework 13 SSD Replacement & Storage Expansion Guide
💾 Framework 13 SSD Specifications
- Supported Form Factors:
- M.2 2280 (22mm x 80mm) - Primary slot
- Single slot design
- No 2230 or 2242 support without adapters
- No additional 2.5" drive bay
- Interface Support:
- PCIe 4.0 x4 (11th Gen Intel and later)
- PCIe 3.0 x4 (backward compatible)
- NVMe 1.4 protocol support
- SATA M.2 not supported (keying incompatible)
🔍 SSD Compatibility Chart
| Specification | 11th Gen Intel | 12th Gen Intel | 13th Gen Intel | AMD Ryzen | Notes |
|---|---|---|---|---|---|
| Max Speed | PCIe 4.0 | PCIe 4.0 | PCIe 4.0 | PCIe 4.0 | All support Gen4 speeds |
| Max Capacity | 4TB+ | 4TB+ | 4TB+ | 4TB+ | 8TB drives now available |
| Heatsink Support | Single-sided | Single-sided | Single-sided | Single-sided | Double-sided may not fit |
| Thermal Limits | Standard | Standard | Standard | Standard | No active cooling on SSD |
🏆 Recommended SSD Options
- Budget Options ($50-100):
- Crucial P3 Plus 1TB-2TB
- Western Digital SN580 1TB-2TB
- TeamGroup MP44L 1TB-2TB
- Kingston NV2 1TB-2TB
- Performance Options ($100-200):
- Samsung 980 Pro 1TB-2TB
- Western Digital SN850X 1TB-2TB
- Crucial P5 Plus 1TB-2TB
- SK Hynix Platinum P41 1TB-2TB
- High-Capacity Options ($200-500):
- Samsung 990 Pro 4TB
- Western Digital SN850X 4TB
- Crucial P3 Plus 4TB
- Sabrent Rocket 4 Plus 4TB-8TB
🔧 Step-by-Step Installation
- Preparation:
- Remove bottom cover (refer to previous section)
- Disconnect battery connector for safety
- Ground yourself with anti-static wrist strap
- Have magnetic screwdriver ready
- Removal of Existing SSD:
- Locate M.2 slot near center of motherboard
- Remove single Phillips #0 screw from standoff
- Gently lift SSD at 30-degree angle
- If present, remove any thermal pad from old SSD
- Installation of New SSD:
- Insert new SSD at 30-degree angle
- Align notch with slot key (M key for NVMe)
- Press down gently and secure with screw
- Ensure screw is snug but not overtightened
- Consider adding thermal pad if not included
📦 Data Migration Options
- Clone Existing Drive:
- Macrium Reflect Free - Best for Windows
- EaseUS Todo Backup - User-friendly
- Clonezilla - Advanced users
- Samsung Data Migration - For Samsung SSDs only
- Clean Installation:
- Create Windows 11 Installation Media
- Download Framework Drivers beforehand
- Backup data before clean install
- Use cloud sync for settings and files
⚡ SSD Performance Optimization
- Windows Optimization:
- Enable TRIM:
fsutil behavior set disabledeletenotify 0 - Disable defragmentation for SSDs
- Enable write caching in device manager
- Adjust virtual memory settings if needed
- Enable TRIM:
- Framework-Specific Tips:
- Ensure latest BIOS version installed
- Update storage controller drivers
- Check for SSD firmware updates
- Monitor temperatures during heavy use
🌡️ Thermal Management
- Thermal Pad Recommendations:
- 0.5mm-1.0mm thickness recommended
- High thermal conductivity (6-12 W/mK)
- Apply to SSD controller chip only
- Ensure no contact with electrical components
- Temperature Monitoring:
- Use CrystalDiskInfo for health monitoring
- Normal operating range: 30-70°C
- Throttling typically begins at 80-85°C
- Check temperatures during sustained workloads
🔍 Troubleshooting Common Issues
- Drive Not Detected:
- Reseat SSD and ensure proper connection
- Check BIOS settings for NVMe support
- Test with different SSD if available
- Update BIOS to latest version
- Performance Issues:
- Check temperatures with CrystalDiskInfo
- Ensure PCIe 4.0 enabled in BIOS
- Update SSD firmware if available
- Run CrystalDiskMark to verify speeds
- Boot Issues:
- Verify boot order in BIOS
- Check UEFI/Legacy settings match installation
- Repair bootloader with installation media
- Test with original SSD if possible
📊 Expected Performance
| SSD Type | Read Speed | Write Speed | 4K Random Read | Real-World Benefit |
|---|---|---|---|---|
| Budget PCIe 4.0 | 3,500-4,500 MB/s | 3,000-4,000 MB/s | 400-600K IOPS | 2-3x faster than SATA |
| Mid-range PCIe 4.0 | 5,000-7,000 MB/s | 4,500-6,500 MB/s | 800-1,000K IOPS | 3-4x faster than SATA |
| High-end PCIe 4.0 | 7,000-7,500 MB/s | 6,500-7,000 MB/s | 1,200-1,400K IOPS | 4-5x faster than SATA |
| PCIe 3.0 | 2,500-3,500 MB/s | 2,000-3,000 MB/s | 300-500K IOPS | 1.5-2x faster than SATA |
💰 Resale Value Impact
- Value Enhancement:
- 1TB SSD: +$80-$120 value
- 2TB SSD: +$150-$200 value
- 4TB SSD: +$250-$350 value
- Name-brand premium: +$20-50 value
- Buyer Preferences:
- Larger capacities appeal to content creators
- Faster drives attract gamers and professionals
- Name-brand SSDs increase buyer confidence
- Documented health status reduces concerns
🎯 Framework-Specific Considerations
- Physical Compatibility:
- Single-sided drives recommended for better thermals
- Maximum thickness: 2.38mm (single-sided)
- No height restrictions for components
- Ensure no interference with bottom cover
- Thermal Management:
- No active cooling on SSD
- Consider thermal pad for sustained workloads
- Monitor temperatures during initial setup
- Avoid drives known for high power consumption
❤️ SSD Health Monitoring
- Monitoring Tools:
- CrystalDiskInfo - Comprehensive health data
- Manufacturer-specific tools (Samsung Magician, WD Dashboard)
- HWiNFO - System-wide monitoring
- Windows built-in drive optimization tool
- Key Health Indicators:
- Percentage lifetime used
- Total bytes written (TBW)
- Temperature during operation
- Reallocated sector count
- Uncorrectable error count
7. Framework 13 LCD Screen & Bezel Replacement Guide
📺 Framework 13 Display Specifications
- Standard Configurations:
- 13.5" 3:2 aspect ratio display
- 2256 x 1504 resolution
- IPS LCD technology
- 400 nits brightness (typical)
- 100% sRGB color gamut
- Available Options:
- Matte finish (standard)
- Privacy screen option
- High-brightness (500+ nits) option
- Touch screen option (requires different bezel)
🔍 Display Compatibility Chart
| Display Type | 11th Gen Intel | 12th Gen Intel | 13th Gen Intel | AMD Ryzen | Notes |
|---|---|---|---|---|---|
| Standard Matte | Yes | Yes | Yes | Yes | All generations compatible |
| Privacy Screen | Yes | Yes | Yes | Yes | Requires specific bezel |
| High Brightness | Yes | Yes | Yes | Yes | 500+ nits option |
| Touch Screen | Yes | Yes | Yes | Yes | Different bezel required |
| Bezel Types | All | All | All | All | Matte, Privacy, Touch |
🛠️ Specialized Tools Needed
- Essential Tools:
- Plastic opening tools (spudgers)
- Suction cup for screen handling
- Phillips #0 screwdriver
- Tweezers for connector handling
- Isopropyl alcohol and microfiber cloths
- Adhesive Materials:
- Double-sided adhesive tape (1mm width)
- Rubbing alcohol for adhesive removal
- Plastic razor blades
- Adhesive promoter (optional)
🔧 Step-by-Step Replacement Process
- Preparation:
- Power down and disconnect all cables
- Remove bottom cover and disconnect battery
- Lay laptop on clean, soft surface
- Gather all necessary tools and materials
- Bezel Removal:
- Use plastic tools to gently pry bezel starting from bottom edge
- Work around perimeter slowly and carefully
- Release all clips before attempting to remove
- Set bezel aside on clean surface
- Display Removal:
- Apply suction cup to center of screen
- Gently lift to access display cable
- Disconnect eDP cable (lift locking flap first)
- Remove 4-6 mounting screws around display edges
- Lift display assembly out carefully
- New Display Installation:
- Clean adhesive residue from chassis
- Position new display in chassis
- Secure with mounting screws
- Connect eDP cable and secure locking mechanism
- Test display before applying adhesive
- Bezel Installation:
- Apply new adhesive tape to bezel or chassis
- Align bezel properly with camera and sensors
- Press firmly around entire perimeter
- Ensure all clips engage properly
🔌 eDP Connector Details
- Connection Specifications:
- 40-pin eDP connector
- Locking mechanism (flip-up style)
- Right-angle connection
- Standard 0.5mm pitch
- Handling Precautions:
- Disconnect battery before handling
- Use tweezers for locking mechanism
- Avoid bending pins
- Ensure complete seating before locking
📏 Adhesive Application Guide
- Adhesive Types:
- Pre-cut adhesive strips (recommended)
- Double-sided tape (1mm width)
- Liquid adhesive (not recommended)
- Frame-style adhesive gaskets
- Application Technique:
- Clean surfaces with isopropyl alcohol
- Apply adhesive in continuous frame pattern
- Leave gaps for cable routing
- Remove protective backing just before installation
- Apply even pressure for 30 seconds after placement
🔍 Troubleshooting Common Issues
- No Display:
- Check eDP connection is fully seated
- Verify locking mechanism is engaged
- Test with external display
- Check BIOS settings
- Flickering or Artifacts:
- Reseat eDP connection
- Check for damaged cable or pins
- Update graphics drivers
- Test with different refresh rate
- Touch Issues (Touch Models):
- Check touch cable connection
- Install correct touch drivers
- Calibrate touch screen in settings
- Check for physical damage to digitizer
🧪 Post-Installation Testing
- Visual Inspection:
- Check for dead or stuck pixels
- Test uniform brightness across screen
- Check color uniformity
- Look for backlight bleeding
- Functional Testing:
- Test all brightness levels
- Check viewing angles
- Test touch functionality (if applicable)
- Verify camera and microphone work
- Software Configuration:
- Install latest display drivers
- Calibrate color if needed
- Set appropriate scaling for 2256x1504 resolution
- Configure refresh rate (60Hz typical)
💰 Resale Value Impact
- Value Enhancement:
- New display assembly: +$200-$300 value
- No dead pixels: +$50-$100 value
- Privacy screen option: +$100-$150 value
- Touch screen upgrade: +$150-$250 value
- Buyer Considerations:
- Perfect display condition increases appeal
- Privacy screens appeal to business users
- Touch screens attract creative professionals
- Documented professional installation builds confidence
⚠️ Critical Safety Precautions
- Always disconnect battery before working on display
- Handle LCD panels with extreme care - they are fragile
- Use proper tools to avoid damaging components
- Work on clean, static-free surface
- Avoid touching LCD surface with bare hands
- Dispose of old display properly (electronics recycling)
8. Framework 13 Motherboard Swap & CPU Upgrade Guide
🔄 The Ultimate Framework Upgrade
Framework's most revolutionary feature is the ability to upgrade your entire computer's performance by swapping the mainboard. This section covers everything from choosing the right mainboard to complete CPU and platform upgrades.
🤔 Upgrade Decision Factors
- Performance Needs:
- 11th→12th Gen: +40-60% multi-core performance
- 12th→13th Gen: +10-15% efficiency gains
- Intel→AMD: Better graphics, similar CPU
- Consider your specific workload requirements
- Cost Analysis:
- Mainboard only vs complete kit
- RAM compatibility (DDR4 vs DDR5)
- Cooling system requirements
- Resale value of old components
- Compatibility Check:
- Chassis compatibility (all mainboards fit)
- Cooling system compatibility
- Expansion card compatibility
- Input cover compatibility
🛠️ Specialized Tools Needed
- Essential Tools:
- Phillips #0 screwdriver (Framework included)
- Anti-static wrist strap (critical)
- Plastic spudgers for connector removal
- Tweezers for small connectors
- Thermal paste and cleaning supplies
- Preparation Materials:
- Isopropyl alcohol (90%+)
- Lint-free cloths
- Thermal paste (high-quality)
- Container for screws and small parts
- Camera for documentation photos
📋 Pre-Upgrade Preparation
- Data Backup:
- Complete system backup
- Export BIOS settings (photos)
- Document current configuration
- Create recovery media
- Component Preparation:
- Download new mainboard drivers
- Check RAM compatibility
- Prepare thermal materials
- Organize workspace
- Safety Preparation:
- Disconnect all power sources
- Use anti-static protection
- Clean workspace
- Allow time for careful work
🔧 Step-by-Step Replacement Process
- Complete Disassembly:
- Remove bottom cover
- Disconnect battery
- Remove all expansion cards
- Remove input cover (keyboard)
- Remove display assembly
- Mainboard Removal:
- Label all connectors before disconnection
- Remove all screws securing mainboard
- Disconnect all cables carefully
- Lift mainboard straight out
- Transfer components to new mainboard
- New Mainboard Installation:
- Install RAM and SSD on new mainboard
- Apply thermal paste to CPU
- Position mainboard in chassis
- Connect all cables (refer to photos)
- Secure with screws
- Reassembly:
- Reinstall display assembly
- Reinstall input cover
- Reconnect battery
- Install expansion cards
- Replace bottom cover
🔌 Connector Guide
- Critical Connections:
- Battery connector (largest, clearly marked)
- Display eDP cable (40-pin, locking mechanism)
- Keyboard/touchpad ribbon cables
- Speaker connections
- Audio board connections
- Connection Tips:
- Take photos before disconnecting
- Note cable routing paths
- Ensure locking mechanisms are engaged
- Check for bent pins
🌡️ Thermal System Management
- Thermal Paste Application:
- Clean old paste completely
- Use high-quality thermal compound
- Pea-sized amount in center
- No need to spread - pressure will distribute
- Cooling System:
- Same cooler works across Intel generations
- AMD models may have different coolers
- Ensure proper mounting pressure
- Check fan connection
⚙️ BIOS Configuration
- Initial Setup:
- Boot to BIOS immediately after upgrade
- Load optimized defaults
- Configure boot order
- Enable desired security features
- Performance Settings:
- Set power limits appropriately
- Configure fan curves if available
- Enable virtualization if needed
- Set memory parameters
📦 Driver Installation
- Essential Drivers:
- Chipset drivers
- Graphics drivers (Intel Iris Xe or AMD Radeon)
- Audio drivers
- Networking drivers
- Thunderbolt drivers (Intel models)
- Framework Specific:
- EC firmware updates
- Audio board firmware
- Expansion card management
- Input cover drivers
🔍 Troubleshooting Common Issues
- No Power:
- Check battery connection
- Verify power button ribbon
- Test with known-good charger
- Check for short circuits
- No Display:
- Reseat display cable
- Test with external display
- Check RAM seating
- Reset BIOS settings
- Peripheral Issues:
- Check all ribbon cable connections
- Verify driver installation
- Test USB ports with known devices
- Update all firmware
📊 Performance Validation
- Benchmark Suite:
- Cinebench R23 (CPU performance)
- 3DMark (Graphics performance)
- CrystalDiskMark (Storage performance)
- UserBenchmark (System comparison)
- Thermal Testing:
- Monitor temperatures under load
- Check for thermal throttling
- Verify fan operation
- Test power consumption
💰 Resale Value Impact
- Value Enhancement:
- 12th/13th Gen upgrade: +$300-$500 value
- AMD platform conversion: +$400-$600 value
- Latest generation premium: +$200-$300 value
- Documented professional upgrade: +$150-$250 value
- Market Positioning:
- Newer generation commands premium pricing
- AMD models appeal to different buyer segments
- Latest hardware extends usable life
- Professional documentation justifies higher prices
✅ Compatibility Notes
- Cross-Generation Compatibility:
- All mainboards fit all Framework 13 chassis
- Cooling systems are cross-compatible within platform
- Expansion cards work across all generations
- Input covers are universally compatible
- Platform-Specific Notes:
- AMD models: DDR5 RAM required
- Intel models: DDR4 RAM
- Cooling solutions may vary slightly
- BIOS settings differ between platforms
🤝 Community Resources
- Framework Community Forum
- Official Framework Guides
- Reddit Framework Community
- Framework Discord Server
9. Framework 13 Input Cover & Keyboard Replacement Guide
⌨️ Modular Input System Design
Framework's input cover system represents the pinnacle of their modular philosophy, allowing complete customization of your typing experience without replacing the entire laptop. This section covers everything from basic keycap replacement to full input cover swaps.
🔧 Technical Specifications
- Mechanical Design:
- Scissor-switch mechanism
- 1.5mm key travel
- 60g actuation force
- N-key rollover
- Electrical Specifications:
- RGB backlighting (16.8 million colors)
- Per-key lighting control
- Hot-swappable design
- Standard 4-pin connector
🔧 Step-by-Step Replacement Process
- Preparation:
- Power down and disconnect all cables
- Remove bottom cover
- Disconnect battery (safety first)
- Gather necessary tools
- Input Cover Removal:
- Remove 8-10 Phillips #0 screws around perimeter
- Gently lift cover starting from front edge
- Disconnect keyboard ribbon cable (locking mechanism)
- Disconnect touchpad cable if present
- Lift cover completely away
- New Cover Installation:
- Connect keyboard ribbon cable first
- Connect touchpad cable if applicable
- Align cover with chassis mounting points
- Secure with screws in proper sequence
- Ensure all connections are secure
⌨️ Individual Keycap Replacement
- Keycap Removal:
- Use keycap puller tool (plastic recommended)
- Pull straight up evenly
- Never twist or use excessive force
- Start from corners and work inward
- New Keycap Installation:
- Align stem with switch mechanism
- Press straight down until click
- Test each key for proper operation
- Check for even lighting
- Compatibility Notes:
- Standard MX-style stems
- Check keycap profile height
- Ensure stabilizer compatibility
- Test larger keys (spacebar, enter, shift)
🔌 Connection Details
- Keyboard Connector:
- 20-pin ZIF connector
- Lift-to-unlock mechanism
- Clearly marked orientation
- Secure locking required
- Touchpad Connector:
- Separate 10-pin connector
- Similar ZIF locking mechanism
- Precision alignment required
- Test functionality before reassembly
🌈 RGB Lighting Customization
- Software Control:
- Framework Input Cover RGB Tool
- Per-key lighting control
- Multiple effect profiles
- Brightness adjustment
- Hardware Features:
- 16.8 million color support
- Individual LED per key
- Multiple lighting zones
- Battery-friendly dimming options
🔍 Troubleshooting Common Issues
- Non-Functioning Keys:
- Reseat keyboard connector
- Check for damaged ribbon cable
- Test individual key switches
- Update keyboard firmware
- Lighting Issues:
- Check RGB software installation
- Verify connector seating
- Test with different effects
- Check power settings
- Touchpad Problems:
- Reseat touchpad connector
- Update touchpad drivers
- Check for physical damage
- Calibrate in settings
🧹 Cleaning & Maintenance
- Regular Cleaning:
- Use compressed air for debris removal
- Isopropyl alcohol on cotton swabs
- Soft brush for between keys
- Microfiber cloth for surfaces
- Deep Cleaning:
- Remove keycaps for thorough cleaning
- Clean switch mechanisms carefully
- Check for worn or damaged components
- Lubricate stabilizers if needed
🎨 Customization Ideas
- Keycap Themes:
- Gaming-themed sets
- Professional appearance mods
- Color-coordinated designs
- Custom legend printing
- Functional Mods:
- Different switch types
- Sound dampening materials
- Improved lighting diffusion
- Custom layout programming
💰 Resale Value Impact
- Value Enhancement:
- New input cover: +$100-$150 value
- Custom high-quality keycaps: +$50-$100 value
- Professional appearance: +$80-$120 value
- Unique customization: +$100-$200 value
- Buyer Preferences:
- Clean, like-new keyboards highly valued
- Customization appeals to enthusiasts
- Professional appearance for business users
- Documented upgrades build confidence
✅ Compatibility Notes
- Universal Compatibility:
- All input covers work with all Framework 13 generations
- Same connector across all models
- Identical mounting points
- Consistent screw locations
- Layout Considerations:
- US QWERTY vs International layouts
- Keycap profile differences
- Language-specific legends
- Regional keyboard standards
🤝 Community Resources
- Framework Input Cover Forum
- 3D Printable Mods on Thingiverse
- Open Source RGB Tools
- Mechanical Keyboard Community
10. Framework 13 Battery Removal & Replacement Guide
🔋 Framework 13 Battery Specifications
- Standard Battery:
- 55Wh Lithium-Ion capacity
- 11.55V nominal voltage
- 4760mAh capacity
- Approx. 8-10 hours typical usage
- Physical Specifications:
- Custom-shaped to fit chassis
- Multiple cell design
- Integrated battery management system
- Standard 4-pin connector
🔍 Battery Compatibility Chart
| Battery Model | 11th Gen Intel | 12th Gen Intel | 13th Gen Intel | AMD Ryzen | Notes |
|---|---|---|---|---|---|
| Standard 55Wh | Yes | Yes | Yes | Yes | All generations compatible |
| Replacement Cycles | 1000+ cycles | 1000+ cycles | 1000+ cycles | 1000+ cycles | 80% capacity after 1000 cycles |
| Warranty | 1 year | 1 year | 1 year | 1 year | Framework warranty |
⚠️ Critical Safety Precautions
- Power Down Completely:
- Shut down through operating system
- Disconnect AC adapter and all peripherals
- Hold power button for 10 seconds to discharge
- Verify all lights are off
- Personal Safety:
- Work in well-ventilated area
- Wear safety glasses
- Have Class D fire extinguisher nearby
- No water or liquids in workspace
- Battery Handling:
- Never puncture or bend battery
- Avoid short-circuiting terminals
- Handle with care - lithium batteries are fragile
- Keep away from heat sources
🔧 Step-by-Step Replacement Process
- Preparation:
- Remove bottom cover
- Disconnect battery connector (pull straight up)
- Wait 5 minutes for capacitor discharge
- Gather necessary tools
- Battery Removal:
- Remove 4-6 Phillips #0 screws securing battery
- Note screw lengths for reassembly
- Gently lift battery from connector end first
- If adhesive present, use plastic card to release
- Lift out at 30-degree angle
- New Battery Installation:
- Inspect new battery for damage
- Align with mounting points and connector
- Lower into place without forcing
- Secure with screws (proper lengths)
- Connect battery connector last
🔌 Battery Connection Details
- Connector Type:
- 4-pin JST-style connector
- Positive and negative power pins
- Data communication pins
- Keyed design (prevents wrong connection)
- Connection Safety:
- Ensure complete discharge before disconnection
- Pull straight up - never at angle
- Check for bent pins before reconnection
- Listen for click when fully seated
📊 Battery Health Management
| Health Status | Capacity Indicator | Recommended Action | Resale Impact |
|---|---|---|---|
| Excellent (90-100%) | Windows reports "Excellent" | Maintain 20-80% charge habit | +$100-$150 value |
| Good (70-89%) | Shows "Good" with moderate wear | Monitor degradation rate | +$50-$80 value |
| Poor (<70%) | Suggests replacement soon | Replace battery recommended | -30% value if not replaced |
| Critical (<50%) | Significant runtime reduction | Immediate replacement required | -50% value if not replaced |
⚙️ New Battery Calibration
- Charge to 100% without interruption
- Use on battery until system shuts down (~5%)
- Charge to 100% again without using
- Check battery reporting in BIOS
- Repeat cycle if reporting inaccurate
🔍 Troubleshooting Common Issues
- Battery Not Detected:
- Reseat connector firmly
- Check for bent pins in connector
- Test with known-good battery if possible
- Update BIOS to latest version
- Not Charging:
- Verify AC adapter functionality
- Check charging port and cable
- Update BIOS and chipset drivers
- Test with different power outlet
- Rapid Drain:
- Calibrate battery through full cycles
- Check for power-hungry applications
- Adjust power settings in Windows
- Disable unnecessary background processes
⚡ Battery Performance Optimization
- Windows Settings:
- Enable battery saver mode
- Adjust screen brightness
- Manage background app activity
- Optimize power plan settings
- Framework Specific:
- Use balanced performance mode
- Manage RGB keyboard lighting
- Optimize expansion card power usage
- Update to latest firmware
♻️ Proper Battery Disposal
- Recycling Options:
- Call2Recycle drop-off locations
- Best Buy electronics recycling
- Local hazardous waste facilities
- Framework battery return program
- Safety Precautions:
- Cover battery terminals with electrical tape
- Store in cool, dry place until disposal
- Never dispose in regular trash
- Handle damaged batteries with extreme care
💰 Resale Value Impact
- Value Enhancement:
- New genuine battery: +$120-$180 value
- Documented replacement: +$60 value
- 90%+ health reading: +$80 value
- Full calibration documentation: +$30 value
- Buyer Confidence:
- Fresh battery reduces perceived age
- Documented health increases trust
- Longer usable life appeals to all buyers
- Professional replacement suggests overall care
📝 Warranty Considerations
- Framework Warranty:
- 1-year battery warranty
- Professional installation recommended
- Keep receipts and documentation
- Register product for warranty coverage
- Third-Party Batteries:
- Check warranty terms carefully
- Understand return policies
- Keep original packaging
- Document installation process
❤️ Battery Health Monitoring
- Monitoring Tools:
- Windows battery health report
- Third-party tools like BatteryInfoView
- Framework BIOS battery information
- Manufacturer diagnostic tools
- Key Metrics:
- Design capacity vs actual capacity
- Cycle count
- Wear level percentage
- Voltage and temperature readings
11. Maximizing Framework 13 Resale Value After Upgrades
📊 Framework 13 Resale Market Analysis 2024
- Target Buyer Profiles:
- Tech enthusiasts seeking customizable laptops
- Environmentally conscious consumers
- DIY and right-to-repair advocates
- Students and professionals wanting premium specs
- Collectors of modular technology
- Market Advantages:
- Framework devices hold value better than traditional laptops
- Upgraded systems command 30-50% premiums
- Documented upgrades increase buyer confidence
- Modular design appeals to specific niche markets
💰 Strategic Pricing Framework
| Condition Grade | Base Value | Upgrade Premium | Documentation Bonus | Total Value Range |
|---|---|---|---|---|
| Excellent (Like New) | $700-$900 | +$300-$600 | +$100-$200 | $1,100-$1,700 |
| Good (Minor Wear) | $500-$700 | +$200-$400 | +$80-$150 | $780-$1,250 |
| Fair (Visible Wear) | $300-$500 | +$150-$300 | +$50-$100 | $500-$900 |
🚀 Upgrade Value Maximization Strategies
- High-ROI Upgrades:
- SSD upgrade to 1TB+: 150-200% return
- RAM upgrade to 32GB: 100-150% return
- Mainboard upgrade to latest gen: 120-180% return
- Battery replacement: 80-120% return
- Input cover refresh: 100-150% return
- Documentation Premium:
- Before/after benchmarks: +15-25% value
- Professional photos: +10-20% value
- Upgrade receipts: +5-15% value
- Performance testing results: +20-30% value
🌐 Recommended Sales Platforms
- Specialized Tech Buyers:
- SellLaptopBack - Tech enthusiast focus
- SellLaptopBack - Premium device specialists
- eBay - Collector market
- Facebook Marketplace - Local buyers
- Niche Markets:
- Framework Community Marketplace
- Reddit Hardware Swap
- Tech forum classifieds
- Local university boards
- Institutional Buyers:
- .gov surplus programs
- .edu technology recycling
- Small business IT upgrades
- Non-profit organizations
📈 Sales Listing Optimization
- Title Optimization:
- "Framework 13 Laptop - [Upgrade Highlights]"
- Include key specs: CPU, RAM, SSD, Generation
- Mention unique features: "Modular," "Upgradable"
- Add value indicators: "Fresh Battery," "Like New"
- Keyword Strategy:
- Primary: Framework 13, modular laptop, upgradable
- Secondary: DIY laptop, repairable, right to repair
- Long-tail: "Framework 13 upgraded," "modular gaming laptop"
- Feature-based: RGB keyboard, latest gen CPU, large SSD
📋 Value-Added Documentation Package
- Essential Documentation:
- High-resolution photos from all angles
- Benchmark screenshots (Cinebench, 3DMark)
- Battery health reports
- Upgrade receipts and component documentation
- Performance testing results
- Professional Reports:
- System health summary
- Upgrade impact analysis
- Thermal performance documentation
- Quality assurance certification
🏫 Institutional Sales Strategy
- .gov/.edu Opportunities:
- Government surplus auctions
- University technology recycling programs
- School district IT upgrades
- Public library technology programs
- Documentation Requirements:
- Hardware specifications sheets
- Performance testing reports
- Compatibility documentation
- Professional condition assessment
🎯 Specialized Buyer Targeting
- SellLaptopBack Strategy:
- Emphasize gaming performance metrics
- Highlight upgrade benefits for enthusiasts
- Provide detailed benchmark comparisons
- Showcase premium components
- SellLaptopBack Approach:
- Focus on technical specifications
- Provide component-level documentation
- Highlight reliability and testing
- Emphasize professional upgrades
🎨 Premium Presentation Standards
- Cosmetic Preparation:
- Professional cleaning of all surfaces
- Keyboard deep cleaning and keycap alignment
- Screen cleaning with proper solutions
- Port cleaning with compressed air
- Photography Standards:
- Well-lit, high-resolution images from all angles
- Close-ups of upgrades and premium features
- Action shots showing functionality
- Comparison shots demonstrating condition
⏰ Strategic Timing Considerations
- Seasonal Opportunities:
- Back-to-school season (August-September)
- Holiday shopping season (November-December)
- Tax return season (February-April)
- Summer technology refresh (June-July)
- Market Timing:
- Before major Framework product announcements
- During technology shortage periods
- After positive Framework news coverage
- During academic semester beginnings
💬 Value-Based Negotiation Framework
- Pricing Justification:
- Component-by-component value analysis
- Upgrade cost documentation
- Performance improvement metrics
- Market comparison analysis
- Value Proposition:
- Ready-to-use premium configuration
- Professional-grade maintenance
- Verified performance metrics
- Quality assurance guarantee
💸 Tax Advantage Strategies
- Donation Benefits:
- .edu institution donations (tax deductible)
- Non-profit organization contributions
- School technology program donations
- Library technology donations
- Business Deductions:
- Technology upgrade write-offs
- Equipment depreciation claims
- Business expense documentation
- Capital gains considerations
🎯 Framework-Specific Value Factors
- Modularity Premium:
- Proven upgrade path: +20-30% value
- Documented repair history: +15-25% value
- Customization evidence: +10-20% value
- Community participation: +5-15% value
- Sustainability Value:
- Environmental appeal: +15-25% value
- Long-term usability: +20-30% value
- Repairability proof: +10-20% value
- Reduced e-waste story: +5-15% value
Need to Sell Your Framework Laptop? Get Instant Cash!
If your Framework 13 (or other Framework model) has performance issues or you're upgrading to a newer laptop, we offer competitive cash payouts for your device. We buy broken, used, and refurbished Framework laptops—including all 13-inch configurations—with free insured shipping and hassle-free evaluations.
Sell Popular Framework Models Now: