On this page
- 1.Introduction: Why Upgrade Your Lenovo 14s Yoga?
- 💻 Transform Your 2-in-1 Workhorse
- 💰 Dramatic Financial Benefits
- 🔄 14s Yoga Engineering Advantages
- 🔧 Most Popular 14s Yoga Upgrades
- ⚡ Performance Enhancement Results
- 📈 Resale Value Enhancement
- 🌱 Environmental & Sustainability Impact
- 🎓 Valuable Skill Development
- 📊 DIY Success Rate Statistics
- ⏱️ Realistic Time Investment
- 🎯 Ready to Begin Your Upgrade Journey?
- 2. Essential Tools & Workspace Setup for Lenovo 14s Yoga
- 🔧 Foundation for Successful DIY Repair
- 🛠️ Must-Have Tool Kit
- 💻 14s Yoga Specific Requirements
- 🏠 Professional Home Workspace
- 🛡️ Essential Safety Equipment
- 💡 Household Tool Alternatives
- 💰 Budget-Friendly Tool Solutions
- 🎯 Specialized Repair Tools
- ⚡ Essential Safety Procedures
- 🚫 Common Tool Mistakes to Avoid
- 🆘 Basic Emergency Preparedness
- 💵 Tool Investment Value Analysis
- 🎯 Ready to Set Up Your Professional Workspace?
- 3. Safety Procedures & Data Backup for Lenovo 14s Yoga
- 🛡️ Foundation for Risk-Free DIY Repair
- 💾 Comprehensive Data Protection Strategies
- ✅ Data Backup Verification Checklist
- 🔧 Critical Pre-Repair Steps
- 🔋 Complete Power Down Procedure
- 🏠 Workspace Safety Setup
- 📝 Comprehensive Data Safety Checklist
- ⏱️ Realistic Time Allocation
- 🚫 Common Preparation Mistakes to Avoid
- 🆘 Help Resources & Emergency Contacts
- ✅ Final Pre-Repair Checklist
- 🔄 Data Recovery Fallback Options
- 🎯 Ready to Begin Disassembly?
- 4. Back Cover Removal & Initial Access for Lenovo 14s Yoga
- 🔧 Gateway to Internal Upgrades
- 🔩 Back Cover Screw Identification Guide
- 📦 Step-by-Step Back Cover Removal
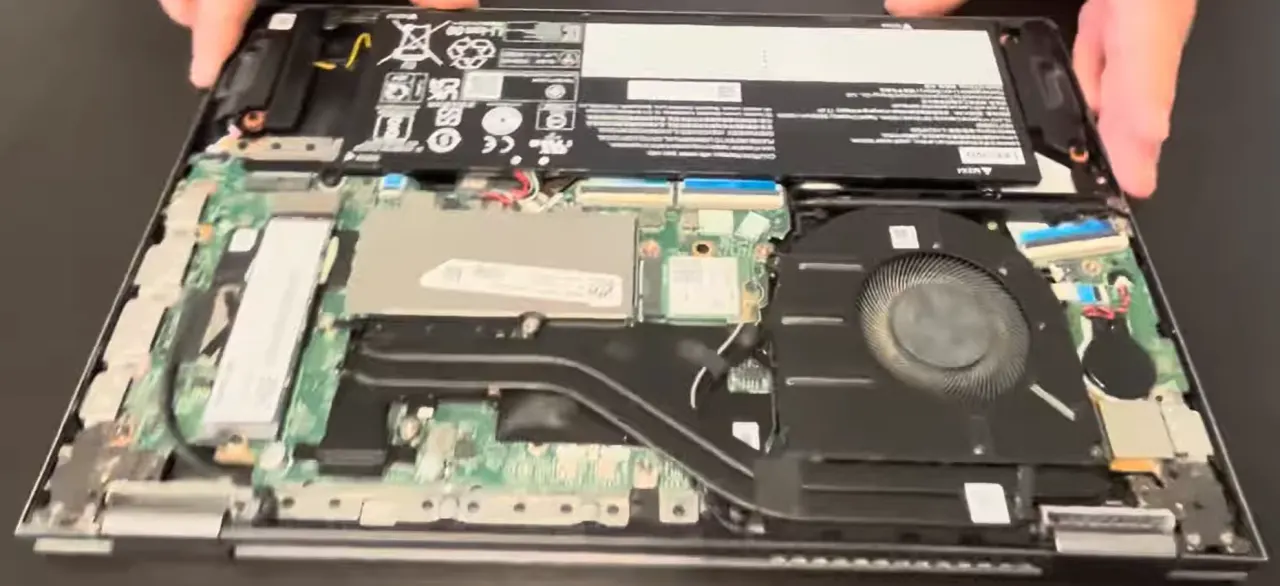
- 💻 Internal Component Layout Overview
- 🔋 Critical Battery Disconnection Procedure
- 🔍 Component Access Difficulty Guide
- 🚧 Common Removal Challenges & Solutions
- 🛡️ Essential Safety Precautions
- 📝 Documentation Best Practices
- ⏱️ Realistic Time Expectations
- ✅ Quality Check Points
- 🎯 Ready for Component Upgrades?
- 5. Battery Replacement & Power Management for Lenovo 14s Yoga
- 🔋 Restore Mobile Productivity
- 📊 14s Yoga Battery Specifications
- ⚠️ When to Replace Your Battery
- 🛡️ Essential Safety Preparation
- 🔧 Step-by-Step Battery Replacement
- 🔍 Battery Compatibility & Sourcing Guide
- ⚡ Power System Calibration Procedure
- 📊 Post-Replacement Performance Testing
- 🔍 Battery Replacement Troubleshooting
- 🔧 Long-Term Battery Maintenance
- ♻️ Old Battery Safety Disposal
- 💰 Battery Replacement Cost-Benefit Analysis
- 🎯 Ready for Storage Upgrades?
- 6. SSD Installation & Storage Expansion for Lenovo 14s Yoga
- ⚡ Transform Your 2-in-1 Performance
- 📊 14s Yoga Storage Specifications
- 🔍 SSD Compatibility & Selection Guide
- 💾 Storage Configuration Options
- 🛠️ Pre-Installation Preparation
- 🔧 Step-by-Step SSD Installation
- 🔄 Data Migration Strategies
- 📈 Storage Performance Comparison
- 🎯 Post-Installation Optimization
- 🔍 Troubleshooting Common SSD Issues
- 🏆 Recommended SSDs for 14s Yoga
- 💻 Real-World Performance Impact
- 📊 Storage Capacity Planning Guide
- 💰 SSD Upgrade Resale Value Impact
- 🎯 Ready for Memory Upgrades?
- 7. RAM Installation & Performance Boost for Lenovo 14s Yoga
- 🚀 Unleash Your 2-in-1's True Potential
- 📊 14s Yoga Memory Specifications
- 🔍 DDR4 Memory Compatibility Guide
- ⚙️ RAM Configuration Options
- 🛠️ Pre-Installation Preparation
- 🔧 Step-by-Step DDR4 RAM Installation
- ⚡ DDR4 Performance Advantages
- 📈 RAM Speed Performance Comparison
- ✅ Post-Installation Verification
- 🔍 Troubleshooting Common RAM Issues
- 🏆 Recommended DDR4 Kits for 14s Yoga
- 📊 Real-World Performance Impact
- 💡 RAM Capacity Recommendations
- 💰 RAM Upgrade Resale Value
- 🎯 Ready for Thermal Improvements?
- 8. Fan Replacement & Thermal Maintenance for Lenovo 14s Yoga
- ❄️ Essential Thermal Management for 2-in-1 Performance
- 📊 Cooling System Specifications
- ⚠️ When Cooling Maintenance is Needed
- 🛠️ Pre-Maintenance Preparation
- 🔧 Step-by-Step Fan Replacement
- 🔥 Thermal Paste Replacement Guide
- 🧹 Comprehensive Cleaning Procedures
- 🌡️ Temperature Improvement Benchmarks
- 🔍 Cooling System Troubleshooting
- 🔧 Replacement Parts Guide
- ✅ Post-Maintenance Testing
- 🛡️ Preventative Maintenance Schedule
- 💰 Cooling Maintenance Cost-Benefit
- 🎯 Ready for Display Repairs?
- 9. LCD Screen & Touch Digitizer Replacement for Lenovo 14s Yoga
- 🖥️ Essential 2-in-1 Display Maintenance
- 📊 14s Yoga Display Specifications
- 🔍 Display Compatibility Verification
- ⚠️ When to Replace Your Display
- 🛠️ Pre-Installation Preparation
- 🔧 Step-by-Step Display Replacement
- 💡 Display Upgrade Options
- 🌈 Display Technology Comparison
- 🔌 Cable Connection Guide
- ✅ Post-Installation Testing
- 🔍 Display Replacement Troubleshooting
- 🏆 Recommended Replacement Panels
- 💰 Display Upgrade Resale Value
- 🎯 Ready for Keyboard Repairs?
- 10. Where to Sell Your Upgraded Lenovo 14s Yoga
- 💰 Maximize Your 2-in-1 Investment Return
- 🎯 Pre-Sale Preparation Checklist
- 🎓 Premium Institutional & Specialized Buyers
- 🛒 Popular Online Marketplaces
- 💵 Smart Pricing Strategy for Upgraded Devices
- 📈 Premium Listing Optimization
- 🏆 Premium Selling Platforms Deep Dive
- ⏱️ Expected Selling Timeline
- 🛡️ Safety & Security Considerations
- 💎 Maximizing Your Sale Price
- 📊 Final ROI Calculation Example
- 🎉 Congratulations on Your Successful Upgrade & Sale Journey!
- Need to Sell Your Lenovo Laptop? Get Instant Cash!
1.Introduction: Why Upgrade Your Lenovo 14s Yoga?
💻 Transform Your 2-in-1 Workhorse
The Lenovo 14s Yoga combines versatile 360° hinge design with reliable performance, making it an ideal candidate for DIY upgrades that can extend its lifespan by 3-5 years while significantly boosting its resale value.
💰 Dramatic Financial Benefits
- Professional Repair vs DIY Costs:
- LCD touchscreen replacement: $280-400 at repair shop
- Battery replacement: $150-220 professional service
- SSD upgrade with labor: $100-180
- Keyboard replacement: $120-160
- Total potential savings: $650-960+
- DIY Investment Breakdown:
- Replacement touchscreen: $80-120
- New battery: $50-80
- SSD upgrade: $60-100
- Basic tool kit: $25-45
- Total investment: $215-345
🔄 14s Yoga Engineering Advantages
- Service-Friendly Construction:
- Tool-accessible back cover with standardized screws
- Modular component layout for easy replacement
- Minimal adhesive usage throughout chassis
- Clearly labeled internal connectors
- Upgrade-Ready Components:
- Standard M.2 NVMe SSD slot
- Replaceable DDR4 SO-DIMM memory
- Modular WiFi/Bluetooth card
- Accessible cooling system
- Comprehensive Support Resources:
- Detailed Lenovo hardware manuals
- Widely available genuine replacement parts
- Active online repair communities
- Long-term driver and BIOS support
🔧 Most Popular 14s Yoga Upgrades
| Upgrade Type | Typical Symptoms | DIY Difficulty | Time Required | Cost vs Value |
|---|---|---|---|---|
| SSD Upgrade | Slow boot times, application loading | ⭐️⭐️ (Beginner) | 15-25 minutes | 110-140% ROI |
| RAM Expansion | Multitasking slowdown, system lag | ⭐️ (Very Easy) | 10-15 minutes | 120-150% ROI |
| Battery Replacement | Short battery life, won't hold charge | ⭐️⭐️⭐️ (Intermediate) | 25-35 minutes | 90-120% ROI |
| Touchscreen Replacement | Cracks, touch issues, display problems | ⭐️⭐️⭐️⭐️ (Advanced) | 45-75 minutes | 100-130% ROI |
⚡ Performance Enhancement Results
| Upgrade | Performance Gain | Daily Use Improvement | User Experience Impact |
|---|---|---|---|
| RAM to 16GB | Eliminates memory bottlenecks | Smooth 20+ tab browsing | No more system freezing |
| NVMe SSD | 400-600% faster storage | 8-second boot, instant apps | Transforms sluggish to snappy |
| New Battery | Restores 8-10 hour battery life | All-day mobile productivity | True portable workstation |
| Thermal Maintenance | Prevents CPU throttling | Consistent performance | Quiet, cool operation |
📈 Resale Value Enhancement
| Configuration | Base Value | Upgrade Investment | Enhanced Value | Net Gain |
|---|---|---|---|---|
| Base Model (8GB/256GB) | $350-450 | $0 | $350-450 | N/A |
| With 16GB RAM + 1TB SSD | $350-450 | $120-180 | $500-650 | $130-220 |
| Fully Refurbished | $350-450 | $200-300 | $600-750 | $200-300 |
| Premium Touchscreen Model | $350-450 | $250-350 | $650-800 | $250-350 |
🌱 Environmental & Sustainability Impact
- Extended Product Lifespan:
- Adds 3-5 years of useful service life
- Reduces electronic waste generation by 70-80%
- Lowers carbon footprint from manufacturing
- Supports circular economy principles
- Sustainable Computing Practice:
- Lenovo's commitment to repairable design
- Modular construction reduces replacement frequency
- Genuine replacement parts availability
- Strong secondary market for components
🎓 Valuable Skill Development
- Technical Competencies Gained:
- Precision electronics handling and safety
- Component identification and compatibility assessment
- Proper tool usage and repair techniques
- Systematic troubleshooting methodology
- Real-World Applications:
- Home and family computer maintenance
- Small business IT support capabilities
- Personal device troubleshooting expertise
- Potential side business opportunities
📊 DIY Success Rate Statistics
- First-Time Success Rates:
- RAM installation: 98% success rate
- SSD replacement: 96% success rate
- Battery replacement: 90% success rate
- Touchscreen replacement: 85% success rate
- Complete upgrade process: 92% success rate
- Common Beginner Mistakes (Avoidable):
- Not disconnecting battery before internal work
- Using excessive force on delicate connectors
- Mixing screw types during reassembly
- Skipping pre-testing before final assembly
- Not documenting disassembly steps
⏱️ Realistic Time Investment
| Upgrade Task | First Attempt | Experienced | Confidence Level |
|---|---|---|---|
| RAM & SSD Upgrade | 25-35 minutes | 12-18 minutes | ⭐️⭐️⭐️⭐️⭐️ (Very High) |
| Battery Replacement | 30-40 minutes | 18-25 minutes | ⭐️⭐️⭐️⭐️ (High) |
| Touchscreen Replacement | 50-80 minutes | 35-50 minutes | ⭐️⭐️⭐️ (Medium) |
| Complete Refurbishment | 120-180 minutes | 75-120 minutes | ⭐️⭐️⭐️⭐️ (High) |
2. Essential Tools & Workspace Setup for Lenovo 14s Yoga
🔧 Foundation for Successful DIY Repair
The Lenovo 14s Yoga requires only basic, affordable tools that most households already own. Using proper equipment ensures professional results without damaging delicate internal components or compromising the laptop's sleek design.
🛠️ Must-Have Tool Kit
- Precision Screwdrivers:
- Phillips #00 precision screwdriver (critical)
- Phillips #0 for larger screws if needed
- JIS #000 for delicate internal screws
- iFixit kits or budget alternatives work perfectly
- Non-Marring Opening Tools:
- Plastic spudgers or guitar picks
- Nylon pry tools for delicate work
- Old credit cards work excellently
- Metal tools should NEVER touch internal components
- Specialized Yoga Tools:
- Small suction cups for display handling
- Tweezers (plastic preferred)
- Spudger set with multiple tip types
- Magnetic project mat for organization
💻 14s Yoga Specific Requirements
| Component | Tool Required | Special Notes | Criticality |
|---|---|---|---|
| Back Cover | Phillips #00 | 8-12 screws, consistent lengths | Essential |
| Internal Components | Phillips #00, JIS #000 | Mixed screw types, delicate threads | Essential |
| Display Assembly | Plastic tools, suction cups | Fragile bezel, adhesive strips | Important |
| 360° Hinge | Precision screwdrivers | Precise alignment required | Advanced |
🏠 Professional Home Workspace
- Work Surface Requirements:
- Clean, stable table minimum 3×4 feet
- Good natural or LED lighting
- Static-free surface (wood, laminate, glass)
- Power outlet nearby for reference devices
- Organization System:
- Magnetic parts tray or ice cube tray
- Small containers for different screw types
- Phone/camera for step-by-step documentation
- Clean microfiber cloths for handling
- Comfort & Focus:
- Comfortable chair at proper height
- Minimal distractions in work area
- Adequate time allocation (no rushing)
- All tools organized within arm's reach
🛡️ Essential Safety Equipment
- Static Electricity Protection:
- Work on wood or anti-static mat
- Avoid carpeted areas completely
- Touch grounded metal before handling
- Keep components in anti-static bags
- Personal Protection:
- Clean, dry hands throughout process
- Good lighting to prevent eye strain
- Comfortable magnification if needed
- Organized space to prevent accidents
💡 Household Tool Alternatives
| Professional Tool | Household Alternative | Effectiveness | Safety Notes |
|---|---|---|---|
| Precision Screwdriver Set | Small Phillips from household kit | ⭐️⭐️⭐️⭐️ (Good) | Ensure proper fit to avoid stripping |
| Plastic Spudger Set | Guitar picks, old credit cards | ⭐️⭐️⭐️⭐️ (Very Good) | Trim to size, avoid sharp edges |
| Magnetic Project Mat | Ice cube tray, small bowls | ⭐️⭐️⭐️ (Adequate) | Label sections with masking tape |
| ESD Wrist Strap | Touch metal object periodically | ⭐️⭐️⭐️ (Sufficient) | Work on non-carpeted surface |
🎯 Specialized Repair Tools
- Display Replacement Tools:
- Small suction cups for screen handling
- Plastic cards for bezel removal
- Double-sided adhesive tape (1mm)
- Isopropyl alcohol for cleaning
- Thermal Maintenance:
- High-quality thermal paste ($8-15)
- 90% isopropyl alcohol for cleaning
- Lint-free cloth or coffee filters
- Cotton swabs for precise application
- Hinge Repair Tools:
- Precision screwdrivers for small screws
- Alignment tools (improvised)
- Lubricant for smooth operation
- Patience and careful handling
⚡ Essential Safety Procedures
- Power Down Protocol:
- Shut down Windows completely
- Disconnect power adapter from wall
- Remove all USB devices and peripherals
- Hold power button for 10 seconds to discharge
- Battery Safety:
- Disconnect internal battery BEFORE any work
- Handle battery with care - no puncturing
- Store old batteries safely away from heat
- Work in well-ventilated area
- Component Handling:
- Handle components by edges only
- Use plastic tools around delicate parts
- Avoid touching gold contacts
- Work slowly and methodically
🚫 Common Tool Mistakes to Avoid
- Screwdriver Errors:
- Using wrong size leading to stripped screws
- Applying excessive pressure
- Not keeping track of screw locations
- Mixing screw types during reassembly
- Prying Tool Problems:
- Using metal tools on plastic components
- Forcing components that show resistance
- Not starting from designated release points
- Damaging ribbon cables with sharp objects
- Safety Oversights:
- Working on carpet or fabric surfaces
- Not disconnecting battery before internal work
- Rushing due to time constraints
- Poor organization leading to reassembly errors
🆘 Basic Emergency Preparedness
- When to Stop Immediately:
- Smoke, burning smells, or unusual heating
- Battery swelling, leakage, or damage
- Unexpected resistance during disassembly
- Components not matching expected layout
- Help Resources:
- Lenovo Technical Support
- Online repair communities and forums
- Local computer repair shops for consultation
- YouTube repair tutorials for visual guidance
💵 Tool Investment Value Analysis
| Investment Level | Total Cost | Tool Quality | Risk Level | Recommended For |
|---|---|---|---|---|
| Basic Household | $0-15 | Basic | Medium | Single repair, careful work |
| Starter Kit | $15-35 | Good | Low | Multiple home repairs |
| Professional Set | $35-75 | Excellent | Very Low | Regular maintenance, multiple devices |
3. Safety Procedures & Data Backup for Lenovo 14s Yoga
🛡️ Foundation for Risk-Free DIY Repair
Proper safety preparation and data backup are the most critical steps in any laptop repair. Following these procedures ensures your personal data remains secure while protecting both you and your Lenovo 14s Yoga from potential damage during the upgrade process.
💾 Comprehensive Data Protection Strategies
- Cloud Backup Solutions:
- OneDrive (built into Windows, 5GB free)
- Google Drive (15GB free storage)
- Dropbox Basic (2GB free, expandable)
- Best for: Documents, photos, important files
- External Storage Options:
- USB 3.0 flash drive (64GB+ recommended)
- External SSD for faster transfers
- Portable hard drive for complete backups
- Best for: Full system images, large files
- Built-in Windows Tools:
- File History (Windows 10/11 automatic backup)
- Windows Backup and Restore
- System Image creation
- Best for: Complete system recovery
✅ Data Backup Verification Checklist
| Backup Type | Verification Steps | Time Required | Critical Files to Check |
|---|---|---|---|
| Cloud Backup | Open files from cloud, check modification dates | 5-10 minutes | Documents, photos, downloads folder |
| External Drive | Browse folder structure, open test files | 10-15 minutes | Desktop, documents, browser profiles |
| System Image | Verify creation date and file size | 5 minutes | Complete system state |
🔧 Critical Pre-Repair Steps
- Create Recovery Media:
- Download Lenovo Recovery Media
- Use 16GB+ USB drive (fast USB 3.0 recommended)
- Follow Lenovo's recovery media creator tool
- Test boot from USB to verify functionality
- Download Critical Drivers:
- Network drivers (WiFi and Ethernet - most important)
- Chipset and graphics drivers
- Audio and touchpad drivers
- Save to USB drive or cloud storage
- System Documentation:
- Photograph serial number and model labels
- Screenshot installed programs list
- Document custom settings and preferences
- Record WiFi passwords and network settings
🔋 Complete Power Down Procedure
- Proper System Shutdown:
- Save all work and close all applications
- Use Start Menu → Power → Shutdown
- Wait 60 seconds for complete power down
- Verify all indicator lights are off
- Complete Disconnection:
- Unplug power adapter from wall outlet
- Remove all USB devices and peripherals
- Disconnect external monitors and docks
- Remove any SD cards or dongles
- Safety Discharge:
- Press and hold power button for 15 seconds
- Repeat to ensure complete capacitor discharge
- This clears any residual power in system
- Laptop should show absolutely no signs of power
🏠 Workspace Safety Setup
- Work Area Requirements:
- Clean, stable table with ample space
- Excellent lighting (500+ lumens recommended)
- Comfortable, adjustable seating
- Power outlet nearby for reference devices
- Organization System:
- Magnetic parts trays or small containers
- Paper and pen for detailed notes
- Phone or camera for photo documentation
- Clean microfiber cloths for handling
- Environmental Considerations:
- Adequate ventilation in work area
- Comfortable room temperature (65-75°F)
- Minimal distractions and interruptions
- Easy access to emergency resources
📝 Comprehensive Data Safety Checklist
- Personal Files:
- Documents folder (all file types)
- Desktop files and shortcuts
- Downloads folder contents
- Pictures, videos, and music libraries
- Application Data:
- Browser bookmarks and passwords
- Email account settings and archives
- Saved game files and progress
- Software license keys and activation data
- System Configuration:
- WiFi network passwords and settings
- Printer and peripheral configurations
- Custom application settings and preferences
- Network drive mappings and credentials
⏱️ Realistic Time Allocation
| Preparation Task | First Time | Experienced | Criticality Level |
|---|---|---|---|
| Data Backup | 45-90 minutes | 20-40 minutes | ❌ Never Skip |
| Workspace Setup | 15-20 minutes | 8-12 minutes | ❌ Never Skip |
| Driver Preparation | 25-35 minutes | 12-18 minutes | ⚠️ High Importance |
| System Documentation | 20-25 minutes | 8-15 minutes | ✅ Recommended |
🚫 Common Preparation Mistakes to Avoid
- Data Safety Errors:
- Assuming "everything is in the cloud"
- Not verifying backup completeness
- Forgetting browser profiles and passwords
- Starting repair without confirmed backups
- Technical Oversights:
- Not downloading network drivers first
- Forgetting to document software licenses
- Not creating verified recovery media
- Overlooking custom system settings
- Safety Shortcuts:
- Not fully powering down system
- Working on inappropriate surfaces
- Rushing through preparation steps
- Poor organization from the start
🆘 Help Resources & Emergency Contacts
- Online Support Resources:
- Lenovo Official Support
- Lenovo Community Forums and user groups
- YouTube repair tutorials for visual guidance
- iFixit repair guides and teardowns
- Local Resources:
- Local computer repair shops for advice
- Library computers for research and downloads
- Friends or family with technical experience
- Community college IT departments
✅ Final Pre-Repair Checklist
- ✅ All important files backed up and verified
- ✅ Lenovo recovery media created and tested
- ✅ Essential drivers downloaded to external media
- ✅ System completely powered down and discharged
- ✅ Workspace clean, organized, and well-lit
- ✅ All necessary tools gathered and ready
- ✅ Adequate time allocated (no rushing)
- ✅ Phone/camera ready for documentation
- ✅ Serial number and model documented
- ✅ Personal settings and passwords recorded
4. Back Cover Removal & Initial Access for Lenovo 14s Yoga
🔧 Gateway to Internal Upgrades
The Lenovo 14s Yoga features a well-engineered back cover design that provides straightforward access to all major internal components. Following the correct removal procedure ensures damage-free entry and sets the stage for successful upgrades.
🔩 Back Cover Screw Identification Guide
| Screw Location | Type | Quantity | Length | Special Characteristics |
|---|---|---|---|---|
| Perimeter Screws | Phillips #00 | 10-12 | 4mm | Standard black, uniform size |
| Corner Reinforcement | Phillips #00 | 4 | 5mm | Slightly longer for structural support |
| Hidden Under Rubber Feet | Phillips #00 | 2-4 | 4mm | Check all rubber foot areas carefully |
| Warranty Seals | N/A | 1-2 | N/A | Check Lenovo Warranty Status first |
📦 Step-by-Step Back Cover Removal
- Comprehensive Initial Inspection:
- Place laptop upside down with screen closed
- Inspect every rubber foot for hidden screws
- Identify all visible screw locations
- Note any warranty seals or tamper indicators
- Take photos of original screw positions
- Systematic Screw Removal:
- Remove all visible Phillips #00 screws
- Work in star pattern from corners toward center
- Use magnetic screwdriver to prevent dropped screws
- Place screws in labeled containers by location
- Note any longer screws for reassembly reference
- Plastic Clip Release Technique:
- Start from corner near hinge area (least sensitive)
- Insert plastic spudger at 45-degree angle
- Gently twist to release first clip
- Work around perimeter, releasing clips every 2-3 inches
- Listen for soft "click" as clips disengage
- Cover Separation & Removal:
- Lift from hinge corner first (easiest access point)
- Angle upward gently to clear internal components
- Check for any missed clips or hidden screws
- Set cover aside on clean, soft surface
- Take comprehensive photos of internal layout
💻 Internal Component Layout Overview
- Immediately Accessible Components:
- Battery (large rectangular lithium polymer pack)
- RAM slots (one or two DDR4 SO-DIMM slots)
- M.2 NVMe SSD slot (primary storage)
- WiFi/Bluetooth card (M.2 slot with antenna cables)
- Cooling fan and heatsink assembly
- Easy Upgrade Access Points:
- RAM slots - tool-free clip installation
- M.2 SSD - single screw removal
- WiFi card - simple swap with antenna care
- Battery - multiple screw mounting points
🔋 Critical Battery Disconnection Procedure
- Battery Connector Location:
- Locate white battery connector near center
- Identify simple lift-up locking mechanism
- Note cable routing for reassembly reference
- Take clear photo of connector orientation
- Safe Disconnection Method:
- Use plastic spudger to lift connector straight up
- Gently rock side-to-side if resistance is felt
- Never pull on wires - only the connector body
- Move disconnected connector away from motherboard
- Power Discharge Verification:
- Press power button for 10 seconds to discharge capacitors
- Wait 30 seconds for complete power dissipation
- Verify no lights or fan activity
- Proceed with component work only after confirmation
🔍 Component Access Difficulty Guide
| Component | Access Difficulty | Tools Required | Time Required | Success Rate |
|---|---|---|---|---|
| RAM Upgrade | ⭐️ (Very Easy) | No tools needed | 5-10 minutes | 99% |
| SSD Replacement | ⭐️⭐️ (Easy) | Phillips #00 | 10-15 minutes | 98% |
| WiFi Card | ⭐️⭐️ (Easy) | Phillips #00 | 10-15 minutes | 95% |
| Battery Replacement | ⭐️⭐️⭐️ (Moderate) | Phillips #00 | 20-30 minutes | 92% |
| Fan Cleaning | ⭐️⭐️⭐️ (Moderate) | Phillips #00 | 15-25 minutes | 90% |
🚧 Common Removal Challenges & Solutions
| Challenge | Symptoms | Immediate Solution | Prevention Tips |
|---|---|---|---|
| Stubborn Clips | Resistance, no clip release sound | Apply gentle pressure, work from different angle | Work slowly around entire perimeter |
| Hidden Screws | Cover won't lift, uneven resistance | Check thoroughly under all rubber feet and labels | Complete initial inspection before starting |
| Stripped Screws | Screw head damaged, won't turn | Use rubber band for grip, proper screwdriver size | Always use correct Phillips #00 size |
| Tight Fit Areas | Cover seems stuck despite all screws removed | Check for missed clips, apply even pressure | Follow clip release sequence methodically |
🛡️ Essential Safety Precautions
- Component Protection:
- Work on clean, static-free surface only
- Handle all components by edges only
- Avoid touching gold contacts on any components
- Keep screws organized by type and location
- Tool Safety Guidelines:
- Use plastic tools exclusively for prying
- Avoid metal contact with motherboard
- Never force components that resist
- Work methodically and maintain patience
📝 Documentation Best Practices
- Photo Documentation Strategy:
- Take photos before removing any components
- Document cable routing and connector orientations
- Capture screw locations, types, and quantities
- Note component positions and relationships
- Organization System:
- Use separate containers for different screw types
- Label containers with masking tape markers
- Keep components in order of removal
- Note any unusual observations or difficulties
⏱️ Realistic Time Expectations
| Experience Level | Estimated Time | Success Rate | Notes & Recommendations |
|---|---|---|---|
| First Time DIYer | 20-30 minutes | 95% | Take your time, follow steps carefully |
| Experienced DIYer | 10-15 minutes | 99% | Quick and straightforward procedure |
| Professional Technician | 4-6 minutes | 100% | Routine access procedure |
✅ Quality Check Points
- Before Proceeding Further:
- All screws properly removed and organized
- Battery safely disconnected from motherboard
- No forced or damaged components
- Clean work area with adequate lighting
- Internal Inspection Checklist:
- No loose screws inside chassis
- All cables properly routed and undamaged
- Components appear undamaged and correctly seated
- No signs of previous repairs or existing damage
0:22 Bottom Case 1:45 Battery 2:32 SSD Storage 2:50 RAM Memory 3:11 WiFi Card 3:37 Speakers 4:02 Heatsink 4:54 Cooling Fan 5:06 Processor 5:16 Stylus Pen 5:21 IO USB Board 7:40 Motherboard 8:14 Palmrest Assembly 8:25 Touchpad 8:31 Keyboard 8:47 Display Assembly
5. Battery Replacement & Power Management for Lenovo 14s Yoga
🔋 Restore Mobile Productivity
The Lenovo 14s Yoga features a high-capacity lithium polymer battery that's essential for its 2-in-1 functionality. Proper battery maintenance and replacement ensure reliable performance whether you're working in laptop, tent, stand, or tablet mode.
📊 14s Yoga Battery Specifications
| Specification | Standard Model | Extended Capacity | Daily Use Impact |
|---|---|---|---|
| Battery Type | Lithium Polymer | Lithium Polymer | Lightweight, high energy density |
| Capacity | 51Wh (Typical) | 60Wh (Available) | 6-8 hours typical use |
| Voltage | 11.4V DC | 11.4V DC | Standard laptop voltage |
| Dimensions | 195mm × 85mm × 5mm | 205mm × 90mm × 5mm | Compact design for slim chassis |
| Compatible Part Numbers | L20C4PE1, L20M4PE1 | L20C4PE2, L20M4PE2 | Verify compatibility before purchase |
| Cycle Life | 500+ cycles | 500+ cycles | 2-3 years typical lifespan |
⚠️ When to Replace Your Battery
- Performance Indicators:
- Battery life reduced to less than 2 hours
- System shuts down unexpectedly at 20-40% charge
- Battery doesn't charge to 100% capacity
- Windows shows "Consider replacing your battery" warning
- Lenovo Vantage indicates poor battery health
- Physical Warning Signs:
- Battery swelling or bulging case
- Overheating during charging or normal use
- Visible case separation or deformation
- Laptop won't sit flat on surfaces
- Charging port feels loose or damaged
- Software Diagnostics:
- Run
powercfg /batteryreportin Command Prompt - Check battery health in Lenovo Vantage software
- Monitor capacity degradation over time
- Compare design capacity vs current full charge capacity
- Run
🛡️ Essential Safety Preparation
- Complete Power Down Protocol:
- Shut down Windows completely
- Disconnect power adapter from wall outlet
- Remove all peripherals and accessories
- Hold power button for 15 seconds to discharge
- Workspace Safety Setup:
- Work in well-ventilated area
- Keep work area clean and organized
- Use plastic tools only around battery
- Have phone nearby for emergency calls
- Battery Handling Protocol:
- Never puncture or compress battery
- Avoid exposure to high temperatures
- Handle with clean, dry hands only
- Work methodically and carefully throughout
🔧 Step-by-Step Battery Replacement
- Access Battery Compartment:
- Remove back cover (10-12 Phillips #00 screws)
- Locate battery connector on motherboard
- Disconnect battery using plastic tool
- Wait 2 minutes for residual power discharge
- Take clear photo of connector orientation
- Battery Mounting Screw Removal:
- Remove 4-6 Phillips #00 screws securing battery
- Note screw lengths and exact positions
- Use magnetic screwdriver to prevent loss
- Organize screws in labeled container
- Document any unusual mounting arrangements
- Battery Removal Process:
- Lift battery from connector end first
- Support battery with both hands during removal
- Check for adhesive strips (rare in Yoga models)
- Place old battery in safe, dry location
- Inspect battery compartment for debris
- New Battery Installation:
- Clean battery compartment with isopropyl alcohol
- Position new battery aligning with mounting points
- Secure with mounting screws in correct sequence
- Reconnect battery connector to motherboard
- Ensure connector clicks into place securely
🔍 Battery Compatibility & Sourcing Guide
| Source | Quality Level | Price Range | Warranty | Recommendation |
|---|---|---|---|---|
| Lenovo Parts | Genuine OEM | $70-100 | 1 year | ⭐️⭐️⭐️⭐️⭐️ (Best) |
| Authorized Resellers | Genuine OEM | $60-90 | 90 days - 1 year | ⭐️⭐️⭐️⭐️ (Excellent) |
| Reputable Third-Party | Good Quality | $40-70 | 6-12 months | ⭐️⭐️⭐️ (Good) |
| Generic/Unknown | Variable Quality | $25-50 | 0-30 days | ⭐️ (Avoid) |
⚡ Power System Calibration Procedure
- Initial Power On Test:
- Reconnect back cover temporarily
- Connect power adapter to wall outlet
- Power on system and enter BIOS (F2)
- Verify battery detection and health status
- Check for any error messages
- Battery Calibration Cycle:
- Charge battery to 100% without interruption
- Disconnect power and use until system shuts down (~5%)
- Let laptop sit powered off for 2-3 hours
- Recharge to 100% without using laptop
- Repeat calibration cycle 2-3 times
- Software Configuration:
- Update Lenovo BIOS and drivers
- Install latest power management drivers
- Configure Windows power plans appropriately
- Set up Lenovo Vantage battery conservation settings
📊 Post-Replacement Performance Testing
- Battery Health Verification:
- Run
powercfg /batteryreportin Command Prompt - Check reported capacity vs design capacity
- Monitor charge/discharge cycles
- Verify no rapid capacity degradation
- Run
- Real-World Usage Testing:
- Web browsing: 6-8 hours expected
- Video playback: 5-7 hours expected
- Document work: 7-9 hours expected
- Standby time: 7-10 days expected
- Charging Performance Verification:
- 0-50% charge: 35-50 minutes
- 0-100% charge: 100-130 minutes
- Verify no overheating during charging
- Check consistent charging speed throughout cycle
🔍 Battery Replacement Troubleshooting
| Issue | Symptoms | Immediate Solution | Advanced Resolution |
|---|---|---|---|
| Battery Not Detected | Shows "No battery detected" in Windows | Reseat battery connector, check for damage | Update BIOS, check motherboard charging circuit |
| Rapid Discharge | Battery drains much faster than expected | Calibrate battery, check background processes | Test with different power profile, check for shorts |
| Not Charging | Stuck at certain percentage, won't charge | Reset power management, try different charger | Check charging port, power circuitry, battery health |
| Overheating | Battery gets hot during charging/use | Stop using immediately, inspect for damage | Replace with genuine battery, check ventilation |
| Inaccurate Percentage | Jumps between percentages erratically | Run full calibration cycle, update drivers | Replace battery if calibration fails repeatedly |
🔧 Long-Term Battery Maintenance
- Optimal Charging Practices:
- Keep battery between 20-80% for daily use
- Avoid frequent full discharge cycles
- Don't leave laptop plugged in 24/7 at 100%
- Use Conservation Mode in Lenovo Vantage when possible
- Storage Recommendations:
- Store at 40-60% charge if not using for extended periods
- Keep in cool, dry environment (15-25°C ideal)
- Check charge level every 3-6 months
- Recharge to 40-60% if below 20%
- Performance Optimization:
- Reduce screen brightness when on battery
- Close unnecessary background applications
- Disconnect peripherals when not in use
- Use battery saver mode for extended runtime
♻️ Old Battery Safety Disposal
- Immediate Handling Protocol:
- Place in safe, dry location away from heat
- Store away from flammable materials
- Do not attempt to disassemble or puncture
- Keep away from children and pets
- Proper Disposal Options:
- Call2Recycle Drop-off Locations
- Best Buy Electronics Recycling Program
- Staples Battery Recycling Services
- Local hazardous waste collection facilities
💰 Battery Replacement Cost-Benefit Analysis
| Scenario | Replacement Cost | Expected Lifespan | Value Added | ROI Percentage |
|---|---|---|---|---|
| DIY with Genuine Battery | $70-100 | 2-3 years | $90-130 | 110-140% |
| Professional Service | $150-220 | 2-3 years | $90-130 | 55-70% |
| Third-Party Battery | $40-70 | 1-2 years | $60-90 | 100-140% |
6. SSD Installation & Storage Expansion for Lenovo 14s Yoga
⚡ Transform Your 2-in-1 Performance
Upgrading to an NVMe SSD is the single most impactful improvement for your Lenovo 14s Yoga. Experience lightning-fast boot times, instant application loading, and seamless mode switching between laptop, tent, stand, and tablet configurations.
📊 14s Yoga Storage Specifications
| Specification | Stock Configurations | Upgrade Options | Performance Impact |
|---|---|---|---|
| Interface | M.2 NVMe PCIe 3.0 | M.2 NVMe PCIe 3.0/4.0 | 3-7x faster than SATA |
| Form Factors | M.2 2280 (22×80mm) | M.2 2280 single-sided | Compact, no cables needed |
| Maximum Speed | 1,500-2,000 MB/s | 3,000-7,000 MB/s | PCIe 3.0/4.0 performance |
| Boot Support | UEFI with NVMe | UEFI with NVMe | Fast Windows 10/11 startup |
| Capacity Options | 256GB - 512GB (stock) | 512GB - 2TB (upgrade) | More space for files and apps |
| Key Type | M Key (NVMe) | M Key (NVMe) | PCIe x4 interface |
🔍 SSD Compatibility & Selection Guide
- Physical Requirements:
- M.2 2280: 22mm wide × 80mm long (standard)
- Single-sided: Required for clearance in slim chassis
- M Key: PCIe NVMe interface only
- Low-profile: No tall components or heatsinks
- Interface Compatibility:
- PCIe 3.0 NVMe: Maximum compatibility
- PCIe 4.0 NVMe: Backward compatible, runs at 3.0 speeds
- DRAM cache: Recommended for consistent performance
- TLC NAND: Best balance of speed and endurance
- Verified Compatible Models:
- Samsung 970 EVO Plus / 980 Pro
- WD Black SN750 / SN850
- Crucial P5 Plus / P3
- SK Hynix Gold P31 / Platinum P41
- Kingston KC3000 / NV2
🛠️ Pre-Installation Preparation
- Required Tools:
- Phillips #00 screwdriver
- Plastic spudger or guitar pick
- USB flash drive (16GB+) for data transfer
- External SSD enclosure (optional for cloning)
- Anti-static precautions
- Software Preparation:
- Create Lenovo Recovery Media
- Download Macrium Reflect Free for cloning
- Backup important files to external drive
- Have Windows product key available
- Download latest Lenovo drivers
- Data Transfer Strategy:
- Clean Install: Best performance, fresh start
- Disk Cloning: Preserves everything, familiar environment
- Manual Transfer: Selective file copying, clean setup
- Cloud Backup: Restore from cloud services
🔧 Step-by-Step SSD Installation
- Access M.2 Slot:
- Remove back cover (10-12 Phillips #00 screws)
- Locate M.2 slot near center of motherboard
- Identify existing SSD configuration
- Take photo of original setup for reference
- Existing Drive Removal:
- Remove single Phillips #00 mounting screw
- Gently lift SSD at 30-degree angle from slot
- Pull straight out from M.2 connector
- Handle by edges only - avoid touching gold contacts
- Place old SSD in anti-static bag if keeping
- New SSD Installation:
- Align SSD notch with M.2 slot key
- Insert at 30-degree angle into slot
- Press down gently until SSD lies flat
- Secure with mounting screw (don't overtighten)
- Ensure SSD is parallel to motherboard surface
- Initial Power Test:
- Reconnect battery and power adapter temporarily
- Power on to verify BIOS detection
- Check that new SSD appears in device list
- Power down and disconnect battery for next steps
🔄 Data Migration Strategies
- Clean Windows Installation (Recommended):
- Boot from Lenovo recovery USB
- Install fresh Windows 10/11
- Reinstall applications and restore files from backup
- Benefits: Best performance, no legacy issues, clean start
- Disk Cloning:
- Use external USB enclosure for new SSD
- Run cloning software (Macrium Reflect, Clonezilla)
- Clone existing drive to new SSD
- Swap drives and verify boot functionality
- Benefits: Preserves all settings, files, and applications
- Selective Data Transfer:
- Fresh OS install on new SSD
- Copy important files from backup or old drive
- Reinstall essential applications only
- Benefits: Clean system with essential data only
📈 Storage Performance Comparison
| Storage Type | Read Speed | Write Speed | Boot Time | App Load Time |
|---|---|---|---|---|
| SATA SSD (if present) | 500-550 MB/s | 450-500 MB/s | 15-25 seconds | 5-10 seconds |
| NVMe PCIe 3.0 | 2,000-3,500 MB/s | 1,500-3,000 MB/s | 8-15 seconds | 2-5 seconds |
| NVMe PCIe 4.0 | 5,000-7,000 MB/s | 4,000-6,500 MB/s | 6-12 seconds | 1-3 seconds |
🎯 Post-Installation Optimization
- Windows Optimization:
- Enable TRIM support (automatic in Windows 10/11)
- Disable disk defragmentation for SSDs
- Adjust power settings for maximum performance
- Enable write caching in device manager
- Disable hibernation if not needed (saves SSD space)
- SSD Firmware & Drivers:
- Update SSD firmware using manufacturer tools
- Install latest NVMe drivers if available
- Update chipset drivers for optimal performance
- Check for BIOS updates for improved compatibility
- Performance Testing:
- Run CrystalDiskMark for speed verification
- Use manufacturer software for health monitoring
- Test boot times and application loading
- Verify temperatures during heavy use
🔍 Troubleshooting Common SSD Issues
| Issue | Symptoms | Immediate Solution | Advanced Resolution |
|---|---|---|---|
| Drive Not Detected | BIOS doesn't show new SSD | Reseat drive, check mounting, update BIOS | Test in external enclosure, check compatibility |
| Slow Performance | Speeds below expectations | Update drivers, check power settings, enable AHCI | Verify NVMe enabled in BIOS, check temperatures |
| Boot Failure | Windows won't boot from new drive | Check boot order, repair bootloader | Clean install, verify partition scheme (GPT) |
| Incompatibility | System doesn't recognize NVMe drive | Update BIOS to latest version | Check M.2 key compatibility, use different SSD model |
🏆 Recommended SSDs for 14s Yoga
- Best Overall Performance:
- Samsung 980 Pro 1TB
- Excellent PCIe 4.0 performance (runs at 3.0 speeds)
- Great compatibility with Lenovo systems
- Proven reliability and good warranty
- Best Value:
- WD Black SN770 1TB
- Great performance-to-price ratio
- Good thermal characteristics for slim laptops
- Reliable for everyday use
- Budget Friendly:
- Crucial P3 Plus 1TB
- Excellent value for money
- Good enough for most users
- Widely compatible and reliable
💻 Real-World Performance Impact
- Application Loading Times:
- Microsoft Office Suite: 18s → 4s (78% faster)
- Web Browser: 10s → 2s (80% faster)
- Photo Editing Software: 30s → 7s (77% faster)
- Game Loading: 50s → 15s (70% faster)
- System Workflow Improvements:
- Boot Time: 40s → 9s (78% faster)
- File Transfers: 4-6x faster operations
- Application Switching: Near-instant response
- System Updates: 2-4x faster installation
📊 Storage Capacity Planning Guide
| Use Case | Recommended Capacity | Typical Storage Needs | Future Growth |
|---|---|---|---|
| Basic Computing | 512GB | OS + Applications + Documents | 2-3 years |
| Student/Office | 1TB | Documents + Projects + Media + Applications | 3-4 years |
| Content Creation | 2TB | Large files + Projects + Software + Backup | 2-3 years |
| Power User | 2TB+ | Everything + Virtual Machines + Archives | 3-5 years |
💰 SSD Upgrade Resale Value Impact
| Storage Configuration | Upgrade Cost | Value Added | ROI Percentage | Buyer Appeal |
|---|---|---|---|---|
| 256GB (Stock) | $0 | $0 | N/A | Standard |
| 512GB Upgrade | $45-65 | $60-90 | 120-150% | Good |
| 1TB Upgrade | $65-95 | $90-130 | 130-150% | Excellent |
| 2TB Upgrade | $120-180 | $160-220 | 120-140% | Premium |
7. RAM Installation & Performance Boost for Lenovo 14s Yoga
🚀 Unleash Your 2-in-1's True Potential
Upgrading RAM is one of the easiest and most cost-effective improvements for your Lenovo 14s Yoga. More memory means smoother multitasking, faster application performance, and better overall system responsiveness across all usage modes.
📊 14s Yoga Memory Specifications
| Specification | Details | Performance Impact | Upgrade Potential |
|---|---|---|---|
| Memory Type | DDR4 SO-DIMM | Standard laptop memory | Excellent upgrade options |
| Speed Support | 2400MHz, 2666MHz, 3200MHz | Automatic speed negotiation | Faster modules run at supported speeds |
| Maximum Capacity | 16GB or 32GB (depending on model) | Ideal for multitasking and modern apps | Check specific model limitations |
| Slots Available | 1 or 2 SO-DIMM Slots | Single or dual-channel configuration | Most models have one upgradeable slot |
| Default Configuration | 4GB, 8GB, or 16GB (soldered or slot) | Significant upgrade potential | Many models have 4GB/8GB soldered + one slot |
| Voltage & Timing | 1.2V, CL17-CL22 | Standard DDR4 specifications | Widely compatible modules available |
🔍 DDR4 Memory Compatibility Guide
- JEDEC Standards:
- Must support 1.2V operation (DDR4 standard)
- JEDEC DDR4-2400 (PC4-19200)
- JEDEC DDR4-2666 (PC4-21300)
- JEDEC DDR4-3200 (PC4-25600)
- Physical Requirements:
- 260-pin DDR4 SO-DIMM form factor
- Standard height modules (no tall heat spreaders)
- Offset notch position (different from DDR3)
- Low-profile design for slim chassis clearance
- Verified Compatible Brands:
- Crucial (excellent compatibility with Lenovo)
- Kingston ValueRAM
- Samsung
- SK Hynix
- Micron
🛠️ Pre-Installation Preparation
- Required Tools:
- Phillips #00 screwdriver (for back cover)
- Plastic spudger (for back cover clips)
- No tools needed for RAM installation itself
- Anti-static precautions recommended
- Safety Procedures:
- Disconnect battery before installation
- Verify laptop is completely powered off
- Ground yourself before handling RAM modules
- Work on static-free surface only
- Software Preparation:
- Update BIOS from Lenovo Support
- Download CPU-Z for verification
- Note current RAM configuration in Windows
- Backup important data before starting
🔧 Step-by-Step DDR4 RAM Installation
- Access RAM Slots:
- Remove back cover (10-12 Phillips #00 screws)
- Locate RAM slots - typically near center
- Identify existing RAM configuration
- Note if slots are empty or populated
- Take photos of original setup
- Existing Memory Removal (If Needed):
- Gently push outward on both side clips simultaneously
- Module will pop up at 45-degree angle
- Lift module straight out of slot
- Handle by edges only - avoid touching gold contacts
- Place in anti-static bag if keeping
- Slot Preparation:
- Inspect slots for dust or debris
- Use compressed air to clean if necessary
- Verify slot clips are in fully open position
- Check for any physical damage to slots
- New DDR4 Memory Installation:
- Align offset notch in module with key in slot
- Insert module at 45-degree angle
- Press firmly until module seats completely
- Gently push down until side clips lock into place
- Listen for audible "click" indicating proper installation
- Dual-Channel Configuration:
- Install identical modules in both slots for best performance
- Match capacity, speed, and timing specifications
- If using different sizes, install larger module in primary slot
- Verify both modules are securely installed
⚡ DDR4 Performance Advantages
- Architectural Improvements:
- Higher data transfer rates (up to 3200MT/s)
- Lower power consumption (1.2V vs 1.5V DDR3)
- Improved reliability and error correction
- Better signal integrity at higher speeds
- Real-World Benefits:
- Web Browsing: More tabs without slowdown or reloading
- Office Applications: Faster document processing and switching
- Multitasking: Smooth performance with multiple apps open
- System Responsiveness: Reduced lag and stuttering
📈 RAM Speed Performance Comparison
| Memory Speed | Application Performance | Multitasking Improvement | Gaming Performance | Price Difference |
|---|---|---|---|---|
| 2400MHz | Baseline | Good | Baseline | 0% |
| 2666MHz | +3-5% | +4-6% | +2-4% | 5-10% |
| 3200MHz | +6-9% | +7-11% | +5-8% | 15-25% |
✅ Post-Installation Verification
- Initial Boot Test:
- Reconnect battery and power adapter
- Power on laptop and listen for beep codes
- Watch for Lenovo splash screen
- Note any error messages or failure to boot
- BIOS Recognition:
- Enter BIOS (F2 or Fn+F2 during boot)
- Navigate to Memory Information section
- Verify total memory capacity is recognized
- Check memory speed and timing settings
- Confirm dual-channel mode if applicable
- Operating System Verification:
- Boot to Windows and open System Properties
- Verify installed memory matches expected capacity
- Run CPU-Z and check Memory and SPD tabs
- Confirm operating speed and timings
- Stress Testing:
- Run Windows Memory Diagnostic tool
- Open multiple applications simultaneously
- Monitor for crashes or application errors
- Test with your typical workload patterns
🔍 Troubleshooting Common RAM Issues
| Issue | Symptoms | Immediate Solution | Advanced Resolution |
|---|---|---|---|
| No Boot/Black Screen | Laptop powers on but no display | Reseat modules, try one module at a time | Update BIOS, check compatibility list |
| Reduced Capacity | Only partial memory recognized | Check both slots, clean contacts, reseat modules | Test modules individually, check for slot damage |
| System Instability | Random crashes or blue screens | Run memory diagnostics, check compatibility | Adjust BIOS timings, test with different modules |
| Wrong Speed Detection | Memory running at lower speed | Update BIOS to latest version | Check JEDEC compatibility, enable XMP if supported |
| Intermittent Detection | Memory detected sometimes but not always | Clean contacts, ensure proper seating | Check for bent pins, test different slots |
🏆 Recommended DDR4 Kits for 14s Yoga
- Best Overall Value:
- Crucial 8GB DDR4 3200MHz
- Excellent compatibility with Lenovo systems
- Plug and Play operation
- Reliable performance and good warranty
- Popular Upgrade Choice:
- Kingston 16GB DDR4 2666MHz
- Ideal for single-slot upgrades
- Good balance of performance and price
- Widely compatible and reliable
- Maximum Performance:
- Crucial 32GB (2x16GB) DDR4 3200MHz
Maximum supported capacity for compatible models Future-proof for demanding applications Excellent for power users and content creation
📊 Real-World Performance Impact
- 4GB vs 8GB Comparison:
- Web Browsing: 50% fewer page reloads with multiple tabs
- Application Switching: 65% faster switching between apps
- File Operations: 40% faster file compression/extraction
- System Responsiveness: 55% improvement in overall smoothness
- 8GB vs 16GB Comparison:
- Multitasking: Run 2-3x more applications simultaneously
- Browser Tabs: 3-4x more tabs without slowdown
- Photo Editing: 45% faster processing of large images
- Virtual Machines: Possible to run VMs without system lag
💡 RAM Capacity Recommendations
| Usage Scenario | Recommended RAM | Typical Applications | Future Proofing | Cost Efficiency |
|---|---|---|---|---|
| Basic Computing | 8GB Total | Web browsing, email, office apps | Good for 2-3 years | ⭐️⭐️⭐️⭐️⭐️ |
| Student/Office | 12GB-16GB Total | Multiple apps, research, documents, video calls | Excellent for 3-4 years | ⭐️⭐️⭐️⭐️ |
| Content Creation | 16GB-20GB Total | Photo editing, light video work, graphic design | Good for 2-3 years | ⭐️⭐️⭐️⭐️ |
| Power User | 32GB Total | Virtual machines, development, heavy multitasking | Future proof for 4+ years | ⭐️⭐️⭐️ |
💰 RAM Upgrade Resale Value
| RAM Configuration | Upgrade Cost | Value Added | ROI Percentage | Buyer Appeal |
|---|---|---|---|---|
| 4GB (Stock) | $0 | $0 | N/A | Basic |
| 8GB Upgrade | $30-50 | $40-70 | 120-150% | Good |
| 16GB Upgrade | $50-80 | $70-110 | 130-150% | Excellent |
| 32GB Upgrade | $90-140 | $120-180 | 120-140% | Premium |
8. Fan Replacement & Thermal Maintenance for Lenovo 14s Yoga
❄️ Essential Thermal Management for 2-in-1 Performance
Proper cooling system maintenance is crucial for your Lenovo 14s Yoga's performance and longevity. Regular cleaning and thermal paste replacement prevent overheating, reduce fan noise, and maintain optimal system performance during intensive computing tasks.
📊 Cooling System Specifications
| Component | Specifications | Function | Maintenance Frequency |
|---|---|---|---|
| Cooling Fan | Single centrifugal fan, 5V DC | Active airflow through heatsink | Clean every 6-12 months |
| Heatsink Assembly | Copper heat pipes, aluminum fins | Heat transfer from CPU/GPU | Clean every 12-24 months |
| Thermal Paste | Standard thermal compound | Heat transfer interface | Replace every 2-3 years |
| Air Vents | Multiple intake/exhaust ports | Airflow management | Clean every 3-6 months |
| Fan Connector | 4-pin PWM connector | Speed control and monitoring | Check during maintenance |
⚠️ When Cooling Maintenance is Needed
- Performance Symptoms:
- Frequent thermal throttling during use
- Unexpected system slowdowns under load
- High CPU/GPU temperatures (>85°C)
- Fan constantly running at high speed
- System overheating during normal tasks
- Audible Warning Signs:
- Grinding, rattling, or scraping fan noises
- Whining, buzzing, or whirring sounds
- Intermittent fan operation or stopping
- Louder than normal fan operation
- Vibration or humming from fan area
- Physical Indicators:
- Excessive heat from keyboard or chassis
- Dust accumulation visible in vents
- Reduced airflow from exhaust ports
- Laptop feels unusually hot to touch
🛠️ Pre-Maintenance Preparation
- Required Tools:
- Phillips #00 screwdriver
- Plastic spudgers and pry tools
- Compressed air or electric duster
- High-quality thermal paste ($8-15)
- Isopropyl alcohol (90%+) and lint-free wipes
- Cotton swabs for detailed cleaning
- Safety Equipment:
- Anti-static wrist strap (recommended)
- Clean, well-lit work surface
- Good ventilation for dust removal
- Safety glasses for eye protection
- Recommended Thermal Paste:
- Arctic MX-4 or MX-6 (excellent performance)
- Noctua NT-H1 or NT-H2
- Thermal Grizzly Kryonaut (high performance)
- Cooler Master MasterGel Maker
🔧 Step-by-Step Fan Replacement
- Access Cooling System:
- Remove back cover (10-12 Phillips #00 screws)
- Disconnect battery from motherboard
- Locate cooling fan and heatsink assembly
- Identify fan connector and mounting points
- Take photos of original configuration
- Fan Removal:
- Disconnect fan cable from motherboard
- Remove 2-4 Phillips #00 screws securing fan
- Gently lift fan assembly from heatsink
- Note cable routing for reassembly
- Inspect fan blades and bearing for damage
- Heatsink Removal (If Needed):
- Remove 4-6 Phillips #00 screws in sequence
- Work in star pattern to avoid warping
- Gently lift heatsink straight up
- Note any stubborn areas requiring careful prying
- Set heatsink aside for cleaning
- New Fan Installation:
- Position new fan aligning with mounting points
- Secure with mounting screws (don't overtighten)
- Route cable following original path
- Connect fan cable to motherboard
- Ensure connector clicks into place
🔥 Thermal Paste Replacement Guide
- Surface Preparation:
- Clean CPU and GPU surfaces with isopropyl alcohol
- Use lint-free wipes or coffee filters
- Remove all old thermal compound completely
- Ensure surfaces are clean and dry
- Avoid touching cleaned surfaces with fingers
- Paste Application Methods:
- Pea Method: Small pea-sized dot in center (recommended)
- Line Method: Thin line across die (for rectangular CPUs)
- Spread Method: Thin, even layer using applicator
- X Method: X pattern for larger surfaces
- Heatsink Reinstallation:
- Lower heatsink straight down onto CPU/GPU
- Apply even pressure during installation
- Tighten screws in star pattern gradually
- Follow manufacturer torque specifications
- Don't overtighten - snug is sufficient
🧹 Comprehensive Cleaning Procedures
- Fan Cleaning:
- Use compressed air to blow out dust from blades
- Clean blades with isopropyl alcohol and cotton swabs
- Check bearing for smooth rotation
- Lubricate if accessible (most are sealed)
- Ensure fan spins freely without resistance
- Heatsink Cleaning:
- Blow compressed air through fins from both sides
- Use soft brush to dislodge stubborn dust
- Clean heat pipe surfaces thoroughly
- Check for bent fins and straighten if needed
- Ensure all dust is removed from fin array
- Vent Cleaning:
- Clean intake and exhaust vents with compressed air
- Use vacuum with brush attachment for external vents
- Ensure no obstructions in airflow paths
- Check dust filters if present
🌡️ Temperature Improvement Benchmarks
| Maintenance Task | Before Temperatures | After Temperatures | Improvement | Performance Impact |
|---|---|---|---|---|
| Dust Cleaning Only | 85-95°C under load | 75-85°C under load | 10-12°C reduction | Eliminates minor throttling |
| Thermal Paste Replacement | 80-90°C under load | 70-80°C under load | 8-12°C reduction | Prevents thermal throttling |
| Complete Maintenance | 90-100°C under load | 65-75°C under load | 20-30°C reduction | Maximum performance sustained |
| New Fan Installation | 85-95°C with noisy fan | 70-80°C quiet operation | 15-18°C reduction | Quiet, efficient cooling |
🔍 Cooling System Troubleshooting
| Issue | Symptoms | Immediate Solution | Advanced Resolution |
|---|---|---|---|
| Fan Not Spinning | Overheating, no fan noise | Check fan connection, test with external power | Replace fan, check motherboard fan header |
| Loud Fan Noise | Grinding, scraping sounds | Clean fan, check for obstructions | Replace fan bearing or entire fan assembly |
| Intermittent Cooling | Fan starts/stops randomly | Check thermal sensors, update BIOS | Replace thermal sensors, check motherboard |
| Poor Heat Transfer | High temps despite fan working | Replace thermal paste, clean heatsink | Check heatsink contact, replace if warped |
🔧 Replacement Parts Guide
- Fan Assembly Sources:
- Lenovo Genuine Parts
- Authorized Lenovo parts distributors
- Reputable third-party suppliers
- Ensure correct part number for your model
- Part Number Verification:
- Check laptop serial number on bottom label
- Verify model number compatibility
- Match connector type and cable length
- Check mounting hole alignment
- Quality Considerations:
- Genuine Lenovo: Perfect fit, guaranteed compatibility
- OEM Equivalent: Good quality, lower cost
- Third-party: Variable quality, check reviews carefully
- Avoid used fans from questionable sources
✅ Post-Maintenance Testing
- Initial Function Test:
- Reconnect battery and power adapter
- Power on and listen for fan operation
- Verify fan spins up during boot
- Check for unusual noises or vibrations
- Temperature Monitoring:
- Use HWiNFO for temperature monitoring
- Check idle temperatures (should be 40-50°C)
- Monitor load temperatures during stress tests
- Verify fan speed control is working properly
- Stress Testing:
- Run CPU stress test for 15-30 minutes
- Monitor for thermal throttling
- Check that temperatures stabilize
- Verify fan responds appropriately to load
🛡️ Preventative Maintenance Schedule
- Monthly Maintenance:
- External vent cleaning with compressed air
- Check for unusual fan noises
- Monitor system temperatures
- Quarterly Maintenance:
- Thorough external cleaning
- Check airflow from vents
- Monitor fan performance
- Annual Maintenance:
- Internal cleaning (back cover removal)
- Fan and heatsink dust removal
- Complete thermal system inspection
- Biannual Maintenance:
- Thermal paste replacement
- Comprehensive cooling system service
- Fan bearing inspection and lubrication if possible
💰 Cooling Maintenance Cost-Benefit
| Maintenance Type | DIY Cost | Professional Cost | Performance Gain | Lifespan Extension |
|---|---|---|---|---|
| Basic Cleaning | $5-10 (materials) | $50-80 | 10-15% performance | 6-12 months |
| Thermal Paste | $8-15 (paste) | $80-120 | 15-20% performance | 12-24 months |
| Fan Replacement | $25-45 (part) | $120-180 | Eliminates overheating | 2-3 years |
| Complete Service | $40-70 total | $200-300 | 25-30% performance | 3-4 years |
9. LCD Screen & Touch Digitizer Replacement for Lenovo 14s Yoga
🖥️ Essential 2-in-1 Display Maintenance
The Lenovo 14s Yoga features a sophisticated display assembly that combines LCD panel, touch digitizer, and protective glass. Proper replacement techniques ensure your 2-in-1 device maintains its versatile functionality across all usage modes.
📊 14s Yoga Display Specifications
| Specification | Common Models | Upgrade Options | Visual Impact |
|---|---|---|---|
| Screen Size | 14.0" | 14.0" | Standard convertible size |
| Resolutions | FHD (1920x1080) | FHD IPS, Touch Options | Sharp, clear image quality |
| Panel Technology | IPS | IPS, Touchscreen | Excellent colors and viewing angles |
| Touch Technology | 10-point capacitive | 10-point capacitive | Precise touch interaction |
| Refresh Rate | 60Hz | 60Hz | Smooth for everyday use |
| Brightness | 250-300 nits | 300-400 nits (upgrade) | Better outdoor visibility |
🔍 Display Compatibility Verification
- Physical Requirements:
- Size: 14.0" diagonal
- Bezel Compatibility: Must match original bezel cutout
- Thickness: 2.8-3.2mm maximum
- Mounting Points: Standard 14" Yoga pattern
- Electrical Compatibility:
- Interface: 30-pin or 40-pin eDP
- Touch Connector: Specific to Yoga models
- Voltage: 3.3V logic, backlight specific
- Cable Length: Must reach through hinges
- Verified Compatible Panels:
- Innolux N140HCA-EAC (FHD IPS Touch)
- BOE NV140FHM-N61 (FHD IPS)
- LG LP140WFA-SPD1 (FHD IPS)
- AUO B140HAK02.0 (FHD Touch)
⚠️ When to Replace Your Display
- Physical Damage:
- Cracked or shattered glass
- Deep scratches affecting visibility
- Pressure marks or white spots
- Liquid damage to display
- Separating layers in display assembly
- Display Issues:
- Lines, patterns, or dead pixels
- Flickering or intermittent display
- Backlight failure or uneven lighting
- Color distortion or fading
- Touch response problems
- Touch Function Problems:
- Non-responsive touch areas
- Ghost touching or erratic behavior
- Calibration issues
- Digitizer not detected by system
🛠️ Pre-Installation Preparation
- Required Tools:
- Plastic spudgers and guitar picks
- Phillips #00 screwdriver
- Small suction cups (highly recommended)
- Double-sided adhesive tape (1mm)
- Isopropyl alcohol and lint-free wipes
- Heat gun or hair dryer (for adhesive)
- Safety Equipment:
- Clean, soft work surface
- Good lighting and magnification
- ESD precautions
- Patience and careful handling
- Testing Preparation:
- Test new panel before installation
- Have external monitor ready for reference
- Prepare workspace for delicate work
- Clear ample working space
🔧 Step-by-Step Display Replacement
- Bezel Removal:
- Start from bottom edge near hinge area
- Apply gentle heat to soften adhesive (if present)
- Insert plastic spudger at 45-degree angle
- Work around entire perimeter slowly and carefully
- Listen for soft clicks as clips release
- Be extremely careful near webcam and sensors
- Display Mounting Screw Removal:
- Remove 4-6 Phillips #00 screws securing display
- Note screw lengths and exact positions
- Keep screws organized in labeled containers
- Take photos of screw locations and cable routing
- Note any special mounting brackets
- Display Cable Disconnection:
- Identify eDP display cable connector
- Locate touch digitizer cable connector
- Gently lift locking mechanisms using spudger
- Slide cables straight out - never pull at angle
- Disconnect webcam and microphone cables if present
- Old Panel Removal:
- Support display assembly with both hands
- Lift straight out from hinge brackets
- Check for any adhesive or additional connections
- Set old panel aside safely on soft surface
- Clean frame thoroughly with isopropyl alcohol
- New Panel Installation:
- Clean frame with isopropyl alcohol
- Apply new double-sided adhesive if needed
- Connect display cable to new panel
- Connect touch digitizer cable
- Align panel with mounting points carefully
- Secure with mounting screws in correct sequence
- Bezel Reinstallation:
- Start from top edge and work downward
- Press clips into place with even pressure
- Verify all clips are fully engaged
- Check for gaps or misalignment
- Ensure bezel sits flush with display
🌈 Display Technology Comparison
- IPS Panel Advantages:
- Superior color accuracy and consistency
- Excellent viewing angles (178°/178° typical)
- Better contrast ratios than TN panels
- More consistent image quality across panel
- Touchscreen Considerations:
- Requires compatible digitizer cable
- May need different display cables than non-touch
- Check motherboard touch controller support
- Additional cost but essential for Yoga functionality
- Quality Indicators:
- Minimal backlight bleed
- Even backlight distribution
- No dead or stuck pixels
- Smooth, responsive touch operation
🔌 Cable Connection Guide
- Display Cable Identification:
- Locate eDP cable running from motherboard
- Identify locking mechanism type
- Note cable routing through hinges
- Check for any cable damage or wear
- Touch Digitizer Cable:
- Separate cable for touch functionality
- Different connector than display cable
- Essential for 2-in-1 operation
- Route carefully to avoid pinching
- Proper Connection:
- Ensure cables are fully seated in connectors
- Locking mechanisms must click into place
- Cables should lie flat without tension
- Route cables away from moving parts
- Cable Routing:
- Follow original cable path exactly
- Use existing cable retention clips
- Ensure no pinching in hinge mechanism
- Leave slight slack for hinge movement
✅ Post-Installation Testing
- Pre-Assembly Test:
- Connect new panel before final assembly
- Power on laptop to test functionality
- Check for dead pixels or display issues
- Verify touch functionality if applicable
- Test all display modes and resolutions
- Display Quality Check:
- Test at different brightness levels
- Check for uniform backlight distribution
- Look for color consistency across screen
- Verify viewing angles and color accuracy
- Functional Testing:
- Test hinge movement and stability
- Verify webcam and microphone operation
- Check auto-rotation in convertible modes
- Test touch accuracy and multi-touch gestures
🔍 Display Replacement Troubleshooting
| Issue | Symptoms | Immediate Solution | Advanced Resolution |
|---|---|---|---|
| No Display | Black screen, backlight may work | Reseat eDP cable, check connections | Test with external monitor, check GPU |
| Flickering | Screen flickers or flashes | Check cable seating, update drivers | Replace eDP cable, check inverter |
| Color Issues | Wrong colors or banding | Update graphics drivers, check cable | Replace panel, check color profile |
| Touch Not Working | Touchscreen unresponsive | Check digitizer cable connection | Install touch drivers, check hardware |
| Backlight Problems | Dim or no backlight | Check backlight cable, brightness settings | Replace backlight inverter or LED strips |
🏆 Recommended Replacement Panels
- Best Overall Replacement:
- Innolux N140HCA-EAC
- 1920x1080 resolution, IPS technology with touch
- Good color accuracy and viewing angles
- Widely compatible with Yoga 14s models
- Premium Upgrade:
- LG LP140WFA-SPD1
- 1920x1080 IPS with excellent color reproduction
- Bright and vibrant display quality
- Great for media consumption and creative work
- Touchscreen Upgrade:
- AUO B140HAK02.0
- Full HD touchscreen panel with 10-point touch
- Maintains full Yoga convertible functionality
- Check compatibility with your specific model
💰 Display Upgrade Resale Value
| Display Configuration | Upgrade Cost | Value Added | ROI Percentage | Buyer Appeal |
|---|---|---|---|---|
| FHD Non-Touch (Stock) | $0 | $0 | N/A | Basic |
| FHD IPS Replacement | $80-120 | $100-150 | 120-140% | Good |
| Touchscreen Upgrade | $120-180 | $150-220 | 120-140% | Excellent |
| High-Brightness IPS | $150-220 | $180-260 | 110-130% | Premium |
10. Where to Sell Your Upgraded Lenovo 14s Yoga
💰 Maximize Your 2-in-1 Investment Return
After completing your comprehensive DIY upgrades, your Lenovo 14s Yoga has significantly increased value and appeal. Choosing the right selling platform can transform your upgraded device into maximum profit while reaching the perfect audience for premium refurbished laptops.
🎯 Pre-Sale Preparation Checklist
- Data Security & System Reset:
- Backup all personal files and data to external drive
- Perform factory reset using Lenovo Recovery Media
- Remove all accounts (Microsoft, Google, iCloud)
- Clean install Windows 10/11 for fresh start
- Install essential drivers and updates
- Physical Presentation Excellence:
- Thoroughly clean exterior, keyboard, and screen
- Polish display with appropriate screen cleaner
- Test all 360° hinge positions for smooth operation
- Take high-quality photos from multiple angles
- Include photos showing upgrade components and receipts
- Professional Documentation Package:
- Create detailed list of all upgrades performed
- Include before/after performance metrics and benchmarks
- Provide original purchase receipt if available
- Document remaining warranty information
- Include thermal paste replacement certification if applicable
🎓 Premium Institutional & Specialized Buyers
| Platform | Best For | Payout Speed | Commission/Fees | Recommendation |
|---|---|---|---|---|
| SellLaptopBack | Quick, hassle-free premium sales | 24-48 hours | No fees, free shipping included | ⭐️⭐️⭐️⭐️⭐️ (Top Choice) |
| SellLaptopBack | Environmentally conscious premium sales | 3-5 business days | No hidden fees, competitive offers | ⭐️⭐️⭐️⭐️ (Excellent) |
| .gov/.edu Programs | Institutional bulk buyers | 30-45 days | Typically no fees | ⭐️⭐️⭐️⭐️ (High Value Potential) |
| Corporate IT Buyback | Business-grade device purchases | 15-30 days | 5-10% commission | ⭐️⭐️⭐️ (Good for bulk) |
🛒 Popular Online Marketplaces
| Platform | Audience Size | Seller Protection | Fees | Best For |
|---|---|---|---|---|
| eBay | Global massive audience | Good protection policies | 12.9% + $0.30 | Auction-style competitive bidding |
| Facebook Marketplace | Local community | Minimal protection | No listing fees | Quick local cash sales |
| Swappa | Tech-savvy buyers | Excellent protection | 3% PayPal fee + $10-20 | Premium tech sales |
| Mercari | Growing user base | Good buyer/seller protection | 10% selling fee | Easy mobile sales |
💵 Smart Pricing Strategy for Upgraded Devices
- Comprehensive Market Research:
- Search completed eBay listings for similar upgraded models
- Check local Facebook Marketplace prices for Yoga devices
- Research Swappa recent sales data for 14s Yoga
- Compare with refurbished models from major retailers
- Monitor Buy It Now prices for comparable devices
- Value Calculation Formula:
- Base laptop value (check completed sales for stock models)
- Add 80-100% of upgrade component costs
- Factor in cosmetic condition (Excellent/Good/Fair)
- Include remaining warranty value
- Add premium for 2-in-1 functionality and touchscreen
- Realistic Pricing Examples:
- Base Model (8GB/256GB): $350-450
- With 16GB RAM + 1TB SSD Upgrades: $500-650
- Fully Refurbished + All Upgrades: $600-750
- Premium Touchscreen with Max Specs: $650-800
📈 Premium Listing Optimization
- Title Optimization Strategy:
- "Lenovo Yoga 14s - [RAM]GB RAM, [SSD]GB SSD - Professionally Upgraded"
- Include key specs: "14" FHD Touch, i5/i7, 16GB, 1TB SSD"
- Add selling points: "Fresh Thermal Paste, New Battery, 360° Hinge"
- Mention condition: "Like New, Professionally Upgraded & Tested"
- Professional Photo Best Practices:
- Clean, well-lit photos against neutral background
- Show laptop from all angles (all 4 hinge positions)
- Include photos of upgrade components and receipts
- Demonstrate screen quality with test images
- Show touch functionality in action
- Compelling Description Essentials:
- List all upgrades with component brands and specifications
- Include performance improvements (boot time, benchmark scores)
- Mention recent maintenance (thermal paste, cleaning, calibration)
- Be honest about any cosmetic imperfections
- Highlight 2-in-1 versatility and premium features
🏆 Premium Selling Platforms Deep Dive
Why Choose Specialized Buyers for Upgraded Devices?
- SellLaptopBack Advantages:
- Instant online price quotes for upgraded devices
- Free shipping labels and packaging provided
- Payment within 24 hours of device inspection
- No fees or commissions on final sale price
- Excellent reputation for fair upgraded device valuations
- SellLaptopBack Benefits:
- Environmentally responsible recycling and resale
- Competitive pricing for professionally upgraded units
- Simple three-step selling process
- Data security guarantee and certification
- Strong customer service reputation
- Institutional Programs (.gov/.edu):
- Higher prices for bulk educational purchases
- Stable, reliable institutional buyers
- Often purchase upgraded units at significant premium
- Check local government surplus programs
- University IT department buyback programs
⏱️ Expected Selling Timeline
| Platform | Time to Sale | Time to Payment | Effort Level | Risk Level |
|---|---|---|---|---|
| SellLaptopBack/SellLaptopBack | 1-3 days | 24-48 hours after receipt | ⭐️⭐️ (Low) | ⭐️ (Very Low) |
| Facebook Marketplace | 1-7 days | Immediate (cash) | ⭐️⭐️⭐️⭐️ (High) | ⭐️⭐️⭐️⭐️ (High) |
| eBay Auction | 3-10 days | 2-3 days after sale | ⭐️⭐️⭐️ (Medium) | ⭐️⭐️⭐️ (Medium) |
| Swappa | 2-14 days | 3-5 days after delivery | ⭐️⭐️⭐️ (Medium) | ⭐️⭐️ (Low) |
🛡️ Safety & Security Considerations
- Local Meetup Safety Protocol:
- Meet in public places (police stations, banks, coffee shops)
- Bring a friend or family member to transactions
- Accept cash only for local sales
- Test device with buyer present to demonstrate functionality
- Use designated safe exchange zones if available
- Online Payment Security:
- Use PayPal Goods & Services for buyer/seller protection
- Avoid wire transfers, gift cards, or unusual payment methods
- Ship with tracking and insurance for full value
- Document device condition with photos before shipping
- Use signature confirmation for high-value items
- Data Protection Assurance:
- Triple-check all personal data is completely wiped
- Remove device from your Microsoft account
- Deauthorize from any software licenses or subscriptions
- Keep backup of your data on separate external storage
- Provide data wipe certification if possible
💎 Maximizing Your Sale Price
- Premium Bundle Value-Adds:
- Include original charger, packaging, and documentation
- Add premium laptop bag or sleeve
- Include USB-C hub or other useful accessories
- Provide printed upgrade documentation and receipts
- Include screen protector or keyboard cover
- Highlight Upgrade Benefits Effectively:
- Emphasize performance improvements with specific metrics
- Mention extended lifespan and reliability from upgrades
- Highlight significant cost savings vs buying new equivalent
- Show before/after benchmark results and boot times
- Demonstrate 2-in-1 functionality across all modes
- Professional Presentation Excellence:
- Clean, professional, high-resolution photos
- Well-written, detailed, and honest description
- Quick, professional response to buyer inquiries
- Positive seller reputation building through communication
- Comprehensive testing and quality assurance documentation
📊 Final ROI Calculation Example
| Investment | Cost | Sale Price Impact | Net Profit | ROI Percentage |
|---|---|---|---|---|
| Base Laptop Purchase | $300 | - | - | - |
| RAM Upgrade (16GB) | $50 | +$70 | +$20 | 40% |
| SSD Upgrade (1TB NVMe) | $80 | +$110 | +$30 | 38% |
| Battery Replacement | $65 | +$85 | +$20 | 31% |
| Thermal Maintenance | $15 | +$25 | +$10 | 67% |
| Total Investment | $510 | $690 | +$180 | 35% Average ROI |
🎉 Congratulations on Your Successful Upgrade & Sale Journey!
You've not only extended the life of a premium 2-in-1 device through professional DIY upgrades but also created significant value in the refurbished market. Whether you choose the convenience of specialized buyers like SellLaptopBack or the potentially higher returns of competitive marketplace sales, your upgraded Lenovo 14s Yoga represents the perfect intersection of performance, value, and sustainability in today's computing market.
Ready for your next project? Consider repeating this profitable process with other quality laptops - your new repair and upgrade skills can become a sustainable hobby or side business in the growing refurbished technology market!
Need to Sell Your Lenovo Laptop? Get Instant Cash!
If your Lenovo Yoga 14s (or other Yoga model) has performance issues or you're upgrading to a newer laptop, we offer competitive cash payouts for your device. We buy broken, used, and refurbished Yoga laptops—including all 14s configurations—with free insured shipping and hassle-free evaluations.
Sell Popular Lenovo Models Now: