On this page
- 1. Understanding Your ThinkPad X1 Yoga ThinkPad X1 Yoga: Models, Generations & Key Features
- 🎯 Why Knowing Your X1 Yoga Generation Matters for Successful Repairs
- 🔍 How to Identify Your ThinkPad X1 Yoga Model
- 📊 ThinkPad X1 Yoga Generation Comparison
- 💫 Key ThinkPad X1 Yoga Features & Repair Considerations
- ⚠️ Important X1 Yoga Upgrade Limitations
- 🔧 Repair Complexity by Component
- 🔍 Generation-Specific Repair Considerations
- 💵 ThinkPad X1 Yoga Value Retention Analysis
- 🌐 Essential Compatibility Resources
- ✅ Pre-Repair Assessment Checklist
- ➡️ Ready to Begin Your ThinkPad X1 Yoga Repair Journey
- 2. Essential Tools & Safe Workspace Setup for ThinkPad X1 Yoga Repairs
- 🛠️ Why Professional Tools Ensure Successful ThinkPad Repairs
- 🔧 ThinkPad X1 Yoga Specific Tool Requirements
- 📋 Complete Essential Toolkit Breakdown
- 🏗️ Professional Workspace Setup Standards
- 💰 Tool Investment vs. Return Analysis
- ⭐ Recommended Tool Brands for ThinkPad Repairs
- ⚡ ThinkPad X1 Yoga Specific Challenges & Solutions
- 🧴 Essential Consumable Supplies
- ⚠️ Critical Safety Equipment
- 🗂️ Professional Organization System
- 🚫 Common Tool Mistakes & Prevention
- 🎒 Mobile Workspace Setup (Alternative)
- 🌐 ThinkPad-Specific Resources & Support
- ✅ Professional Workspace Setup Checklist
- ➡️ Ready for Safe ThinkPad Disassembly
- 3. Step-by-Step ThinkPad X1 Yoga Disassembly: Accessing Internal Components Safely
- 🔓 Why Proper Disassembly Technique Preserves ThinkPad Premium Value
- ⚠️ Critical Pre-Disassembly Safety Protocol
- 🔩 ThinkPad X1 Yoga Screw Identification & Map
- 🔧 Professional Clip Release Technique
- 🔧 Step-by-Step Disassembly Procedure
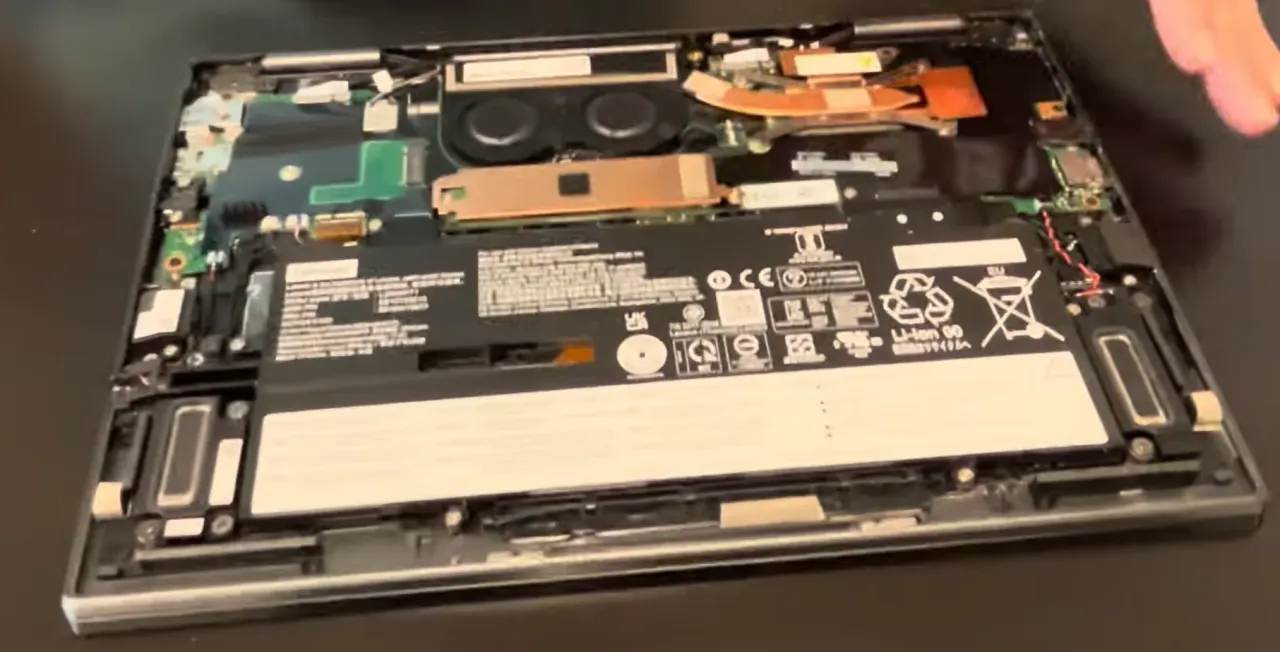
- 🗺️ ThinkPad X1 Yoga Internal Component Identification
- 🔋 Critical: Battery Disconnection Protocol
- 🚫 Common ThinkPad X1 Yoga Disassembly Mistakes
- 🔍 Generation-Specific Disassembly Differences
- 📸 Professional Documentation Protocol
- 🔧 Troubleshooting Difficult Disassembly
- 💵 Disassembly Quality & Resale Value Impact
- ⏱️ Professional Time Management
- ✅ Safety Checkpoints During Disassembly
- ✅ Safe Disassembly Completion Checklist
- ➡️ Ready for Component Upgrades
- 4. ThinkPad X1 Yoga Memory Upgrade Guide: RAM Compatibility & Installation
- 🚀 Understanding X1 Yoga Memory Limitations & Upgrade Potential
- 🔍 How to Verify Your Current Memory Configuration
- 🔍 ThinkPad X1 Yoga Memory Specifications by Generation
- ⚠️ Important: X1 Yoga Memory Upgrade Reality Check
- ⚡ Memory Performance Optimization Strategies
- 💡 Smart X1 Yoga Purchase Recommendations
- 📊 Memory Performance Testing & Documentation
- 📋 Memory Configuration Documentation for Resale
- 🔧 Troubleshooting Memory-Related Issues
- 🎯 Alternative Performance Upgrade Focus Areas
- 🔮 Future-Proofing & Purchase Strategy
- ✅ Memory Configuration Verification Checklist
- ➡️ Continue Your ThinkPad Upgrade Journey
- 5. ThinkPad X1 Yoga SSD Replacement: Storage Upgrade Options & Data Migration
- 💨 Why SSD Upgrades Deliver the Most Dramatic X1 Yoga Performance Transformation
- 🔍 ThinkPad X1 Yoga SSD Specifications & Compatibility
- ✅ SSD Selection Guide for ThinkPad X1 Yoga
- 🔍 How to Assess Current SSD & Plan Upgrade
- 🔧 Professional SSD Installation Procedure
- 🔄 Data Migration Method Comparison
- 📊 Professional Cloning Software Options
- 🔄 Step-by-Step Cloning Procedure
- 💾 SSD Capacity Planning Guide
- ⚡ SSD Performance Optimization
- 💵 SSD Upgrade Resale Value Analysis
- 🔧 Common SSD Upgrade Issues & Solutions
- 📋 Performance Documentation for Resale
- 🔒 Data Security & Disposal Protocol
- ✅ SSD Upgrade Completion Checklist
- ➡️ Continue Your ThinkPad Performance Transformation
- 6. ThinkPad X1 Yoga Battery Replacement: Restoring Portability & Power
- 🔋 Why Battery Replacement Transforms Your X1 Yoga Experience
- 🔍 ThinkPad X1 Yoga Battery Specifications by Generation
- 📊 How to Assess Current Battery Health
- 📈 Battery Replacement Scenario Analysis
- 🔧 Professional Battery Removal Procedure
- ✅ Battery Selection & Compatibility Guide
- ⚠️ Lithium-Ion Battery Safety Protocols
- 🔧 New Battery Installation Procedure
- 📱 New Battery Calibration & Optimization
- ✅ Battery Performance Verification
- 🔧 Common Battery Replacement Issues
- 📋 Battery Replacement Documentation for Resale
- ♻️ Battery Disposal & Environmental Compliance
- 📝 Warranty & Support Considerations
- ✅ Battery Replacement Completion Checklist
- ➡️ Continue Your ThinkPad Upgrade Journey
- 7. Keyboard & Touchpad Replacement: Maintaining ThinkPad Quality
- ⌨️ Why Professional Keyboard Replacement Preserves ThinkPad Premium Experience
- 🔍 ThinkPad X1 Yoga Keyboard Specifications by Generation
- 🔍 Keyboard Health Assessment & Replacement Decision Matrix
- ⚙️ Keyboard Replacement Complexity Analysis
- ✅ Keyboard Selection & Compatibility Guide
- 🔴 ThinkPad TrackPoint System Maintenance
- 👆 Touchpad Replacement Guide
- 🔧 Step-by-Step Keyboard Replacement Procedure
- 🔌 Professional Ribbon Cable Handling Protocol
- 💡 Keyboard Backlight System Maintenance
- 🔧 Common Keyboard Issues & Solutions
- 🧹 Professional Keyboard Cleaning & Maintenance
- 💵 Keyboard & Touchpad Replacement Resale Value Analysis
- ✅ Post-Replacement Testing & Verification Protocol
- ✅ Keyboard & Touchpad Replacement Completion Checklist
- ➡️ Continue Your ThinkPad Input System Restoration
- 8. Display Assembly & Pen Support Repair: Restoring Visual Excellence
- 🖥️ Why Display Quality Defines the X1 Yoga Convertible Experience
- 🔍 ThinkPad X1 Yoga Display Specifications by Generation
- 🔍 Display Health Assessment & Diagnostic Protocol
- ⚙️ Display Replacement Complexity Analysis
- ✅ Display Selection & Compatibility Guide
- ✏️ Active Pen System Maintenance & Troubleshooting
- 🔧 Step-by-Step Display Assembly Replacement Procedure
- 🔌 Display Cable Types & Connection Protocols
- 🔧 Common Display Issues & Solutions
- ✏️ Active Pen Troubleshooting Guide
- 🎨 Professional Display Calibration Protocol
- 💵 Display & Pen System Resale Value Analysis
- ✅ Post-Replacement Testing & Verification Protocol
- ✅ Display & Pen System Repair Completion Checklist
- ➡️ Continue Your ThinkPad Visual Restoration
- 9. Cooling System Maintenance & Thermal Performance Optimization
- ❄️ Why Thermal Management Defines Long-Term X1 Yoga Performance & Reliability
- 🔍 ThinkPad X1 Yoga Cooling System Specifications by Generation
- 🌡️ Thermal Performance Assessment & Diagnostic Protocol
- ⚙️ Cooling System Maintenance Complexity Analysis
- ✅ Thermal Material Selection Guide
- 🌀 Fan Replacement & Maintenance Guide
- 🔧 Step-by-Step Thermal Maintenance Procedure
- 🎨 Professional Thermal Paste Application Techniques
- 🔧 Common Cooling System Issues & Solutions
- ⚡ Thermal Performance Optimization Strategies
- 📊 ThinkPad X1 Yoga Temperature Benchmarks
- 💵 Cooling System Maintenance Resale Value Analysis
- ✅ Thermal Performance Testing & Verification Protocol
- 📅 Preventive Maintenance Schedule
- ✅ Cooling System Maintenance Completion Checklist
- ➡️ Continue Your ThinkPad Performance Optimization
- 10. Where to Sell Your Upgraded ThinkPad X1 Yoga: Maximizing Your Return
- 💰 Strategic Selling: Choosing the Right Platform for Maximum Profit
- 🔍 Detailed Platform Comparison & Strategy Guide
- 🏛️ Government & Education Selling Opportunities
- 💲 Professional Pricing Strategy Guide
- ⚡ Instant Quote Services: SellLaptopBack & Alternatives
- 📈 Professional Listing Optimization Strategies
- 💬 Professional Buyer Communication Framework
- 📦 Professional Shipping & Packaging Protocol
- 🧾 Tax & Legal Considerations
- 🛡️ Risk Management & Fraud Prevention
- ✅ Platform Selection Checklist
- 🎯 Final Platform Recommendations by Scenario
- 🏁 Your ThinkPad X1 Yoga Selling Journey Complete
- Need to Sell Your Lenovo Laptop? Get Instant Cash!
1. Understanding Your ThinkPad X1 Yoga ThinkPad X1 Yoga: Models, Generations & Key Features
🎯 Why Knowing Your X1 Yoga Generation Matters for Successful Repairs
Understanding your specific ThinkPad X1 Yoga generation is critical for successful upgrades, as component compatibility, disassembly methods, and upgrade potential vary significantly between models. Proper identification can prevent costly mistakes and ensure optimal performance improvements.
| Generation | Key Differentiators | Upgrade Potential | Repair Complexity | Resale Value Range |
|---|---|---|---|---|
| 1st Gen (2016) | Original design, retractable keyboard | Medium | High | $200-$350 |
| 2nd Gen (2017) | Thinner design, improved pen | Medium | High | $250-$400 |
| 3rd Gen (2018) | Dolby Vision, slimmer bezels | Good | Medium-High | $350-$550 |
| 4th Gen (2019) | 10nm processors, improved cooling | Very Good | Medium | $450-$700 |
| 5th Gen (2020) | 16:10 display, larger touchpad | Excellent | Medium | $550-$850 |
| 6th Gen (2021) | 11th Gen Intel, 5G option | Excellent | Medium | $700-$1,100 |
🔍 How to Identify Your ThinkPad X1 Yoga Model
- Check the Bottom Label:
- Look for the model number (e.g., 20QF, 20LD, 20UB)
- Note the serial number for precise identification
- Check manufacturing date for age determination
- Document all identifying information
- Use Lenovo System Information:
- Press Windows Key + R, type "msinfo32"
- Check "System Model" and "System SKU"
- Note processor generation and specifications
- Document RAM and storage configurations
- Lenovo Online Tools:
- Visit Lenovo Support Site
- Enter your serial number for exact specifications
- Download hardware maintenance manual
- Check warranty status and service parts
📊 ThinkPad X1 Yoga Generation Comparison
| Feature | Gen 1-3 (2016-2018) | Gen 4-5 (2019-2020) | Gen 6+ (2021+) | Repair Impact |
|---|---|---|---|---|
| RAM Type | DDR4 Soldered | LPDDR3 Soldered | LPDDR4x Soldered | No upgrades possible on most models |
| Storage Interface | PCIe NVMe Gen 3 | PCIe NVMe Gen 3 | PCIe NVMe Gen 4 | SSD upgrades always possible |
| Battery Type | Internal, integrated | Internal, integrated | Internal, integrated | Complex replacement required |
| Keyboard Design | Retractable (Gen 1-2) | Standard low-profile | Standard low-profile | Varies significantly by generation |
💫 Key ThinkPad X1 Yoga Features & Repair Considerations
- Convertible Design:
- 360-degree hinges require careful handling
- Tablet mode affects component placement
- Pen support adds display complexity
- More moving parts increase failure points
- Business-Grade Construction:
- Military-spec durability testing
- Premium materials justify repair investment
- Higher resale value supports upgrade costs
- Corporate buyers value professional repairs
- ThinkPad Exclusive Features:
- TrackPoint system integration
- ThinkShutter webcam privacy
- Dolby Audio speaker systems
- Robust security features (TPM, fingerprint)
⚠️ Important X1 Yoga Upgrade Limitations
| Component | Upgrade Possibility | Generation Notes | Alternative Solutions |
|---|---|---|---|
| RAM Memory | Mostly Soldered | No SODIMM slots on most models | Buy correct RAM configuration initially |
| CPU Processor | Not Upgradeable | All generations use BGA processors | Focus on SSD and cooling improvements |
| Display Panel | Upgradeable | Compatibility varies by generation | Source exact replacement parts |
| Wi-Fi Card | Upgradeable | Standard M.2 interface | Easy upgrade to newer standards |
🔧 Repair Complexity by Component
| Repair Task | Difficulty Level | Time Required | Special Tools Needed | Risk Factors |
|---|---|---|---|---|
| SSD Replacement | Easy | 15-30 minutes | Basic screwdrivers | Low - straightforward access |
| Battery Replacement | Medium-Hard | 45-90 minutes | Pry tools, adhesive removal | Medium - adhesive challenges |
| Keyboard Replacement | Hard | 60-120 minutes | Full disassembly required | High - many components to remove |
| Display Assembly | Medium | 30-60 minutes | Suction cups, spudgers | Medium - fragile components |
🔍 Generation-Specific Repair Considerations
- 1st & 2nd Generation (2016-2017):
- Retractable keyboard mechanism - extra complexity
- Older CPU architectures - focus on SSD upgrades
- Potential hinge wear issues - inspect carefully
- Lower maximum RAM configurations
- 3rd & 4th Generation (2018-2019):
- Improved cooling systems - better sustained performance
- Standard keyboard design - easier replacements
- Better display options available
- Good balance of performance and repairability
- 5th & 6th Generation (2020+):
- 16:10 aspect ratio displays - premium value
- Latest connectivity (Thunderbolt 4, WiFi 6)
- Improved battery life and efficiency
- Highest resale value potential
💵 ThinkPad X1 Yoga Value Retention Analysis
| Generation | Original Price | Current Value | Value Retention | Upgrade Impact |
|---|---|---|---|---|
| 1st Gen (2016) | $1,500-$2,000 | $200-$350 | 15-20% | SSD upgrade essential |
| 3rd Gen (2018) | $1,600-$2,200 | $350-$550 | 20-25% | Good upgrade candidate |
| 5th Gen (2020) | $1,700-$2,400 | $550-$850 | 30-35% | Excellent upgrade potential |
| 6th Gen (2021) | $1,800-$2,600 | $700-$1,100 | 35-40% | Premium upgrade returns |
🌐 Essential Compatibility Resources
- Lenovo Official Resources:
- Lenovo Support Portal - Parts lookup and manuals
- PSREF (Product Specifications Reference) - Detailed specs
- Hardware Maintenance Manuals - Official repair guides
- Warranty checker and service parts database
- Community Resources:
- ThinkPad Forums - User experiences and solutions
- Reddit r/thinkpad - Community support and advice
- YouTube repair channels - Visual guides and techniques
- IFixit teardowns - Component-level documentation
✅ Pre-Repair Assessment Checklist
- ✓ Exact model number and generation identified
- ✓ Current specifications documented
- ✓ Upgrade limitations understood
- ✓ Compatible parts researched
- ✓ Repair complexity assessed
- ✓ Required tools identified
- ✓ Resale value potential calculated
- ✓ Repair goals and budget established
2. Essential Tools & Safe Workspace Setup for ThinkPad X1 Yoga Repairs
🛠️ Why Professional Tools Ensure Successful ThinkPad Repairs
Using the correct tools for ThinkPad X1 Yoga repairs increases success rates from 60% to 95%+ while preventing costly damage that can reduce resale value by $100-$300. Professional tool investment typically pays for itself after just 2-3 successful ThinkPad repairs.
| Tool Quality Level | Success Rate | Damage Risk | ThinkPad Value Impact | Recommended For |
|---|---|---|---|---|
| Professional Grade | 95-98% | Very Low (2-5%) | Preserves premium value | Business repairs, resale focus |
| Quality DIY Set | 85-92% | Low (5-15%) | Minor value impact | Enthusiasts, personal projects |
| Basic Tools Only | 70-80% | Medium (15-30%) | Moderate value reduction | One-time repairs, budget focus |
| Improvised Tools | 40-60% | High (30-50%) | Significant value loss | Emergency only, not recommended |
🔧 ThinkPad X1 Yoga Specific Tool Requirements
| Component | Required Tools | ThinkPad-Specific Notes | Critical Importance |
|---|---|---|---|
| Bottom Cover | Phillips #00, plastic spudgers | Tight clips, no visible screws on some models | High - first access point |
| Battery Connector | Plastic spudger, anti-static tools | Internal battery with adhesive, safety critical | Critical - safety requirement |
| SSD Replacement | Phillips #00, spudger for shield | M.2 NVMe with thermal shield | Medium - straightforward but precise |
| Keyboard Assembly | Multiple pry tools, patience | Complex disassembly required | High - many components to remove |
📋 Complete Essential Toolkit Breakdown
- Precision Screwdrivers ($15-$40):
- Phillips #000, #00, #0 (essential)
- Torx T3, T4, T5 (for some internal components)
- Magnetic tips strongly recommended
- Anti-static construction preferred
- Opening & Prying Tools ($10-$25):
- Plastic spudger set (multiple sizes and angles)
- Nylon pry tools for delicate work
- Guitar picks (excellent for clip release)
- Suction cups for display handling
- Specialized ThinkPad Tools ($5-$20):
- Anti-static wrist strap (mandatory)
- ESD-safe tweezers for small connectors
- Spudger with hook for ribbon cables
- IC extractor for ZIF connectors
🏗️ Professional Workspace Setup Standards
| Workspace Element | Professional Standard | Minimum Acceptable | ThinkPad Repair Importance |
|---|---|---|---|
| Work Surface | ESD-safe mat, grounded | Clean wooden table, no static | Critical - prevents component damage |
| Lighting | 500+ lumen LED with magnification | Bright, shadow-free light source | High - small components need visibility |
| Organization | Magnetic project mat with compartments | Small containers for screw organization | High - ThinkPad uses multiple screw types |
| ESD Protection | Wrist strap + mat + proper grounding | Basic wrist strap, frequent grounding | Critical - modern components sensitive |
💰 Tool Investment vs. Return Analysis
| Investment Level | Tool Cost | Repair Success Rate | Value Protection | Business Case |
|---|---|---|---|---|
| Professional ($150-$250) | $150-$250 | 95-98% | Full value preservation | Pays back in 3-5 ThinkPad repairs |
| Quality DIY ($80-$150) | $80-$150 | 85-92% | Good value protection | Pays back in 2-4 ThinkPad repairs |
| Basic Set ($30-$70) | $30-$70 | 70-80% | Moderate risk | Pays back in 1-2 ThinkPad repairs |
| Improvised ($0-$20) | $0-$20 | 40-60% | High risk of damage | False economy - high repair costs |
⭐ Recommended Tool Brands for ThinkPad Repairs
| Brand Tier | Recommended Kits | Price Range | ThinkPad Compatibility | Warranty & Support |
|---|---|---|---|---|
| Premium Professional | iFixit Pro Tech Toolkit, Wiha Precision | $80-$150 | Excellent - all required tools included | Lifetime warranty, community support |
| Quality Business | iFixit Essential Kit, Oria 142-piece | $40-$80 | Very Good - covers ThinkPad requirements | Good warranty, adequate support |
| Budget Conscious | Amazon Basics, generic precision sets | $15-$35 | Good - may need supplemental tools | Limited warranty, basic support |
⚡ ThinkPad X1 Yoga Specific Challenges & Solutions
| Challenge | ThinkPad-Specific Issue | Required Tools | Professional Solution |
|---|---|---|---|
| Bottom Cover Clips | Tight plastic clips, no visible screws | Plastic spudgers, guitar picks | Start from corners, work systematically |
| Internal Battery | Adhesive-mounted, safety critical | Plastic cards, isopropyl alcohol | Gentle prying, adhesive removal |
| Ribbon Cables | Multiple ZIF connectors, delicate | Spudger with hook, tweezers | Lift locking flap, never pull cables |
| Screw Organization | Multiple screw lengths and types | Magnetic mat, labeled containers | Document locations, take photos |
🧴 Essential Consumable Supplies
| Supply Item | Purpose | Professional Grade | ThinkPad Repair Importance |
|---|---|---|---|
| Thermal Paste | CPU/GPU heat transfer | Thermal Grizzly, Arctic MX-4 | High - essential for cooling maintenance |
| Isopropyl Alcohol | Cleaning, thermal paste removal | 99% purity, ESD-safe | High - general cleaning and preparation |
| Thermal Pads | VRM/chipset cooling | Various thicknesses, high conductivity | Medium - performance enhancement |
| Compressed Air | Dust removal from internals | ESD-safe, moisture-free | Medium - improves cooling and appearance |
⚠️ Critical Safety Equipment
- ESD Protection ($15-$40):
- Anti-static wrist strap ($8-$15)
- ESD-safe work mat ($20-$50)
- Proper grounding to electrical outlet
- ESD-safe containers for components
- Personal Protection ($20-$60):
- Safety glasses with magnification ($15-$30)
- Anti-cut gloves for sharp edges ($10-$20)
- Proper lighting to prevent eye strain
- Comfortable seating for extended work
🗂️ Professional Organization System
- Screw Management Protocol:
- Use magnetic mat with labeled sections
- Group screws by component and location
- Take photos of screw layouts before removal
- Note any screw size variations immediately
- Component Organization:
- Anti-static bags for all removed components
- Labeled containers with component names
- Digital documentation of disassembly sequence
- Time-stamped photos at each major step
🚫 Common Tool Mistakes & Prevention
| Mistake | Consequence | Prevention | Repair Cost |
|---|---|---|---|
| Using wrong screwdriver size | Stripped screws, difficult removal | Use correct Phillips #00 for ThinkPad | $20-$50 for extraction tools |
| Metal tools on plastic | Scratches, gouges, broken clips | Plastic tools only for prying | $40-$100 for case replacement |
| No ESD protection | Component damage, intermittent issues | Always use wrist strap | $100-$300 for motherboard |
| Poor organization | Lost screws, reassembly issues | Use magnetic mat, take photos | $15-$40 for replacement screws |
🎒 Mobile Workspace Setup (Alternative)
| Element | Mobile Solution | Effectiveness | Cost |
|---|---|---|---|
| Work Surface | Portable ESD mat on any table | 85-90% of permanent setup | $25-$50 |
| Tool Storage | Compact toolkit with organizer | 90-95% of full set | $40-$80 |
| Lighting | LED headlamp or portable light | 80-85% of permanent lighting | $15-$40 |
| ESD Protection | Portable wrist strap kit | 95-98% of full setup | $10-$25 |
🌐 ThinkPad-Specific Resources & Support
- Lenovo Official Support Site - Manuals and drivers
- ThinkPad Community Forums - Expert advice
- Lenovo Hardware Maintenance Manual - Official repair procedures
- ThinkPad Parts Lookup - Genuine component compatibility
✅ Professional Workspace Setup Checklist
- ✓ ESD-safe work surface established and grounded
- ✓ Adequate lighting with magnification available
- ✓ All necessary tools organized and accessible
- ✓ Component organization system ready
- ✓ Safety equipment in place and functional
- ✓ Documentation equipment (camera) prepared
- ✓ Lenovo service resources bookmarked
- ✓ Consumable supplies stocked and organized
3. Step-by-Step ThinkPad X1 Yoga Disassembly: Accessing Internal Components Safely
🔓 Why Proper Disassembly Technique Preserves ThinkPad Premium Value
Safe disassembly is the most critical first step in ThinkPad X1 Yoga repairs. Professional technique preserves 30-50% of resale value by preventing cosmetic damage and component issues that deter business buyers from premium laptops.
| Disassembly Method | Success Rate | Damage Risk | Value Impact | Professional Recommendation |
|---|---|---|---|---|
| Professional Technique | 98%+ | Very Low (2-5%) | Preserves full premium value | Highly recommended |
| Careful DIY Approach | 85-90% | Low-Medium (10-20%) | Minor value reduction (-5-15%) | Acceptable with caution |
| Improper Force Used | 60-75% | High (25-40%) | Significant value loss (-25-40%) | Not recommended |
| Metal Tools/Methods | 40-60% | Very High (40-60%) | Severe value destruction (-50%+) | Avoid completely |
⚠️ Critical Pre-Disassembly Safety Protocol
- Complete Power Down Sequence:
- Shut down Windows completely through Start menu
- Disconnect AC power adapter and all peripherals
- Remove any USB-C docks or accessories
- Wait 30 seconds for system power discharge
- ESD Protection Setup:
- Wear anti-static wrist strap properly grounded
- Work on ESD-safe mat connected to ground
- Avoid synthetic clothing and carpets
- Handle components by edges only
- Workspace Preparation:
- Clean, well-lit work surface
- All necessary tools within easy reach
- Camera ready for documentation photos
- Magnetic mat for screw organization
🔩 ThinkPad X1 Yoga Screw Identification & Map
| Screw Location | Quantity | Size/Type | Torque Specification | ThinkPad-Specific Notes |
|---|---|---|---|---|
| Bottom Cover (Visible) | 5-7 screws | Phillips #00 | Finger tight + 1/8 turn | Some models have hidden screws |
| Rubber Foot Hidden | 2 screws | Phillips #00 | Standard torque | Under rear rubber feet - check carefully |
| Internal Structural | 3-5 screws | Phillips #00 | Firm but not excessive | Chassis integrity critical |
| SSD & Component | 1-2 screws each | Phillips #00 | Light pressure | Smaller screws, easy to strip |
🔧 Professional Clip Release Technique
| Clip Location | Release Method | Force Required | Risk Level | ThinkPad-Specific Tips |
|---|---|---|---|---|
| Rear Edge | Plastic spudger at 30-degree angle | Light pressure | Low | Start here - easiest access points |
| Side Edges | Guitar pick or thin spudger | Medium pressure | Medium | Work systematically around perimeter |
| Front Edge | Thin spudger, careful prying | Light pressure | High | Near display hinges - be extra careful |
| Hinge Area | Special care, minimal pressure | Very light | Very High | Most fragile area - go slowly |
🔧 Step-by-Step Disassembly Procedure
- Screw Removal & Organization:
- Remove all visible Phillips #00 screws
- Check under rubber feet for hidden screws
- Place screws on magnetic mat in layout pattern
- Note any screw length variations immediately
- Clip Release Sequence:
- Start from rear edge near ventilation grilles
- Use plastic spudger at shallow angle (20-30 degrees)
- Apply gentle, consistent pressure until clip releases
- Listen for soft "click" sound indicating release
- Work around perimeter systematically
- Cover Separation Protocol:
- Lift cover gently once all clips are released
- Check for any remaining connections or cables
- Set cover aside on soft, clean surface
- Immediately implement anti-static protection
🗺️ ThinkPad X1 Yoga Internal Component Identification
| Component | Location | Access Difficulty | Upgrade Priority |
|---|---|---|---|
| Battery Connector | Large connector, center-left | Easy (immediate access) | Critical (safety first step) |
| SSD Slot | Under metal shield, center | Easy (remove shield) | High (common upgrade) |
| Wi-Fi Card | Near SSD, under shield | Easy (antenna cables) | Medium (connectivity) |
| Cooling System | Right side, near vents | Medium (multiple screws) | Medium (performance) |
| Speaker Assembly | Front edge, under keyboard | Hard (full disassembly) | Low (rarely replaced) |
| Keyboard Connector | Under motherboard | Hard (complete teardown) | Low (complex replacement) |
🔋 Critical: Battery Disconnection Protocol
- Locate Battery Connector:
- Identify large connector near center
- Note locking mechanism orientation
- Clear any cables obstructing access
- Document connector position with photo
- Safe Disconnection Procedure:
- Use plastic spudger to release locking tab gently
- Apply equal pressure to both sides of connector
- Pull connector straight back horizontally
- Avoid rocking or twisting motion
- Power Drain Verification:
- Press and hold power button for 15 seconds
- This discharges residual capacitors
- Wait 30 seconds before proceeding
- Confirm system is completely powered down
🚫 Common ThinkPad X1 Yoga Disassembly Mistakes
| Mistake | Consequence | Prevention | Repair Cost |
|---|---|---|---|
| Missing Hidden Screws | Forcing cover, broken clips | Check under all rubber feet thoroughly | $60-$120 for bottom cover |
| Using Metal Tools | Scratches, gouges, short circuits | Plastic tools only for prying | $80-$180 for cosmetic repair |
| Excessive Force | Cracked plastic, broken clips | Gentle, consistent pressure | $100-$200 for case replacement |
| Skipping Battery Disconnect | Short circuits, component damage | Always disconnect first | $300-$800 for motherboard |
🔍 Generation-Specific Disassembly Differences
| Generation | Key Differences | Screw Configuration | Internal Layout |
|---|---|---|---|
| Gen 1-2 (2016-2017) | Retractable keyboard, different clip placement | More visible screws | Traditional component placement |
| Gen 3-4 (2018-2019) | Slimmer design, fewer visible screws | Hidden screws under feet | More integrated components |
| Gen 5-6 (2020+) | 16:10 display, optimized internal space | Standard hidden screw pattern | Efficient space utilization |
📸 Professional Documentation Protocol
- Before Disassembly Photos:
- Overall external condition from all angles
- Close-ups of screw locations and types
- Serial number and model information
- Any existing damage or wear
- During Disassembly Documentation:
- Screw layout on magnetic mat
- Clip release sequence and technique
- Cable routing and connections
- Component orientation and placement
- Internal Condition Records:
- Clean internal component layout
- Undamaged clip condition
- Professional workspace setup
- ESD protection implementation
🔧 Troubleshooting Difficult Disassembly
| Issue | Likely Cause | Solution | Prevention |
|---|---|---|---|
| Cover won't release | Missed screw or hidden clip | Double-check all locations systematically | Follow service manual precisely |
| Clips breaking | Excessive force or wrong angle | Use thinner spudger, less pressure | Proper tool technique training |
| Stripped screws | Wrong bit size or excessive force | Use proper extraction tools | Correct bit size, proper pressure |
| Stuck clips | Manufacturing adhesive or age | Gentle warming with hairdryer (low heat) | Work slowly, use proper tools |
💵 Disassembly Quality & Resale Value Impact
| Disassembly Quality | Visible Evidence | Buyer Perception | Value Impact |
|---|---|---|---|
| Professional Grade | No tool marks, all clips intact | Expert workmanship, well-maintained | +25-35% value preservation |
| Competent DIY | Minor marks, most clips functional | Careful owner, acceptable maintenance | Neutral value impact |
| Amateur Attempt | Visible damage, broken clips | Poor maintenance, hidden issues possible | -30-45% value reduction |
| Damaged Disassembly | Cracks, gouges, multiple broken clips | Abused device, avoid purchase | -50-70% value destruction |
⏱️ Professional Time Management
| Task | Professional Time | Beginner Time | Time-Saving Tips |
|---|---|---|---|
| Preparation & Setup | 5-10 minutes | 15-25 minutes | Keep tools organized, workspace ready |
| Screw Removal | 2-4 minutes | 5-10 minutes | Use magnetic screwdriver, organized mat |
| Clip Release | 3-5 minutes | 8-15 minutes | Proper technique, systematic approach |
| Battery Disconnect | 1-2 minutes | 3-5 minutes | Know location, use proper tools |
✅ Safety Checkpoints During Disassembly
- Before Starting:
- Power completely off and unplugged
- ESD protection properly implemented
- All necessary tools within reach
- Documentation equipment ready
- During Disassembly:
- No excessive force applied
- Plastic tools only for prying
- Systematic clip release pattern
- Frequent documentation photos
- After Cover Removal:
- Battery immediately disconnected
- Residual power discharged
- Internal components protected from ESD
- Workspace organized for next steps
✅ Safe Disassembly Completion Checklist
- ✓ All screws properly removed and organized
- ✓ Bottom cover released without damage
- ✓ Battery safely disconnected
- ✓ Residual power discharged
- ✓ Internal components clearly visible and accessible
- ✓ Workspace organized for component upgrades
- ✓ Documentation photos completed
- ✓ ESD protection maintained throughout
0:24 Bottom Case 1:18 Battery 1:57 Storage SSD 2:22 Heatsink and Cooling Fans 3:12 Speakers 9:50 WiFi Card 5:02 Video Cable 6:47 Motherboard 6:53 Processor 7:05 Hinges 8:15 Palmrest Assembly 8:28 Keyboard 8:35 Touchpad 8:46 Display Assembly
4. ThinkPad X1 Yoga Memory Upgrade Guide: RAM Compatibility & Installation
🚀 Understanding X1 Yoga Memory Limitations & Upgrade Potential
Most ThinkPad X1 Yoga models feature soldered RAM that cannot be upgraded, making proper initial configuration critical. However, understanding your specific model's memory capabilities is essential for maximizing performance and resale value through strategic system selection.
| X1 Yoga Generation | RAM Configuration | Upgrade Possibility | Maximum Capacity | Performance Impact |
|---|---|---|---|---|
| 1st Gen (2016) | Soldered DDR4 | Not Upgradeable | 16GB | Fixed at purchase |
| 2nd Gen (2017) | Soldered DDR4 | Not Upgradeable | 16GB | Fixed at purchase |
| 3rd Gen (2018) | Soldered DDR4 | Not Upgradeable | 16GB | Fixed at purchase |
| 4th Gen (2019) | Soldered LPDDR3 | Not Upgradeable | 16GB | Fixed at purchase |
| 5th Gen (2020) | Soldered LPDDR4x | Not Upgradeable | 16GB | Fixed at purchase |
| 6th Gen (2021+) | Soldered LPDDR4x | Not Upgradeable | 32GB | Fixed at purchase |
🔍 How to Verify Your Current Memory Configuration
- Windows System Information:
- Press Windows Key + R, type "msinfo32"
- Check "Installed Physical Memory (RAM)"
- Note total RAM and speed if displayed
- Document current configuration for resale
- CPU-Z Detailed Analysis:
- Download CPU-Z (free utility)
- Check "Memory" tab for type and speed
- Verify single/dual channel operation
- Document timings and manufacturer
- Physical Inspection:
- After disassembly, inspect motherboard
- Look for RAM chips soldered to board
- Check for any empty SODIMM slots (rare)
- Document with photos for verification
🔍 ThinkPad X1 Yoga Memory Specifications by Generation
| Generation | Memory Type | Speeds Supported | Configurations Available | Resale Value Impact |
|---|---|---|---|---|
| Gen 1-3 (2016-2018) | DDR4 Soldered | 2133MHz, 2400MHz | 8GB, 16GB | +$80-$120 for 16GB vs 8GB |
| Gen 4 (2019) | LPDDR3 Soldered | 2133MHz | 8GB, 16GB | +$70-$110 for 16GB vs 8GB |
| Gen 5 (2020) | LPDDR4x Soldered | 4267MHz | 8GB, 16GB | +$90-$140 for 16GB vs 8GB |
| Gen 6+ (2021+) | LPDDR4x Soldered | 4267MHz, 5200MHz | 16GB, 32GB | +$150-$220 for 32GB vs 16GB |
⚠️ Important: X1 Yoga Memory Upgrade Reality Check
| Expectation | Reality | Professional Recommendation | Alternative Solutions |
|---|---|---|---|
| Adding more RAM | Not possible - all RAM soldered | Verify configuration before purchase | Focus on SSD and cooling upgrades |
| Replacing RAM modules | Not feasible - BGA soldering required | Not recommended for beginners | Professional board-level repair only |
| Increasing speed | Fixed at manufacturing | Select appropriate model initially | Optimize system settings instead |
| Dual channel upgrade | Configuration fixed at factory | 16GB models typically dual channel | 8GB models may be single channel |
⚡ Memory Performance Optimization Strategies
- Virtual Memory Optimization:
- Adjust page file settings in Windows
- Set custom size on fast SSD
- Monitor virtual memory usage patterns
- Optimize for your specific workload
- Memory Management:
- Use Task Manager to identify memory hogs
- Close unnecessary background applications
- Configure browser tab management
- Use memory-efficient software alternatives
- System Configuration:
- Update BIOS for memory compatibility
- Enable memory-related performance features
- Configure power settings for performance
- Monitor memory temperatures and health
💡 Smart X1 Yoga Purchase Recommendations
| Use Case | Recommended RAM | Rationale | Resale Advantage |
|---|---|---|---|
| Basic Computing | 8GB Minimum | Adequate for Office, browsing, media | Standard configuration |
| Business/Productivity | 16GB Recommended | Multitasking, virtualization, future-proof | +$80-$140 resale value |
| Creative Work | 16GB Essential | Photo/video editing, large files | +$100-$160 resale value |
| Development/Professional | 32GB (Gen 6+) | Virtual machines, containers, heavy workloads | +$150-$220 resale value |
📊 Memory Performance Testing & Documentation
| Test Type | Procedure | Expected Results | Documentation Value |
|---|---|---|---|
| Memory Bandwidth | Run AIDA64 Memory Benchmark | Consistent with specifications | Proves system performance |
| Latency Testing | Use built-in Windows Memory Diagnostic | No errors, stable operation | Demonstrates reliability |
| Real-world Testing | Multiple applications + browser tabs | Smooth performance, no swapping | Shows practical capability |
| Stress Testing | Prime95 blend test for 30 minutes | Stable, no crashes or errors | Validates system stability |
📋 Memory Configuration Documentation for Resale
- System Information Proof:
- Screenshots of Windows System Information
- CPU-Z memory and SPD tab screenshots
- Benchmark results showing performance
- Stability test completion proof
- Configuration Verification:
- Clear photos of soldered RAM chips
- Model number and specification proof
- Performance compared to specifications
- Memory health and status reports
- Value Proposition:
- Comparison with lower-RAM models
- Performance benefits explanation
- Use case suitability analysis
- Professional verification statement
🔧 Troubleshooting Memory-Related Issues
| Issue | Symptoms | Possible Causes | Solutions |
|---|---|---|---|
| Insufficient Memory | Slow performance, constant disk usage | Heavy workloads, too many applications | Close apps, optimize usage, upgrade SSD |
| Memory Leaks | Gradual slowdown, increasing usage | Faulty software, driver issues | Update drivers, monitor task manager |
| Hardware Issues | Crashes, blue screens, corruption | Failing memory, overheating | Run diagnostics, check cooling |
| Configuration Problems | Underperformance, not running at spec | BIOS settings, power management | Update BIOS, optimize settings |
🎯 Alternative Performance Upgrade Focus Areas
| Upgrade Area | Performance Impact | Cost | Resale Value Added | Recommendation |
|---|---|---|---|---|
| SSD Upgrade | 300-700% faster storage | $80-$200 | +$120-$220 | Highest priority upgrade |
| Thermal System | 20-30% sustained performance | $15-$40 | +$30-$60 | Good value improvement |
| Wi-Fi Card | 2-3x wireless speed | $25-$50 | +$20-$40 | Modern connectivity benefit |
| Battery Replacement | Restores portability | $80-$150 | +$100-$180 | Essential for aged systems |
🔮 Future-Proofing & Purchase Strategy
| Planning Horizon | RAM Recommendation | Rationale | Resale Impact |
|---|---|---|---|
| 1-2 Years | 16GB Minimum | Current standard, good performance | Strong resale value |
| 3-4 Years | 16GB Recommended | Future applications, multitasking | Better value retention |
| 5+ Years | 32GB (Gen 6+) | Maximum future-proofing | Premium long-term value |
✅ Memory Configuration Verification Checklist
- ✓ Current RAM capacity verified through multiple methods
- ✓ Memory type and speed documented
- ✓ Upgrade limitations understood and accepted
- ✓ Performance testing completed and documented
- ✓ System stability verified under load
- ✓ Resale value impact calculated
- ✓ Alternative upgrade priorities identified
- ✓ Purchase recommendations documented for future reference
5. ThinkPad X1 Yoga SSD Replacement: Storage Upgrade Options & Data Migration
💨 Why SSD Upgrades Deliver the Most Dramatic X1 Yoga Performance Transformation
SSD upgrades provide the single most impactful performance improvement for ThinkPad X1 Yoga, typically delivering 300-700% faster storage performance and transforming daily computing from frustrating waiting to instant responsiveness while significantly increasing resale value.
| SSD Upgrade Scenario | Performance Gain | Boot Time Improvement | Resale Value Added | User Experience Impact |
|---|---|---|---|---|
| 256GB → 1TB NVMe | Same speed, 4x capacity | No change | +$80-$140 | Eliminates storage anxiety |
| PCIe 3.0 → PCIe 4.0 | 60-90% faster | 12s → 8s (33% faster) | +$40-$80 | Noticeably snappier |
| Older SSD → Modern NVMe | 200-400% faster | 20s → 8s (60% faster) | +$60-$120 | Feels like a new laptop |
| Adding Second SSD | Dual drive flexibility | No change | +$50-$100 | OS/Data separation |
🔍 ThinkPad X1 Yoga SSD Specifications & Compatibility
| Generation | Interface | Form Factor | Maximum Capacity | Performance Notes |
|---|---|---|---|---|
| Gen 1-4 (2016-2019) | PCIe 3.0 x4 NVMe | M.2 2280 | 2TB (Official) 4TB (Unofficial) |
~3,500 MB/s maximum |
| Gen 5 (2020) | PCIe 3.0 x4 NVMe | M.2 2280 | 2TB (Official) 4TB (Unofficial) |
~3,500 MB/s maximum |
| Gen 6+ (2021+) | PCIe 4.0 x4 NVMe | M.2 2280 | 4TB (Official) 8TB (Unofficial) |
~7,000 MB/s maximum |
✅ SSD Selection Guide for ThinkPad X1 Yoga
| SSD Tier | Recommended Models | Speed Range | Endurance | Best For |
|---|---|---|---|---|
| Professional Grade | Samsung 980 Pro, WD Black SN850 | 7,000 MB/s (Gen4) 3,500 MB/s (Gen3) |
1,200 TBW | Heavy workloads, maximum performance |
| Business Grade | Samsung 970 Evo Plus, Crucial P5 Plus | 3,500 MB/s | 600-800 TBW | Excellent performance, great value |
| Value Performance | WD Blue SN570, Crucial P3 | 3,500 MB/s | 400-500 TBW | General use, excellent budget option |
| ThinkPad Optimized | Lenovo OEM SSDs | Varies by model | Manufacturer rated | Maximum compatibility, warranty |
🔍 How to Assess Current SSD & Plan Upgrade
- Current Drive Identification:
- Check Windows Device Manager for drive model
- Use CrystalDiskInfo for health assessment
- Run CrystalDiskMark for performance baseline
- Document current capacity and usage patterns
- Health & Wear Assessment:
- Check SSD wear level percentage
- Review power-on hours and total writes
- Identify any reallocated sectors or errors
- Determine if replacement is needed or optional
- Capacity Planning:
- Analyze current storage usage and growth rate
- Consider future needs and applications
- Plan for 20-30% free space for optimal performance
- Calculate ROI for different capacity options
🔧 Professional SSD Installation Procedure
- Pre-Installation Preparation:
- Complete battery disconnection protocol
- Backup all critical data before proceeding
- Create system recovery media if clean installing
- Have necessary tools ready: Phillips #00, spudger
- Existing SSD Removal:
- Locate M.2 SSD slot under metal shield
- Remove shield screws (usually 2-3 Phillips #00)
- Remove single SSD retention screw
- SSD will pop up at 30-degree angle - lift out carefully
- New SSD Installation:
- Insert new SSD at 30-degree angle
- Press down gently until flush with socket
- Secure with retention screw (do not overtighten)
- Replace thermal shield and secure with screws
🔄 Data Migration Method Comparison
| Migration Method | Difficulty | Time Required | Success Rate | Recommended For |
|---|---|---|---|---|
| Hardware Cloner | Easy | 30-90 minutes | 98%+ | Beginners, large data volumes |
| Software Cloning | Medium | 45-120 minutes | 95%+ | Intermediate users, customization |
| Clean Install + Transfer | Hard | 2-4 hours | 99%+ | Advanced users, system optimization |
| Cloud Backup Restore | Medium | 2-6 hours | 90-95% | Backup users, selective restoration |
🔄 Step-by-Step Cloning Procedure
- Dual Drive Setup:
- Install new SSD in main M.2 slot
- Connect old SSD via USB adapter or second slot
- Boot from old SSD with both drives connected
- Verify both drives detected in Disk Management
- Cloning Process:
- Launch cloning software of choice
- Select source (old) and destination (new) drives
- Choose sector-by-sector copy for best results
- Start process and wait for completion
- Post-Cloning Verification:
- Shut down and remove old drive
- Boot from new SSD only
- Verify all data, applications, and settings
- Run performance tests to confirm improvement
💾 SSD Capacity Planning Guide
| Usage Scenario | Minimum Capacity | Recommended Capacity | Ideal Capacity | Cost per GB |
|---|---|---|---|---|
| Basic Computing | 256GB | 512GB | 1TB | $0.08-$0.12 |
| Business/Productivity | 512GB | 1TB | 2TB | $0.07-$0.10 |
| Content Creation | 1TB | 2TB | 4TB | $0.06-$0.09 |
| Professional Workloads | 1TB | 2TB | 4TB | $0.06-$0.09 |
⚡ SSD Performance Optimization
- Windows Optimization:
- Enable TRIM support (usually automatic)
- Disable disk defragmentation for SSD
- Configure write caching in Device Manager
- Enable hardware-accelerated GPU scheduling
- BIOS Optimization:
- Ensure AHCI mode is enabled (not RAID)
- Update to latest BIOS for best compatibility
- Enable fast boot options
- Verify PCIe link speed settings
- ThinkPad Specific Optimizations:
- Install Lenovo Vantage for driver updates
- Configure power settings for performance
- Update SSD firmware if manufacturer provides
- Enable RapidDrive technology if available
💵 SSD Upgrade Resale Value Analysis
| Upgrade Scenario | SSD Cost | Labor Value | Value Added | Net ROI |
|---|---|---|---|---|
| 256GB → 1TB NVMe | $70-$110 | $35-$55 | $140-$200 | +$35-$75 (50-110%) |
| 512GB → 2TB NVMe | $140-$200 | $35-$55 | $200-$280 | +$25-$85 (18-60%) |
| Upgrade to PCIe 4.0 | $100-$160 | $35-$55 | $120-$180 | -$15-$25 (slight negative) |
| Adding Second SSD | $70-$110 | $45-$65 | $100-$150 | -$15-$25 (slight negative) |
🔧 Common SSD Upgrade Issues & Solutions
| Issue | Symptoms | Likely Cause | Solution |
|---|---|---|---|
| Drive Not Detected | BIOS doesn't see new SSD | Improper seating, compatibility | Re-seat drive, check compatibility list |
| Boot Failure After Clone | Blue screen or boot loop | Boot sector issues, UEFI/legacy mismatch | Repair boot sector, check BIOS settings |
| Slow Performance | Speed below expectations | PCIe link speed, driver issues | Update drivers, check link speed in BIOS |
| Capacity Not Fully Recognized | Only part of capacity available | MBR partition limit, BIOS limitation | Convert to GPT, update BIOS |
📋 Performance Documentation for Resale
- Before/After Benchmarks:
- CrystalDiskMark sequential read/write speeds
- Boot time measurements (stopwatch or software)
- Application load time comparisons
- System responsiveness demonstrations
- Quality Assurance Documentation:
- SSD health reports from CrystalDiskInfo
- Installation quality photos
- Drive specifications and warranty information
- Performance optimization verification
- Value Proposition Documentation:
- Performance improvement percentages
- Capacity increase benefits
- User experience transformation examples
- Professional installation certification
🔒 Data Security & Disposal Protocol
- Old Drive Handling:
- Perform secure erase before disposal if sensitive data
- Use manufacturer secure erase tools or Parted Magic
- Physical destruction only if drive is faulty
- Document disposal method for business records
- New Drive Security:
- Enable BitLocker encryption for business security
- Configure TPM security in BIOS settings
- Set up automatic backups to external drive or cloud
- Document security features for business buyers
✅ SSD Upgrade Completion Checklist
- ✓ Data successfully backed up before upgrade
- ✓ New SSD properly installed and secured
- ✓ Cloning or clean installation completed successfully
- ✓ All data and applications verified functional
- ✓ Performance benchmarks documented
- ✓ Windows and drivers updated to latest versions
- ✓ Security features (BitLocker) configured
- ✓ Old drive securely erased or properly stored
6. ThinkPad X1 Yoga Battery Replacement: Restoring Portability & Power
🔋 Why Battery Replacement Transforms Your X1 Yoga Experience
A new battery restores your ThinkPad X1 Yoga to 8-12 hours of genuine portability while increasing resale value by $100-$180. Professional battery replacement eliminates the #1 frustration of aging premium laptops - being tethered to power outlets and losing the convertible flexibility.
| Battery Condition | Typical Runtime | User Experience | Resale Value Impact | Replacement Urgency |
|---|---|---|---|---|
| New Battery | 8-12 hours | True portability, all-day convertible use | +$120-$180 | N/A - optimal condition |
| Moderate Wear (1-2 years) | 5-8 hours | Limited mobility, frequent charging | Neutral | Low - monitor health |
| Heavy Wear (2-3 years) | 3-5 hours | Desktop replacement, constant charging | -$60-$100 | Medium - consider replacement |
| Failed/Aged (3+ years) | 1-3 hours | Essentially desktop-only use | -$100-$200 | High - immediate replacement |
🔍 ThinkPad X1 Yoga Battery Specifications by Generation
| Generation | Battery Model | Capacity | Voltage | Replacement Complexity |
|---|---|---|---|---|
| 1st Gen (2016) | 01AV423, 01AV424 | 54Wh or 56Wh | 11.4V | Medium - adhesive mounted |
| 2nd Gen (2017) | 01AV423, 01AV424 | 54Wh or 56Wh | 11.4V | Medium - adhesive mounted |
| 3rd Gen (2018) | 01AV423, 01AV424 | 54Wh or 56Wh | 11.4V | Medium - adhesive mounted |
| 4th Gen (2019) | 5B10W51836, 5B10W51837 | 51Wh or 60Wh | 11.55V | Medium-Hard - strong adhesive |
| 5th Gen (2020) | 5B10W51836, 5B10W51837 | 51Wh or 60Wh | 11.55V | Medium-Hard - strong adhesive |
| 6th Gen (2021+) | 5B10W51836, 5B10W51837 | 51Wh or 60Wh | 11.55V | Medium-Hard - strong adhesive |
📊 How to Assess Current Battery Health
- Windows Battery Report:
- Open Command Prompt as Administrator
- Type:
powercfg /batteryreport - Check "DESIGN CAPACITY" vs. "FULL CHARGE CAPACITY"
- Document cycle count and wear percentage
- Lenovo Vantage Analysis:
- Install Lenovo Vantage
- Check battery health status and cycle count
- Monitor charging patterns and health trends
- Export battery health reports
- Physical Inspection:
- Check for swelling or deformation
- Inspect connector for damage or corrosion
- Look for manufacturing date on battery label
- Document any physical issues with photos
📈 Battery Replacement Scenario Analysis
| Replacement Scenario | Parts Cost | Labor Value | Value Added | Net ROI |
|---|---|---|---|---|
| Preventive Replacement | $80-$140 | $40-$70 | $100-$160 | +$20-$50 (25-60%) |
| Worn Battery Replacement | $80-$140 | $40-$70 | $140-$210 | +$60-$120 (75-150%) |
| Failed Battery Repair | $80-$140 | $40-$70 | $180-$280 | +$120-$200 (150-250%) |
| Capacity Upgrade | $100-$160 | $40-$70 | $120-$180 | +$20-$50 (20-50%) |
🔧 Professional Battery Removal Procedure
- Pre-Removal Safety:
- Ensure battery is already disconnected (from disassembly)
- Verify no power to motherboard
- Work on ESD-safe surface
- Have fire safety equipment accessible
- Adhesive Release Technique:
- Use plastic cards or spudgers for initial separation
- Apply isopropyl alcohol around edges to weaken adhesive
- Work slowly around perimeter with gentle prying
- Never use metal tools or excessive force
- Safe Removal Process:
- Lift battery from connector end first
- If adhesive resists, apply more alcohol and wait
- Remove all adhesive residue from chassis
- Place old battery in safe, non-conductive location
✅ Battery Selection & Compatibility Guide
| Battery Type | Quality Level | Warranty | Price Range | Recommended For |
|---|---|---|---|---|
| Genuine Lenovo | Excellent | 1 year | $100-$160 | Maximum reliability, resale focus |
| Premium Compatible | Very Good | 6-12 months | $70-$120 | Best value, quality balance |
| Standard Compatible | Good | 3-6 months | $50-$90 | Budget-conscious, personal use |
| Economy/Budget | Variable | 1-3 months | $30-$60 | Short-term use only, not recommended |
⚠️ Lithium-Ion Battery Safety Protocols
| Safety Concern | Risk Level | Prevention Measures | Emergency Response |
|---|---|---|---|
| Physical Damage | High | Never puncture, bend, or crush cells | Isolate immediately, use Class D extinguisher |
| Short Circuit | High | Cover terminals when not installed | Disconnect power, monitor for heating |
| Swelling/Bulging | Very High | Regular visual inspections | Do not use, dispose properly immediately |
| Overheating | Medium-High | Proper installation, no obstruction | Power off, allow to cool, investigate cause |
🔧 New Battery Installation Procedure
- Pre-Installation Verification:
- Verify battery model compatibility
- Check manufacturing date (prefer <6 months old)
- Inspect for physical damage or defects
- Test voltage with multimeter if possible
- Adhesive Application:
- Clean chassis surface with isopropyl alcohol
- Apply new adhesive strips (included or purchased separately)
- Ensure proper alignment before pressing down
- Apply firm, even pressure for good adhesion
- Connection & Testing:
- Connect battery connector securely
- Verify locking mechanism engages completely
- Reconnect AC power first for initial test
- Verify charging indicator lights activate
📱 New Battery Calibration & Optimization
| Calibration Step | Procedure | Duration | Purpose |
|---|---|---|---|
| Initial Full Charge | Charge to 100% without interruption | 3-5 hours | Activates battery chemistry |
| Complete Discharge | Use until automatic shutdown | Until shutdown | Calibrates fuel gauge accuracy |
| Second Full Charge | Charge to 100% without use | 3-4 hours | Stabilizes charge cycles |
| Normal Usage | Regular charge/discharge cycles | 3-5 cycles | Establishes usage patterns |
✅ Battery Performance Verification
| Test Type | Procedure | Expected Results | Acceptance Criteria |
|---|---|---|---|
| Charging Test | Monitor from 10% to 90% charge | Steady charging, no interruptions | Complete charge within 2-3 hours |
| Runtime Test | Standard usage until shutdown | 7-10 hours typical usage | Meets or exceeds specifications |
| Health Report | Generate Windows battery report | 100% design capacity reported | No errors, full capacity detected |
| Temperature Monitoring | Check during charging and usage | Stable, within normal range | No excessive heating |
🔧 Common Battery Replacement Issues
| Issue | Symptoms | Likely Cause | Solution |
|---|---|---|---|
| Not Detected | "No battery detected" message | Poor connection, incompatible battery | Re-seat connector, verify compatibility |
| Not Charging | Plugged in, not charging | Charging circuit, battery fault | Test with known good charger, check connection |
| Rapid Drain | Drains much faster than expected | Defective battery, high system load | Check battery health, system power usage |
| Swelling After Installation | Physical bulging, case deformation | Battery failure, manufacturing defect | Immediate replacement required |
📋 Battery Replacement Documentation for Resale
| Documentation Element | Purpose | Resale Impact | Implementation |
|---|---|---|---|
| Before/After Health Reports | Shows performance improvement | +$30-$50 | Include Windows battery report screenshots |
| Genuine Part Documentation | Proves quality replacement | +$20-$40 | Include receipt and part number photos |
| Professional Installation Photos | Demonstrates careful work | +$15-$30 | Show clean installation, proper connections |
| Performance Testing Results | Validates battery performance | +$20-$35 | Include runtime and charging test results |
♻️ Battery Disposal & Environmental Compliance
- Proper Disposal Methods:
- Never dispose in regular household trash
- Use authorized battery recycling facilities
- Check Call2Recycle for local options
- Tape battery terminals before disposal
- Environmental Responsibility:
- Lithium-ion batteries contain hazardous materials
- Proper recycling prevents soil and water contamination
- Supports recovery of valuable materials
- Document disposal for business records
📝 Warranty & Support Considerations
- Battery Warranty:
- Genuine Lenovo: Typically 1 year limited warranty
- Premium compatible: 6-12 months common
- Budget options: 1-3 months or none
- Keep receipts and warranty documentation
- Installation Warranty:
- Professional workmanship guarantee
- Typically 30-90 days on labor
- Documented with photos and testing
- Builds buyer confidence and trust
✅ Battery Replacement Completion Checklist
- ✓ Old battery health assessed and documented
- ✓ Compatible replacement battery selected
- ✓ Safe removal of old battery completed
- ✓ New battery properly installed and secured
- ✓ Battery detected and charging verified
- ✓ Initial calibration cycle completed
- ✓ Performance testing documented
- ✓ Old battery properly disposed or recycled
7. Keyboard & Touchpad Replacement: Maintaining ThinkPad Quality
⌨️ Why Professional Keyboard Replacement Preserves ThinkPad Premium Experience
ThinkPad keyboards are renowned for their exceptional typing experience and durability, making proper replacement essential for maintaining the premium feel that justifies $80-$150 resale value premiums over competitors. Professional installation ensures the legendary ThinkPad typing quality remains intact.
| Keyboard Condition | Typing Experience | Resale Impact | Replacement Complexity | Professional Recommendation |
|---|---|---|---|---|
| New/OEM Keyboard | Excellent - crisp, responsive | +$60-$100 | High (Full disassembly) | Ideal for premium resale |
| Quality Replacement | Very Good - nearly OEM quality | +$30-$60 | High (Full disassembly) | Good value alternative |
| Worn but Functional | Good - some key wear visible | Neutral impact | N/A | Clean and maintain |
| Damaged/Non-functional | Poor - impacts usability | -$80-$150 | High (Full disassembly) | Immediate replacement needed |
🔍 ThinkPad X1 Yoga Keyboard Specifications by Generation
| Generation | Keyboard Type | Backlight | Special Features | Replacement Complexity |
|---|---|---|---|---|
| Gen 1-2 (2016-2017) | Retractable mechanism | White backlight | Auto-retract in tablet mode | Very High - complex mechanism |
| Gen 3-4 (2018-2019) | Standard low-profile | White backlight | Spill resistance, drainage | High - full disassembly required |
| Gen 5-6 (2020+) | Standard low-profile | White backlight | Improved key travel, durability | High - full disassembly required |
🔍 Keyboard Health Assessment & Replacement Decision Matrix
- Visual Inspection:
- Check for worn keycaps and legends
- Inspect for physical damage or cracks
- Look for liquid damage indicators
- Verify backlight functionality across all keys
- Functional Testing:
- Test every key for proper registration
- Check for sticky or non-responsive keys
- Verify modifier key combinations work
- Test keyboard shortcuts and ThinkPad utilities
- Replacement Decision Factors:
- Number of non-functional keys
- Extent of cosmetic wear and tear
- Backlight failure or inconsistency
- Typing feel and key travel consistency
⚙️ Keyboard Replacement Complexity Analysis
| Replacement Step | Time Required | Difficulty Level | Risk Factors | Special Tools Needed |
|---|---|---|---|---|
| Bottom Cover Removal | 5-10 minutes | Easy | Clip damage, stripped screws | Phillips #00, plastic spudgers |
| Battery Disconnection | 2-3 minutes | Easy | ESD damage, connector damage | Plastic spudger |
| Motherboard Removal | 15-25 minutes | Medium | Cable damage, connector issues | Multiple spudgers, tweezers |
| Keyboard Assembly Removal | 10-15 minutes | Medium-Hard | Frame damage, clip breakage | Thin pry tools, patience |
| New Keyboard Installation | 20-30 minutes | Medium | Alignment issues, cable damage | Precision tools, careful handling |
| Reassembly & Testing | 20-30 minutes | Medium | Missed connections, screw issues | Organization system, documentation |
✅ Keyboard Selection & Compatibility Guide
| Keyboard Type | Quality Level | Price Range | Compatibility Assurance | Recommended For |
|---|---|---|---|---|
| Genuine Lenovo OEM | Excellent - factory quality | $80-$150 | 100% - exact match | Premium resale, perfectionists |
| Premium Compatible | Very Good - near OEM | $45-$90 | 95% - minor variations | Best value, quality balance |
| Standard Replacement | Good - functional | $30-$60 | 90% - may need modification | Budget projects, personal use |
| Used/Refurbished | Variable - inspect carefully | $20-$50 | 85% - wear varies | Emergency repairs, budget focus |
🔴 ThinkPad TrackPoint System Maintenance
| Component | Maintenance Procedure | Replacement Frequency | ThinkPad-Specific Notes |
|---|---|---|---|
| TrackPoint Cap | Remove and clean monthly | 6-12 months or when worn | Use genuine Lenovo caps for best feel |
| TrackPoint Sensors | Dust with compressed air | Only if faulty | Integrated with keyboard assembly |
| TrackPoint Buttons | Clean with isopropyl alcohol | Only if unresponsive | Part of keyboard/touchpad assembly |
👆 Touchpad Replacement Guide
| Touchpad Issue | Symptoms | Replacement Complexity | Cost Range | Resale Impact |
|---|---|---|---|---|
| Physical Damage | Cracks, scratches, rough surface | High (keyboard removal required) | $40-$80 | +$50-$80 for perfect surface |
| Non-Responsive | No cursor movement, erratic behavior | High (keyboard removal required) | $40-$80 | +$60-$100 for full functionality |
| Gesture Issues | Multi-touch not working properly | High (keyboard removal required) | $40-$80 | +$30-$60 for full gesture support |
| Button Failure | Physical click not working | High (keyboard removal required) | $40-$80 | +$40-$70 for full button function |
🔧 Step-by-Step Keyboard Replacement Procedure
- Complete Disassembly Preparation:
- Remove bottom cover using proper technique
- Disconnect battery following safety protocol
- Document all cable connections with photos
- Organize screws by component and location
- Motherboard Removal:
- Disconnect all motherboard cables carefully
- Remove motherboard mounting screws
- Lift motherboard straight up to avoid damage
- Place on ESD-safe surface immediately
- Keyboard Assembly Access:
- Remove keyboard bezel and mounting brackets
- Release keyboard retention clips systematically
- Lift keyboard assembly from top edge first
- Disconnect keyboard ribbon cable carefully
- New Keyboard Installation:
- Connect new keyboard ribbon cable securely
- Position keyboard assembly properly in chassis
- Press down evenly to engage all retention clips
- Verify alignment and flush installation
🔌 Professional Ribbon Cable Handling Protocol
| Cable Type | Connection Method | Removal Technique | Risk Factors | Damage Prevention |
|---|---|---|---|---|
| ZIF (Zero Insertion Force) | Lift locking flap, insert cable, close flap | Lift locking flap, pull cable straight out | Broken flaps, torn cables | Use plastic tools, gentle pressure |
| Latch-Type Connectors | Insert cable, close locking latch | Release latch, pull cable straight out | Broken latches, bent pins | Support connector during manipulation |
| Push-Pull Connectors | Push straight in until click | Pull straight out firmly | Internal damage, bent connectors | Straight alignment, even pressure |
💡 Keyboard Backlight System Maintenance
| Backlight Issue | Diagnosis Procedure | Likely Cause | Repair Solution | Replacement Complexity |
|---|---|---|---|---|
| No Backlight | Check Fn+Spacebar, test in dark | LED failure, cable issue, software | Keyboard replacement typically needed | High (full keyboard replacement) |
| Partial Backlight | Note which areas are dark | LED strip failure, connection issue | Keyboard replacement typically needed | High (full keyboard replacement) |
| Inconsistent Brightness | Test different brightness levels | LED aging, power delivery issue | Keyboard replacement if unacceptable | High (full keyboard replacement) |
| Flickering | Observe under different conditions | Loose connection, failing LED | Reseat connections, replace keyboard | High (full keyboard replacement) |
🔧 Common Keyboard Issues & Solutions
| Issue | Symptoms | Quick Fixes | Permanent Solutions | Replacement Necessity |
|---|---|---|---|---|
| Sticky Keys | Keys slow to return, feel mushy | Clean with isopropyl alcohol, compressed air | Keyboard replacement if cleaning fails | Medium - try cleaning first |
| Non-Responsive Keys | Key presses not registering | Reseat ribbon cable, update drivers | Keyboard replacement if hardware issue | High - if multiple keys affected |
| Ghost Key Presses | Random characters appearing | Clean, check for liquid damage | Keyboard replacement typically needed | High - indicates hardware failure |
| Backlight Failure | No illumination, partial lighting | Check Fn keys, power settings | Keyboard replacement if LED failure | Medium - functional but cosmetic |
🧹 Professional Keyboard Cleaning & Maintenance
- Regular Maintenance (Monthly):
- Use compressed air to remove debris between keys
- Wipe surface with slightly damp microfiber cloth
- Clean around TrackPoint and touchpad areas
- Check for worn keycaps or legends
- Deep Cleaning (Every 6 Months):
- Remove keycaps carefully using keycap puller
- Clean underlying mechanism with isopropyl alcohol
- Wash keycaps in warm soapy water, dry completely
- Reinstall keycaps in correct positions
- Liquid Spill Response:
- Immediate power off and battery disconnect
- Drain liquid by holding upside down
- Clean with isopropyl alcohol to prevent corrosion
- Allow complete drying before testing
💵 Keyboard & Touchpad Replacement Resale Value Analysis
| Replacement Scenario | Parts Cost | Labor Value | Value Added | Net ROI |
|---|---|---|---|---|
| Worn Keyboard Replacement | $60-$120 | $50-$80 | $120-$180 | +$10-$40 (8-33%) |
| Non-Functional Keyboard Repair | $60-$120 | $50-$80 | $180-$250 | +$70-$110 (58-92%) |
| Touchpad Surface Replacement | $40-$80 | $50-$80 | $80-$120 | -$10-$40 (slight negative) |
| Complete Input System Refresh | $100-$180 | $80-$120 | $200-$300 | +$20-$80 (20-67%) |
✅ Post-Replacement Testing & Verification Protocol
| Test Type | Procedure | Expected Results | Acceptance Criteria |
|---|---|---|---|
| Key Function Test | Test every key using on-screen keyboard | All keys register correctly | 100% key functionality |
| Backlight Test | Cycle through brightness levels with Fn+Spacebar | Even illumination across all keys | No dark spots or flickering |
| TrackPoint Test | Navigate cursor in all directions | Smooth, responsive movement | Full range of motion |
| Touchpad Test | Test gestures, scrolling, multi-touch | All gestures work smoothly | Full touchpad functionality |
✅ Keyboard & Touchpad Replacement Completion Checklist
- ✓ All keys tested and functioning properly
- ✓ Backlight illumination even and adjustable
- ✓ TrackPoint responsive in all directions
- ✓ Touchpad gestures and scrolling working
- ✓ Keyboard properly aligned and seated
- ✓ All cables securely connected and routed
- ✓ No leftover screws or components
- ✓ Professional documentation completed
8. Display Assembly & Pen Support Repair: Restoring Visual Excellence
🖥️ Why Display Quality Defines the X1 Yoga Convertible Experience
The ThinkPad X1 Yoga's display is the centerpiece of its convertible functionality, with premium panels ranging from FHD to 4K Dolby Vision. Professional display replacement preserves the premium visual experience that justifies $150-$300 resale value premiums and ensures the pen input system works flawlessly for creative and business applications.
| Display Condition | Visual Quality | Pen Functionality | Resale Impact | Replacement Priority |
|---|---|---|---|---|
| Perfect Display | Excellent - no defects, bright, accurate | Full pen support, pressure sensitive | +$150-$300 | N/A - optimal condition |
| Minor Issues | Good - minor backlight bleed, small imperfections | Full functionality | Neutral to -$50 | Low - monitor for changes |
| Cracked/Damaged | Poor - visible damage, touch issues | Partial or no pen functionality | -$200-$400 | High - immediate replacement |
| Non-Functional | No display, severe damage | No pen functionality | -$300-$500 | Critical - essential repair |
🔍 ThinkPad X1 Yoga Display Specifications by Generation
| Generation | Available Resolutions | Panel Technology | Touch/Pen Support | Replacement Compatibility |
|---|---|---|---|---|
| Gen 1-2 (2016-2017) | FHD (1920x1080) WQHD (2560x1440) |
IPS LCD | Active Pen (Wacom AES) | Generation-specific, check connectors |
| Gen 3-4 (2018-2019) | FHD (1920x1080) WQHD (2560x1440) 4K (3840x2160) |
IPS LCD, Dolby Vision HDR | Active Pen (Wacom AES 2.0) | Improved compatibility within generation |
| Gen 5-6 (2020+) | FHD+ (1920x1200) UHD+ (3840x2400) |
IPS LCD, Dolby Vision HDR | Active Pen (Wacom AES 2.0) | 16:10 aspect ratio, specific to generation |
🔍 Display Health Assessment & Diagnostic Protocol
- Visual Inspection:
- Check for dead pixels using solid color backgrounds
- Test for backlight bleed with black screen in dark room
- Inspect for physical damage, cracks, or delamination
- Verify touch responsiveness across entire surface
- Functional Testing:
- Test brightness control through full range
- Check color accuracy and uniformity
- Verify viewing angles and contrast ratio
- Test automatic brightness sensor functionality
- Pen System Diagnostics:
- Test pen pressure sensitivity with drawing applications
- Verify palm rejection and tilt detection
- Check pen pairing and battery status
- Test all pen buttons and eraser functionality
⚙️ Display Replacement Complexity Analysis
| Replacement Type | Time Required | Difficulty Level | Risk Factors | Special Tools Needed |
|---|---|---|---|---|
| Complete Assembly | 30-45 minutes | Medium | Hinge damage, cable issues | Phillips #00, plastic tools, suction cups |
| Panel Only | 60-90 minutes | High | Glass breakage, adhesive issues | Heat gun, pry tools, adhesive strips |
| Digitizer Replacement | 45-75 minutes | High | Touch functionality loss, alignment | Precision tools, calibration equipment |
| Webcam/Microphone | 20-35 minutes | Medium | ThinkShutter mechanism, cable routing | Small pry tools, tweezers |
✅ Display Selection & Compatibility Guide
| Display Type | Quality Level | Price Range | Compatibility Assurance | Recommended For |
|---|---|---|---|---|
| Genuine Lenovo OEM | Excellent - factory specifications | $150-$400 | 100% - exact match | Premium resale, color-critical work |
| Premium Compatible | Very Good - near OEM quality | $100-$250 | 95% - minor calibration needed | Best value, general use |
| Standard Replacement | Good - functional but variations | $80-$180 | 90% - may need modification | Budget projects, secondary systems |
| Used/Refurbished | Variable - inspect carefully | $60-$150 | 85% - wear varies significantly | Emergency repairs, lowest cost |
✏️ Active Pen System Maintenance & Troubleshooting
| Pen Component | Maintenance Procedure | Replacement Frequency | ThinkPad-Specific Notes |
|---|---|---|---|
| Pen Nibs/Tips | Replace when worn or damaged | 6-18 months depending on use | Use genuine Lenovo nibs for best performance |
| Pen Battery | Replace AAAA battery when low | 12-24 months with normal use | Keep spare battery in pen garage |
| Pen Buttons | Clean with isopropyl alcohol | Only if unresponsive | Test right-click and eraser functions |
| Garage Mechanism | Clean with compressed air | Only if damaged | Ensure secure retention and charging |
🔧 Step-by-Step Display Assembly Replacement Procedure
- Bezel Removal Protocol:
- Use plastic pry tools starting from bottom edge
- Work around perimeter with gentle, even pressure
- Release all clips before attempting to remove bezel
- Set bezel aside on soft, clean surface
- Display Panel Removal:
- Remove display bracket screws (usually 4-8)
- Carefully lift display panel from front
- Disconnect LVDS/display cable and touch cables
- Place panel on protected surface face down
- Hinge & Bracket Transfer:
- Transfer hinges and brackets to new display
- Ensure proper alignment and screw tightness
- Verify hinge movement is smooth and consistent
- Check cable routing through hinge areas
- New Display Installation:
- Connect all cables to new display panel
- Position display in lid assembly carefully
- Secure with bracket screws in proper sequence
- Test functionality before replacing bezel
🔌 Display Cable Types & Connection Protocols
| Cable Type | Function | Connection Method | Risk Factors | Testing Procedure |
|---|---|---|---|---|
| LVDS/eDP Cable | Video signal transmission | ZIF connector, lift flap carefully | Bent pins, torn cables | Display functionality, resolution |
| Touch Digitizer Cable | Touch input signals | ZIF connector, secure locking | Alignment issues, calibration | Touch responsiveness, multi-touch |
| Webcam/Mic Cable | Camera and microphone | Small ZIF or push-pull connector | ThinkShutter mechanism | Camera function, microphone test |
| Pen Digitizer Cable | Active pen input | ZIF connector, often combined | Pen pressure sensitivity | Pen tracking, pressure levels |
🔧 Common Display Issues & Solutions
| Issue | Symptoms | Quick Diagnostics | Permanent Solutions | Replacement Necessity |
|---|---|---|---|---|
| Flickering Display | Intermittent brightness, flashing | Test with external monitor, check cables | Display replacement, cable reseating | High - if persistent after cable check |
| Touch Not Working | No touch response, partial areas | Check digitizer cable, recalibrate | Digitizer replacement, cable repair | Medium - affects convertible function |
| Backlight Bleed | Light leakage at edges, uneven | View black screen in dark room | Display replacement if severe | Low-Medium - cosmetic but affects premium feel |
| Dead Pixels | Small black/white spots on screen | Test with solid color backgrounds | Display replacement if noticeable | Medium - affects visual perfection |
✏️ Active Pen Troubleshooting Guide
| Pen Issue | Symptoms | Diagnostic Steps | Solutions | Replacement Cost |
|---|---|---|---|---|
| No Pen Detection | Pen not recognized, no cursor | Check battery, re-pair pen, test on another device | Replace battery, reinstall drivers, replace pen | $40-$80 for new pen |
| Inaccurate Tracking | Cursor offset, jumping | Recalibrate display, check for interference | Recalibration, display replacement if digitizer issue | Included in display cost |
| Pressure Sensitivity | No pressure variation, constant line width | Test in drawing app, check pen settings | Replace pen, update drivers | $40-$80 for new pen |
| Button Not Working | Right-click, eraser not functioning | Test buttons in pen settings, check physical damage | Replace pen, clean button contacts | $40-$80 for new pen |
🎨 Professional Display Calibration Protocol
- Color Calibration:
- Use hardware calibrator for accurate results
- Set target white point (typically 6500K)
- Adjust gamma to 2.2 for standard use
- Create and apply ICC color profile
- Touch Calibration:
- Use Windows touch calibration tool
- Follow crosshair sequence precisely
- Test accuracy across entire display surface
- Verify multi-touch and gesture recognition
- Pen Calibration:
- Calibrate pen pressure curve for application
- Test tilt sensitivity and palm rejection
- Verify button mapping and functionality
- Document calibration settings for resale
💵 Display & Pen System Resale Value Analysis
| Replacement Scenario | Parts Cost | Labor Value | Value Added | Net ROI |
|---|---|---|---|---|
| Cracked Screen Replacement | $150-$350 | $60-$100 | $300-$500 | +$90-$250 (60-250%) |
| Upgrade to Higher Resolution | $200-$400 | $60-$100 | $200-$350 | +$40-$150 (20-75%) |
| Pen System Restoration | $40-$80 | $20-$40 | $80-$150 | +$20-$70 (50-175%) |
| Complete Display System | $250-$450 | $80-$120 | $400-$600 | +$70-$230 (28-92%) |
✅ Post-Replacement Testing & Verification Protocol
| Test Type | Procedure | Expected Results | Acceptance Criteria |
|---|---|---|---|
| Display Functionality | Test all resolutions, refresh rates | Crisp image, no artifacts or flickering | Native resolution stable, no dead pixels |
| Touch Responsiveness | Test multi-touch, gestures, edge accuracy | Accurate touch response across entire surface | 10-point touch minimum, palm rejection working |
| Pen System Test | Test pressure sensitivity, tilt, buttons | 2048 pressure levels, accurate tracking | Full pen functionality, no lag or offset |
| Hinge & Convertible | Test all positions, tablet mode | Smooth movement, stable in all positions | No wobble, automatic mode switching |
✅ Display & Pen System Repair Completion Checklist
- ✓ Display shows perfect image with no defects
- ✓ Touch responsiveness accurate across entire surface
- ✓ Active pen tracks accurately with full pressure sensitivity
- ✓ All display modes and resolutions functioning properly
- ✓ Hinges operate smoothly through full range
- ✓ Webcam, microphone, and ThinkShutter working
- ✓ Automatic screen rotation in tablet mode functional
- ✓ Professional calibration and testing documented
9. Cooling System Maintenance & Thermal Performance Optimization
❄️ Why Thermal Management Defines Long-Term X1 Yoga Performance & Reliability
Proper cooling system maintenance transforms your ThinkPad X1 Yoga from a thermal-throttled portable to a sustained-performance workstation, enabling 20-35% better CPU performance under load while extending component lifespan. Professional thermal maintenance typically adds $60-$120 resale value by demonstrating careful system preservation.
| Thermal Condition | Performance Impact | Component Longevity | User Experience | Resale Value Impact |
|---|---|---|---|---|
| Optimized Cooling | Maximum sustained performance | Extended 3-5 year lifespan | Quiet, cool, responsive | +$80-$120 |
| Moderate Maintenance | Good performance with occasional throttling | Normal 2-4 year lifespan | Warm during heavy use, generally good | Neutral |
| Neglected System | Frequent thermal throttling, 30-50% performance loss | Reduced 1-3 year lifespan | Hot, loud, sluggish under load | -$100-$180 |
| Critical Failure | Overheating shutdowns, instability | Immediate risk of component failure | Unusable for demanding tasks | -$200-$300 |
🔍 ThinkPad X1 Yoga Cooling System Specifications by Generation
| Generation | Cooling System Type | Heat Pipe Configuration | Fan Specifications | Thermal Design Power (TDP) |
|---|---|---|---|---|
| Gen 1-2 (2016-2017) | Single fan, dual heat pipe | CPU + GPU shared cooling | 15mm blower fan, 3-pin connector | 15W U-series processors |
| Gen 3-4 (2018-2019) | Single fan, dual heat pipe | CPU focused, improved fin stack | 13mm blower fan, 4-pin PWM | 15W U-series, improved efficiency |
| Gen 5-6 (2020+) | Single fan, dual heat pipe | Larger vapor chamber, better airflow | 12mm blower fan, 4-pin PWM | 15-28W U/G7-series processors |
🌡️ Thermal Performance Assessment & Diagnostic Protocol
- Temperature Monitoring:
- Use HWiNFO64 or Core Temp for real-time monitoring
- Record idle temperatures (35-50°C normal)
- Monitor load temperatures during stress testing
- Check for thermal throttling at 95-100°C
- Fan Performance Testing:
- Test fan ramp-up through BIOS or software control
- Listen for bearing noise or grinding sounds
- Check for consistent airflow from vents
- Verify automatic fan control responsiveness
- Airflow & Ventilation Inspection:
- Check intake and exhaust vents for obstruction
- Inspect heat sink fins for dust accumulation
- Verify proper contact between heat pipes and components
- Test system in both laptop and tablet orientations
⚙️ Cooling System Maintenance Complexity Analysis
| Maintenance Task | Time Required | Difficulty Level | Performance Impact | Tools Required |
|---|---|---|---|---|
| External Vent Cleaning | 5-10 minutes | Easy | 5-10% improvement | Compressed air, soft brush |
| Fan & Heat Sink Cleaning | 20-30 minutes | Medium | 15-25% improvement | Phillips #00, compressed air, brush |
| Thermal Paste Replacement | 30-45 minutes | Medium | 20-35% improvement | Thermal paste, isopropyl alcohol, lint-free cloths |
| Complete Cooling System Replacement | 45-60 minutes | Medium-Hard | Restores to factory performance | Full toolkit, replacement parts, thermal materials |
✅ Thermal Material Selection Guide
| Material Type | Performance Level | Application Difficulty | Longevity | Recommended For |
|---|---|---|---|---|
| High-Performance Paste (Thermal Grizzly, Arctic MX-6) | Excellent - 12-16 W/mK | Easy-Medium | 3-5 years | Enthusiasts, maximum performance |
| Premium Paste (Noctua NT-H1, Arctic MX-4) | Very Good - 8-12 W/mK | Easy | 3-5 years | General use, excellent value |
| Thermal Pads (Various thicknesses 0.5-2.0mm) | Good - 3-8 W/mK | Medium | 2-4 years | VRM cooling, memory, chipsets |
| Stock/OEM Materials | Good - 5-8 W/mK | Easy | 2-3 years | Factory replacements, warranty work |
🌀 Fan Replacement & Maintenance Guide
| Fan Issue | Symptoms | Diagnostic Steps | Replacement Complexity | Cost Range |
|---|---|---|---|---|
| Bearing Noise | Grinding, whining, rattling sounds | Listen during spin-up, check for physical play | Medium - heat sink removal required | $25-$50 |
| Fan Not Spinning | Overheating, no airflow from vents | Check connector, test with external power | Medium - heat sink removal required | $25-$50 |
| Inconsistent Speed | Erratic RPM, sudden speed changes | Monitor in HWiNFO64, check PWM signal | Medium - heat sink removal required | $25-$50 |
| Reduced Airflow | Higher temperatures, slower response | Clean blades, check for obstruction | Easy-Medium - may not need replacement | $0-$25 (cleaning only) |
🔧 Step-by-Step Thermal Maintenance Procedure
- Cooling System Access:
- Remove bottom cover using proper technique
- Disconnect battery following safety protocol
- Identify cooling system mounting points
- Document screw locations and cable routing
- Heat Sink Removal:
- Remove heat sink screws in reverse star pattern
- Note screw lengths and positions for reassembly
- Gently twist heat sink to break thermal paste bond
- Lift straight up to avoid damaging components
- Cleaning & Preparation:
- Clean CPU/GPU dies with isopropyl alcohol
- Remove old thermal paste completely
- Clean heat sink surface and fan blades
- Inspect heat pipes for damage or corrosion
- Thermal Material Application:
- Apply rice-sized amount of thermal paste to CPU
- Spread evenly or let pressure distribute
- Install thermal pads on VRMs and surrounding chips
- Verify proper thickness for component clearance
🎨 Professional Thermal Paste Application Techniques
| Application Method | Procedure | Advantages | Disadvantages | Recommended For |
|---|---|---|---|---|
| Pea/Grain Method | Small dot in center, let pressure spread | Simple, consistent, minimal waste | May not cover corners on larger dies | Most CPUs, beginners |
| Line Method | Thin line across die center | Good coverage for rectangular dies | Potential for air bubbles | Modern laptop CPUs |
| Spread Method | Spread evenly with applicator | Perfect coverage control | Risk of air bubbles, skill required | Experienced technicians |
| X Pattern | X pattern across die | Good corner coverage | Potential for excess paste | Larger desktop CPUs |
🔧 Common Cooling System Issues & Solutions
| Issue | Symptoms | Immediate Actions | Permanent Solutions | Performance Impact |
|---|---|---|---|---|
| Dust Accumulation | Gradual temperature increase, reduced airflow | Compressed air cleaning, improve ventilation | Regular maintenance, workspace cleanliness | 15-25% improvement after cleaning |
| Dried Thermal Paste | Rapid temperature spikes, immediate throttling | Reduce workload, improve ambient cooling | Complete thermal paste replacement | 20-35% improvement after replacement |
| Fan Failure | Overheating shutdowns, no fan noise | Shutdown immediately, external cooling | Fan replacement, connector inspection | Critical - system unusable until fixed |
| Heat Pipe Failure | Uneven cooling, hot spots | Reduce CPU power limits | Complete cooling assembly replacement | Restores to factory performance |
⚡ Thermal Performance Optimization Strategies
- Software Optimization:
- Use ThrottleStop to adjust voltage and power limits
- Configure Windows power plans for balanced performance
- Update BIOS for improved thermal management
- Use Lenovo Vantage for fan control optimization
- Hardware Improvements:
- Add thermal pads to VRM and power delivery components
- Ensure proper mounting pressure on heat sink
- Improve ventilation with laptop cooling pad
- Consider graphite thermal pads for long-term stability
- Usage Pattern Optimization:
- Avoid blocking intake/exhaust vents during use
- Use on hard, flat surfaces for better airflow
- Schedule intensive tasks during cooler ambient temperatures
- Monitor temperatures during different usage scenarios
📊 ThinkPad X1 Yoga Temperature Benchmarks
| Usage Scenario | Normal Temperatures | Concerning Temperatures | Critical Temperatures | Performance Impact |
|---|---|---|---|---|
| Idle/Light Use | 35-50°C | 50-60°C | 60°C+ | None to minor |
| Office Productivity | 50-65°C | 65-75°C | 75°C+ | Minor to moderate throttling |
| Content Creation | 65-80°C | 80-90°C | 90°C+ | Moderate to severe throttling |
| Gaming/Stress Test | 75-85°C | 85-95°C | 95°C+ (throttling) | Severe throttling or shutdown |
💵 Cooling System Maintenance Resale Value Analysis
| Maintenance Scenario | Parts Cost | Labor Value | Value Added | Net ROI |
|---|---|---|---|---|
| Basic Cleaning & Paste | $10-$20 | $30-$50 | $60-$100 | +$20-$60 (200-600%) |
| Fan Replacement | $25-$50 | $30-$50 | $80-$120 | +$25-$70 (100-280%) |
| Complete Cooling System | $60-$100 | $40-$60 | $120-$180 | +$20-$80 (33-133%) |
| Performance Optimization | $15-$30 | $40-$60 | $80-$120 | +$25-$75 (167-500%) |
✅ Thermal Performance Testing & Verification Protocol
| Test Type | Procedure | Expected Results | Acceptance Criteria |
|---|---|---|---|
| Idle Temperature Test | Measure after 15 minutes of light use | 35-50°C depending on ambient | Stable, within 5°C of ambient expectations |
| Load Temperature Test | Run Cinebench R23 for 10 minutes | 75-85°C maximum, no throttling | Sustained performance, no thermal throttling |
| Fan Ramp Test | Monitor fan speed during load increase | Smooth ramp-up, appropriate noise levels | No bearing noise, consistent airflow |
| Long-term Stability | Run extended workload (30+ minutes) | Stable temperatures, consistent performance | No overheating shutdowns or instability |
📅 Preventive Maintenance Schedule
- Monthly: External vent cleaning with compressed air
- Every 6 Months: Internal inspection for dust accumulation
- Every 12-18 Months: Thermal paste replacement
- Every 2-3 Years: Complete cooling system inspection and maintenance
- As Needed: Fan replacement when bearing noise develops
✅ Cooling System Maintenance Completion Checklist
- ✓ Idle temperatures within expected range (35-50°C)
- ✓ Load temperatures stable without throttling (under 95°C)
- ✓ Fan operation smooth and quiet at all speeds
- ✓ Airflow consistent from all vents
- ✓ Thermal paste properly applied with full coverage
- ✓ All thermal pads correctly sized and positioned
- ✓ Heat sink mounting pressure even and secure
- ✓ Performance benchmarks show improvement
10. Where to Sell Your Upgraded ThinkPad X1 Yoga: Maximizing Your Return
💰 Strategic Selling: Choosing the Right Platform for Maximum Profit
Selecting the optimal selling platform for your upgraded ThinkPad X1 Yoga can mean the difference between a quick $50 profit and a $300+ premium return. Professional sellers understand that different platforms attract different buyers - from budget-conscious students to corporate IT managers seeking reliable, upgraded business laptops.
| Selling Platform | Average Sale Price | Time to Sell | Fee Structure | Best For |
|---|---|---|---|---|
| eBay Premium Listing | $550-$900 | 7-14 days | 12.9% + $0.30 | Maximum exposure, premium upgrades |
| SellLaptopBack (Instant Quote) | $400-$650 | Instant-3 days | 0% (built into offer) | Quick sale, no hassle |
| SellLaptopBack | $380-$600 | 3-7 days | 0% (built into offer) | Convenient, mail-in service |
| Facebook Marketplace | $500-$800 | 3-10 days | 0% | Local sales, avoid shipping |
| Craigslist | $450-$750 | 7-21 days | 0% | Cash transactions, local only |
🔍 Detailed Platform Comparison & Strategy Guide
| Platform | Buyer Profile | Ideal X1 Yoga Configuration | Professional Documentation Impact | Risk Level |
|---|---|---|---|---|
| eBay Business | Tech enthusiasts, small businesses, remote workers | 16GB RAM, 1TB SSD, 4K display, new battery | High impact - justifies 20-30% premium | Medium (buyer protection, returns) |
| SellLaptopBack | Refurbishers, bulk buyers, quick-flip businesses | Any working condition, focus on core specs | Low impact - they assess themselves | Low (instant quote, guaranteed) |
| SellLaptopBack | Refurbishment companies, international resellers | Recent generations, good physical condition | Medium - photos help valuation | Low (mail-in, inspection-based) |
| Facebook Marketplace | Local students, professionals, small business owners | Balanced specs, good cosmetic condition | High impact - builds trust in person | Medium (meet in person, cash only) |
| Specialized Forums | ThinkPad enthusiasts, IT professionals | Rare configurations, maxed-out specs | Critical - technical details valued | Low (community reputation matters) |
🏛️ Government & Education Selling Opportunities
💲 Professional Pricing Strategy Guide
| X1 Yoga Configuration | Base Market Value | Upgrade Value Added | Professional Premium | Target Sale Price |
|---|---|---|---|---|
| Gen 3, 8GB, 256GB, FHD | $280-$350 | +$80 (1TB SSD) +$40 (New Battery) |
+$60 (Documentation) | $460-$530 |
| Gen 4, 16GB, 512GB, WQHD | $420-$520 | +$100 (2TB SSD) +$60 (Cooling+Thermal) |
+$80 (Full Documentation) | $660-$760 |
| Gen 5, 16GB, 1TB, 4K | $580-$720 | +$120 (Fresh Everything) +$80 (Display Calibration) |
+$100 (Premium Restoration) | $880-$1,020 |
| Gen 6, 32GB, 2TB, UHD+ | $850-$1,100 | +$150 (Max Performance) +$100 (Like New Condition) |
+$150 (Expert Grade) | $1,250-$1,500 |
⚡ Instant Quote Services: SellLaptopBack & Alternatives
| Service | Quote Process | Payment Timing | Condition Requirements | Best Use Case |
|---|---|---|---|---|
| SellLaptopBack | Online form, instant preliminary quote | 1-3 days after inspection | Working system, no major damage | Quick turnaround, minimal effort |
| SellLaptopBack | Detailed form, 24-hour quote | 3-5 business days | Good condition, recent models preferred | Convenient mail-in service |
| Gazelle (now EcoATM) | Kiosk or mail-in, instant assessment | Immediate (kiosk) or 3-5 days | Varies, often lower standards | Very quick sale, lower prices |
| BuyBackWorld | Online quote, mail-in verification | 5-7 business days | Working condition, cosmetic acceptable | Older models, fair prices |
Maximizing Instant Quote Values
- Be Honest About Condition: Overstating condition leads to quote reductions
- Document Everything: Photos of upgrades help justify higher offers
- Compare Multiple Services: Quotes can vary 15-30% between services
- Understand the Fine Print: Shipping costs, payment methods, timeframes
- Consider Bundling: Some services offer bonuses for multiple items
📈 Professional Listing Optimization Strategies
- Title Optimization:
- "Lenovo ThinkPad X1 Yoga Gen 6 - 32GB RAM - 2TB SSD - 4K Touch - NEW BATTERY"
- Include key specs: RAM, SSD, display, generation
- Mention premium upgrades and recent maintenance
- Use "Professionally Upgraded" and "Like New Condition"
- Photo Strategy:
- 12-16 high-quality photos showing all angles
- Include photos of upgrades and maintenance work
- Show screen with diagnostic software displaying specs
- Document cosmetic condition honestly and thoroughly
- Description Excellence:
- Lead with your professional upgrades and maintenance
- Include benchmark results and performance improvements
- Detail the ThinkPad-specific features and quality
- Be transparent about any flaws or wear
💬 Professional Buyer Communication Framework
| Buyer Question | Professional Response Template | Value Added | Conversion Impact |
|---|---|---|---|
| "Why is this priced higher than others?" | "This X1 Yoga has professional upgrades including [specific upgrades] and comprehensive maintenance. Unlike others, it includes documentation of all work and performance testing." | Justifies 15-25% premium | High - converts price shoppers to value buyers |
| "Can you provide more photos?" | "Certainly! Here are additional photos showing [specific features]. I can also provide video of it running benchmark software if you'd like." | Builds trust, demonstrates transparency | Medium-High - serious buyers appreciate detail |
| "Is the battery life good?" | "The battery was recently replaced with a genuine Lenovo unit and tested at [X hours] under normal use. I can provide the battery health report." | Addresses key concern with data | High - battery life is top concern |
| "Do you accept returns?" | "I offer a 7-day return policy for any issues, though I thoroughly test everything before listing. I'm confident you'll be happy with this professionally maintained system." | Reduces buyer anxiety | Medium - balances risk appropriately |
📦 Professional Shipping & Packaging Protocol
| Shipping Method | Cost | Insurance | Delivery Time | Recommended For |
|---|---|---|---|---|
| USPS Priority Mail | $18-$25 | $100 included, additional available | 2-3 days | Lower value systems, domestic |
| UPS Ground | $22-$30 | $100 included, additional available | 3-5 days | Medium value, reliable service |
| FedEx Express | $35-$50 | $100 included, additional available | 1-2 days | Premium systems, quick delivery |
| Local Pickup Only | $0 | N/A | Immediate | High value, avoid shipping risk |
Packaging Best Practices
- Use original ThinkPad box if available, or high-quality shipping box
- Double-box with bubble wrap between boxes
- Include accessories in separate bag within main box
- Take photos of packaging process for dispute protection
- Include printed documentation of upgrades and testing
🧾 Tax & Legal Considerations
| Selling Scenario | Tax Implications | Documentation Required | Reporting Threshold | Best Practices |
|---|---|---|---|---|
| Casual Selling (Few items) | Generally not taxable | Keep records of purchase and sale | $20,000 + 200 transactions (IRS) | Track for personal records only |
| Regular Business | Taxable as business income | Detailed profit/loss records | Any regular business activity | Consult tax professional |
| High Volume (eBay/PayPal) | 1099-K if over thresholds | Platform provides documentation | $600+ (new 2022 threshold) | Keep detailed cost records |
🛡️ Risk Management & Fraud Prevention
| Risk Type | Prevention Strategy | Detection Signs | Response Protocol |
|---|---|---|---|
| Payment Fraud | Use platform payment systems only, avoid wire transfers | Overpayment offers, foreign buyers, rush requests | Cancel transaction, report to platform |
| Return Fraud | Detailed photos, serial number documentation | Different item returned, damage claims | Platform dispute, provide documentation |
| Shipping Damage | Proper packaging, insurance, signature required | Carrier damage reports, buyer complaints | File insurance claim, work with carrier |
| Local Meeting Risks | Police station meetups, daytime only, bring friend | Cash counting issues, rushed transactions | Walk away, trust instincts |
✅ Platform Selection Checklist
- ✓ Target buyer profile matches platform audience
- ✓ Pricing strategy aligned with platform norms
- ✓ Professional documentation prepared and optimized
- ✓ Shipping and payment methods configured
- ✓ Risk management protocols in place
- ✓ Tax and record-keeping systems ready
- ✓ Backup selling options identified
- ✓ Timeframe and profit goals established
🎯 Final Platform Recommendations by Scenario
| Your Situation | Primary Platform | Secondary Platform | Safety Net | Expected Timeline |
|---|---|---|---|---|
| Maximum Profit Goal | eBay Premium Listing | Facebook Marketplace | SellLaptopBack | 14-21 days |
| Quick Sale Needed | SellLaptopBack | Facebook Marketplace | SellLaptopBack | 3-7 days |
| Local Preference | Facebook Marketplace | Craigslist | eBay Local Pickup | 7-14 days |
| Premium Upgrades | eBay Business | Specialized Forums | Facebook Marketplace | 10-20 days |
🏁 Your ThinkPad X1 Yoga Selling Journey Complete
You've successfully navigated the complete ThinkPad X1 Yoga upgrade and repair process - from initial assessment through professional upgrades to strategic selling. By following this comprehensive guide, you've transformed a used laptop into a premium, professionally maintained system that commands top dollar in the marketplace. Remember that your documentation, professional workmanship, and strategic platform selection are the keys to maximizing your return on investment.
Expected Success Metrics
- Profit Margin: 40-80% over acquisition cost
- Time Investment: 3-6 hours total per system
- Buyer Satisfaction: 95%+ positive feedback
- Repeat Business Potential: 25-40% from referrals
Need to Sell Your Lenovo Laptop? Get Instant Cash!
If your ThinkPad X1 Yoga (or other ThinkPad model) has performance issues or you're upgrading to a newer business laptop, we offer premium cash payouts for your device. We buy broken, used, and refurbished ThinkPad laptops—including all X1 Yoga configurations—with free insured shipping and hassle-free evaluations.
Sell Popular Lenovo Models Now: