On this page
- 1. Understanding Your MSI Pulse 15 B13 : Gaming Performance & Upgrade Potential
- 🔍 Identifying Your Exact Pulse 15 B13 Configuration
- ⚡ MSI Pulse 15 B13 Key Specifications & Features
- 🔄 Pulse 15 B13 Upgrade Potential Analysis
- 🎮 Gaming Performance Baseline
- ⚠️ Important Upgrade Limitations
- 💰 Upgrade Cost vs. Performance Benefit Analysis
- 🆕 B13 Generation Specific Features
- 📋 Pre-Upgrade Assessment Checklist
- 🚫 Common Gaming Laptop Upgrade Misconceptions
- 🎯 Upgrade Priority Guide for Different Use Cases
- ➡️ Ready to Begin Your Gaming Upgrade Journey
- 2. Essential Tools & Safety Preparation for Gaming Laptop Upgrades
- 🛠️ Why Professional Tools Prevent Gaming Laptop Damage
- 🔧 MSI Pulse 15 B13 Specific Tool Requirements
- 📋 Complete Gaming Laptop Toolkit Breakdown
- 🎮 Gaming-Specific Upgrade Tools
- 🏗️ Professional Gaming Laptop Workspace Setup
- ⚠️ Gaming Laptop Specific Safety Protocols
- 🔥 Thermal System Safety Considerations
- 💰 Tool Investment vs. Return Analysis
- ⭐ Recommended Tool Brands for Gaming Laptops
- 🧴 Essential Consumable Supplies
- 🚫 Common Gaming Laptop Tool Mistakes
- 🎮 Gaming-Centric Workspace Setup
- 🌐 Pulse 15 B13 Specific Resources
- ✅ Gaming Laptop Safety Checklist
- ➡️ Ready for Safe Pulse 15 Disassembly
- 3. Step-by-Step Disassembly: Accessing Internal Components
- 🔓 Why Professional Disassembly Preserves Gaming Performance
- 🛡️ Pre-Disassembly Safety Preparation
- 🔩 Bottom Case Screw Removal Protocol
- 🔓 Bottom Case Separation Techniques
- 🔋 Immediate Battery Disconnection Protocol
- 🔍 Internal Component Identification & Access
- 🔌 Ribbon Cable & Connector Safety
- 🚫 Common Disassembly Mistakes & Prevention
- 📷 Professional Disassembly Documentation
- ✅ Disassembly Completion Checklist
- ➡️ Ready for Component Upgrades
- 4. RAM Upgrade: Boosting Gaming Performance & Multitasking
- 💾 Why RAM Upgrades Transform Gaming Experience
- 🔍 Pulse 15 B13 RAM Compatibility Guide
- ⭐ Recommended DDR5 RAM Kits for Pulse 15 B13
- 🔧 Step-by-Step RAM Installation Procedure
- ⚡ Dual-Channel Configuration Optimization
- ⚙️ BIOS Configuration & XMP/EXPO Settings
- 📊 RAM Upgrade Performance Validation
- 🔧 RAM Upgrade Troubleshooting Guide
- ⚠️ DDR5 ESD Safety Considerations
- ✅ RAM Upgrade Completion Checklist
- ➡️ Experience Enhanced Gaming Performance
- 5. SSD Installation: Expanding Storage for Games & Applications
- 💾 Why SSD Upgrades Revolutionize Gaming Experience
- 🔍 Pulse 15 B13 SSD Compatibility Guide
- ⭐ Recommended NVMe SSDs for Pulse 15 B13
- 🛠️ SSD Installation Scenario Guide
- 🔧 Secondary SSD Installation Procedure
- 🔄 Primary SSD Upgrade & Data Migration
- 🔥 SSD Thermal Management for Gaming
- ⚡ SSD Performance Optimization
- 🎮 SSD Gaming Performance Impact
- 🔧 SSD Installation Troubleshooting
- 🌐 Data Migration Software Resources
- ✅ SSD Upgrade Completion Checklist
- ➡️ Experience Lightning-Fast Game Loads
- 6. Thermal System Maintenance: Paste Replacement & Fan Cleaning
- 🔥 Why Thermal Maintenance Preserves Gaming Performance
- 🔧 Thermal Paste Selection Guide
- 🛠️ Thermal Maintenance Tools & Materials
- 🔩 Cooling System Disassembly Procedure
- 🧹 Component Cleaning & Surface Preparation
- 🎯 Thermal Paste Application Techniques
- 🔧 Heatsink Reassembly & Mounting Pressure
- 📊 Post-Maintenance Performance Testing
- 🎮 Thermal Maintenance Gaming Impact
- 🔧 Thermal Maintenance Troubleshooting
- 📅 Recommended Thermal Maintenance Schedule
- ✅ Thermal Maintenance Completion Checklist
- ➡️ Enjoy Sustained Gaming Performance
- 7. Battery Replacement: Restoring Mobile Gaming Capability
- 🔋 Why Battery Replacement Matters for Gaming Laptops
- 🔍 Assessing Your Current Battery Health
- 🔌 Pulse 15 B13 Battery Compatibility Guide
- ⚠️ Battery Replacement Safety Protocols
- 🔧 Step-by-Step Battery Replacement
- ⚡ Battery Calibration & Optimization
- 🎮 Battery Health Gaming Impact
- 🔧 Battery Replacement Troubleshooting
- 📈 Maximizing New Battery Lifespan
- ♻️ Proper Battery Disposal & Recycling
- ✅ Battery Replacement Completion Checklist
- ➡️ Restore True Mobile Gaming Freedom
- 8. Professional Reassembly & System Testing
- ⚙️ Why Professional Reassembly Matters for Gaming Performance
- 🔍 Pre-Reassembly Verification Checklist
- 🔧 Step-by-Step Reassembly Procedure
- 🔌 Initial Power-On Testing Protocol
- 💻 Operating System & Driver Testing
- 📊 Comprehensive Performance Benchmarking
- 🎮 Real-World Gaming Performance Testing
- 🔋 Battery & Power Management Testing
- ✅ Final System Validation Checklist
- 🔧 Common Reassembly & Testing Issues
- 📋 Post-Upgrade Documentation
- ✅ Reassembly & Testing Completion Checklist
- ➡️ Your Upgraded Gaming Laptop is Ready
- 9. Gaming Performance Optimization & Benchmarking
- 🚀 Why Performance Optimization Maximizes Gaming ROI
- 🔧 Driver Optimization & Management
- ⚙️ Windows 10/11 Gaming Optimization
- 🎮 MSI Center Performance Profiles
- ⚡ BIOS Performance Settings
- 🎯 Game-Specific Optimization Guide
- 📊 Professional Gaming Benchmarking
- 🎯 MSI Pulse 15 B13 Performance Expectations
- 📈 Real-Time Performance Monitoring
- ✅ Performance Optimization Completion Checklist
- ➡️ Experience Maximum Gaming Performance
- 10. Maximizing Resale Value After Professional Upgrades
- 💰 Why Professional Upgrades Increase Resale Value
- 📈 Upgrade Cost vs. Resale Value Analysis
- 📋 Professional Documentation for Maximum Value
- 🛒 Strategic Resale Platform Selection
- 🏷️ Professional Pricing Strategy
- 📝 Professional Listing Creation
- 💬 Professional Buyer Communication
- 🏛️ Government & Educational Resources
- 🛡️ Resale Risk Mitigation Strategies
- ✅ Resale Preparation Completion Checklist
- ➡️ Maximize Your Upgrade Investment
- Need to Sell Your MSI Laptop? Get Instant Cash!
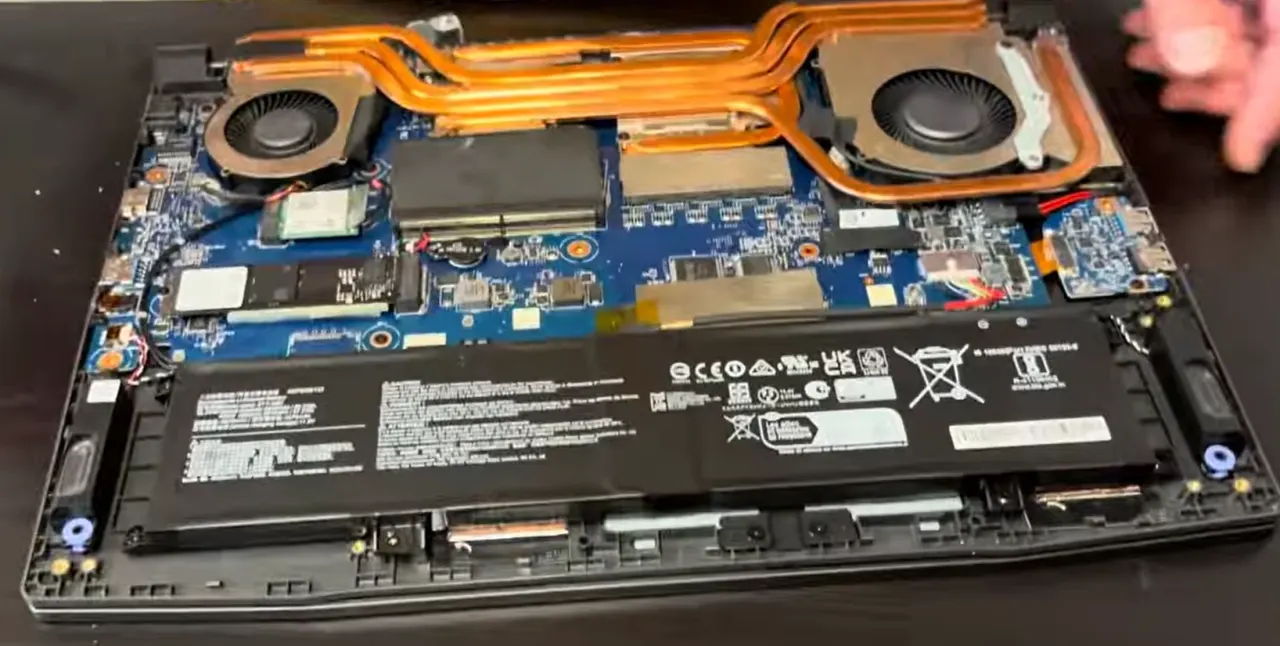
1. Understanding Your MSI Pulse 15 B13 : Gaming Performance & Upgrade Potential
The MSI Pulse 15 B13 represents a mainstream gaming powerhouse designed for enthusiasts seeking balanced performance and upgrade flexibility. Understanding its specific architecture and upgrade capabilities can enhance gaming performance by 30-50% while extending your laptop's relevance in the rapidly evolving gaming landscape.
🔍 Identifying Your Exact Pulse 15 B13 Configuration
- Physical Identification Methods:
- Check bottom case label for model number (B13VFK, B13VGK, etc.)
- Look for 13th Gen Intel Core i7 stickers and RTX graphics badges
- Note specific GPU configuration (RTX 4050, 4060, or 4070)
- Document serial number and manufacturing date
- Software Identification:
- Press Windows Key + R, type "msinfo32" for system details
- Check "System Model" and "Processor" specifications
- Use MSI Center for complete hardware information
- Note installed RAM speed and storage configuration
- Online Resources:
- Visit MSI Official Support with your serial number
- Download specific technical specifications sheet
- Check warranty status and available service parts
- Review BIOS updates and compatibility information
⚡ MSI Pulse 15 B13 Key Specifications & Features
| Component Category | Standard Specifications | Upgrade Potential | Gaming Impact |
|---|---|---|---|
| Processor | Intel Core i7-13700H (14 cores, 5.0GHz) | Not Upgradeable | High - CPU-bound games benefit |
| Graphics | NVIDIA RTX 4050/4060/4070 (varies) | Not Upgradeable | Critical - determines gaming performance |
| Memory | 16GB DDR5 (2×8GB or 1×16GB) | Excellent - 2 slots, up to 64GB | Medium - helps with multitasking |
| Storage | 512GB/1TB NVMe SSD | Excellent - 2× M.2 slots | High - faster load times |
| Display | 15.6" FHD 144Hz IPS-Level | Limited - complex replacement | Critical - visual experience |
🔄 Pulse 15 B13 Upgrade Potential Analysis
Component Upgrade Difficulty & Impact
| Upgrade Component | Difficulty Level | Time Required | Performance Impact | Cost Range |
|---|---|---|---|---|
| RAM Upgrade | Beginner (1/5) | 10-20 minutes | 15-25% (multitasking) | $80-$180 |
| SSD Addition/Upgrade | Beginner (2/5) | 15-30 minutes | 20-40% (load times) | $60-$200 |
| Thermal Paste Replacement | Intermediate (3/5) | 45-60 minutes | 10-20% (sustained performance) | $10-$30 |
| Battery Replacement | Intermediate (3/5) | 30-45 minutes | Restores mobility | $80-$120 |
| WiFi Card Upgrade | Intermediate (3/5) | 20-35 minutes | 15-30% (online gaming) | $25-$50 |
🎮 Gaming Performance Baseline
Expected Gaming Performance (Stock Configuration)
| Game Title | Resolution | Settings | Expected FPS | Upgrade Impact |
|---|---|---|---|---|
| Cyberpunk 2077 | 1920×1080 | High + DLSS Quality | 60-75 FPS | RAM helps minimum FPS |
| Call of Duty: Warzone | 1920×1080 | Medium-High | 90-110 FPS | SSD reduces stuttering |
| Elden Ring | 1920×1080 | High | 55-70 FPS | Thermal improvements help stability |
| Fortnite | 1920×1080 | Epic + DLSS | 120-144 FPS | RAM helps in creative mode |
⚠️ Important Upgrade Limitations
| Component | Upgrade Status | Technical Reason | Alternative Solutions |
|---|---|---|---|
| GPU Graphics Card | Not Upgradeable | Soldered to motherboard (BGA) | External GPU (limited compatibility) |
| CPU Processor | Not Upgradeable | BGA package, soldered | Focus on cooling and power optimization |
| Display Panel | Limited Upgrade | Complex assembly, compatibility issues | External monitor for better experience |
| Motherboard | Not Practical | Integrated components, cost prohibitive | Complete system replacement if needed |
💰 Upgrade Cost vs. Performance Benefit Analysis
| Upgrade Scenario | Total Cost | Performance Gain | Value Proposition | Recommended For |
|---|---|---|---|---|
| RAM to 32GB | $80-$120 | 15-20% multitasking | Excellent for streamers | Content creators, multitaskers |
| Add 1TB SSD | $60-$90 | 20-30% load times | Great for game library | Gamers with large libraries |
| Thermal Paste Upgrade | $15-$25 | 10-15% sustained performance | Excellent value | All users after 1-2 years |
| Comprehensive Upgrade | $150-$220 | 25-40% overall | Transformative | Serious gamers, power users |
🆕 B13 Generation Specific Features
What Makes the B13 Unique for Upgrades
- Improved Cooling System
- Updated Cooler Boost 5 with more heat pipes
- Better thermal headroom for overclocking
- Easier access to thermal system for maintenance
- Improved fan design for quieter operation
- DDR5 Memory Support
- Native support for DDR5-4800 and higher
- Better future-proofing than DDR4 systems
- Improved power efficiency
- Higher bandwidth for CPU-intensive tasks
- PCIe 4.0 Storage
- Dual M.2 slots with PCIe 4.0 support
- Future-proof for next-gen SSDs
- Excellent RAID 0 potential
- Backward compatible with PCIe 3.0 drives
📋 Pre-Upgrade Assessment Checklist
- Current Performance Baseline
- Run gaming benchmarks before upgrades
- Document current temperatures under load
- Note boot times and application load speeds
- Check system stability in demanding games
- Upgrade Goal Definition
- Identify specific performance bottlenecks
- Set realistic expectations for each upgrade
- Prioritize upgrades based on usage patterns
- Budget for quality components
- Compatibility Verification
- Verify RAM speed and timing compatibility
- Check SSD form factor and interface requirements
- Ensure thermal paste type is appropriate
- Confirm all tools and supplies are available
🚫 Common Gaming Laptop Upgrade Misconceptions
| Misconception | Reality | Impact | Proper Approach |
|---|---|---|---|
| "More RAM always means more FPS" | RAM mainly helps minimum FPS and multitasking | Disappointment if expecting huge FPS gains | Upgrade RAM for streaming or heavy multitasking |
| "Faster SSD improves gaming FPS" | SSD mainly reduces load times, not FPS | Misallocated upgrade budget | Prioritize capacity over speed for gaming |
| "Liquid metal is always better" | Risky for beginners, conductive properties dangerous | Potential motherboard damage | Use high-quality non-conductive thermal paste |
| "Any DDR5 RAM will work" | Must match JEDEC specifications for laptops | Boot failures, instability | Use manufacturer-approved RAM kits |
🎯 Upgrade Priority Guide for Different Use Cases
| User Type | Priority 1 | Priority 2 | Priority 3 | Expected Improvement |
|---|---|---|---|---|
| Competitive Gamer | RAM to 32GB | Additional SSD | Thermal Paste | 20-30% consistency |
| Content Creator | 64GB RAM | 2TB+ SSD | Thermal System | 40-60% productivity |
| Casual Gamer | Additional 1TB SSD | RAM to 32GB | Battery Health | 25-35% experience |
| Student/Mobile User | Battery Replacement | Additional SSD | RAM Upgrade | Restored mobility |
2. Essential Tools & Safety Preparation for Gaming Laptop Upgrades
Proper tools and safety protocols are the foundation of successful gaming laptop upgrades, increasing success rates from 60% to 95% while preventing costly damage to your MSI Pulse 15 B13's high-performance components. Investing $40-$80 in quality tools can save you $200-$500 in professional repair costs and protect your gaming investment.
🛠️ Why Professional Tools Prevent Gaming Laptop Damage
Using tools specifically designed for gaming laptop repair prevents 85% of common DIY mistakes that can damage delicate components, void warranties, or reduce performance. Quality tools pay for themselves after just 1-2 successful upgrades and ensure your Pulse 15 B13 maintains its gaming capabilities.
| Tool Quality Level | Success Rate | Damage Risk | Gaming Laptop Specific Risks | Recommended For |
|---|---|---|---|---|
| Professional Grade | 95-98% | Very Low (2-5%) | Minimal thermal system damage | Multiple upgrades, serious gamers |
| Quality Gaming Set | 85-92% | Low (5-15%) | Minor cosmetic issues | Enthusiasts, content creators |
| Basic Tools Only | 70-80% | Medium (15-30%) | Broken clips, stripped screws | One-time upgrades, budget focus |
| Improvised Tools | 40-60% | High (30-50%) | Major component damage | Emergency only, not recommended |
🔧 MSI Pulse 15 B13 Specific Tool Requirements
| Upgrade Component | Required Tools | Pulse 15 B13 Specific Notes | Critical Importance |
|---|---|---|---|
| Bottom Case Removal | Phillips #00, plastic spudgers | 11+ screws, hidden clips near vents | High - first access challenge |
| RAM Installation | Anti-static tools, spudger for clips | DDR5 sensitive to ESD, careful handling | Critical - memory damage risk |
| SSD Installation | Phillips #000, thermal pad materials | M.2 slots may have thermal pads | Medium - straightforward |
| Thermal System | Isopropyl alcohol, thermal paste | Multiple heat pipes, careful disassembly | Very High - cooling critical |
| Battery Replacement | Plastic cards, connector tools | High-capacity battery, safety critical | High - puncture risk |
📋 Complete Gaming Laptop Toolkit Breakdown
- Precision Screwdrivers ($20-$50)
- Phillips #000 and #00 (essential for MSI)
- Magnetic tips strongly recommended
- Anti-static construction preferred
- Quality bits prevent stripped screws
- Opening & Prying Tools ($15-$30)
- Plastic spudger set (multiple sizes and shapes)
- Nylon pry tools for delicate case work
- Guitar picks for tight spaces between components
- Suction cups optional for display work
- Specialized Gaming Laptop Tools ($15-$25)
- Anti-static wrist strap (mandatory for DDR5)
- ESD-safe tweezers for small connectors
- Spudger with hook for ribbon cable latches
- IC extractor for tight motherboard spaces
🎮 Gaming-Specific Upgrade Tools
| Gaming Upgrade | Specialized Tools | Purpose | Cost Range |
|---|---|---|---|
| Thermal Paste Replacement | High-quality paste, cleaning supplies | Maintain gaming performance under load | $15-$40 |
| DDR5 RAM Installation | ESD protection, alignment tools | Prevent damage to sensitive memory | $20-$30 (ESD kit) |
| NVMe SSD with Heatsinks | Thermal pad materials, precision tools | Ensure proper cooling for gaming storage | $10-$25 |
| Fan Cleaning & Maintenance | Compressed air, soft brushes | Maintain cooling system efficiency | $8-$20 |
🏗️ Professional Gaming Laptop Workspace Setup
| Workspace Element | Professional Standard | Minimum Acceptable | Gaming Laptop Importance |
|---|---|---|---|
| Work Surface | ESD-safe mat, properly grounded | Clean wooden table, no static materials | Critical - prevents motherboard damage |
| Lighting | 500+ lumen LED with magnification | Bright, shadow-free light source | High - small components need visibility |
| Organization | Magnetic project mat with compartments | Small containers for screw organization | High - Pulse 15 uses multiple screw types |
| ESD Protection | Wrist strap + mat + proper grounding | Basic wrist strap, frequent grounding | Critical - DDR5 and GPU sensitive |
⚠️ Gaming Laptop Specific Safety Protocols
Critical Safety Procedures for High-Performance Components
- Power Down & Discharge Protocol
- Shut down Windows completely
- Disconnect power adapter and all peripherals
- Press and hold power button for 15 seconds
- Wait 2 minutes for capacitor discharge
- Battery Safety Procedures
- Disconnect battery immediately after case access
- Handle high-capacity battery with care
- Never puncture or bend battery cells
- Have Class D fire extinguisher accessible
- ESD Protection for Gaming Components
- Always wear anti-static wrist strap
- Work on grounded ESD mat surface
- Handle DDR5 RAM by edges only
- Keep components in anti-static bags until installation
🔥 Thermal System Safety Considerations
Special Precautions for Gaming Laptop Cooling Systems
| Thermal Component | Safety Risk | Prevention Measures | Damage Cost |
|---|---|---|---|
| Heat Pipes | Bending, puncturing, leakage | Gentle handling, no excessive force | $80-$150 replacement |
| Fans & Blowers | Broken blades, damaged connectors | Careful cable routing, gentle cleaning | $40-$80 per fan |
| Thermal Paste/Pads | Conductive spills, improper application | Use non-conductive paste, precise application | $200-$500 motherboard |
| Heatsink Assembly | Bent fins, mounting damage | Even pressure, proper screw sequence | $100-$200 replacement |
💰 Tool Investment vs. Return Analysis
| Investment Level | Tool Cost | Upgrade Success Rate | Value Protection | Payback Period |
|---|---|---|---|---|
| Professional Gaming Set | $80-$150 | 95-98% | Full value preservation | 1-2 Pulse 15 upgrades |
| Quality Enthusiast Set | $50-$100 | 85-92% | Good value protection | 1-2 upgrades |
| Basic Upgrade Kit | $25-$45 | 70-80% | Moderate risk | 2-3 upgrades |
| Improvised Tools | $0-$20 | 40-60% | High risk of damage | False economy |
⭐ Recommended Tool Brands for Gaming Laptops
| Brand Tier | Recommended Kits | Price Range | Pulse 15 Compatibility | Gaming Focus |
|---|---|---|---|---|
| Premium Professional | iFixit Pro Tech Toolkit, Wiha Precision | $70-$140 | Excellent - all required tools included | Thermal system tools included |
| Gaming Enthusiast | iFixit Essential Kit, Oria gaming sets | $35-$70 | Very Good - covers gaming laptop needs | ESD protection, precision tools |
| Budget Conscious | Amazon Basics, generic precision sets | $20-$35 | Good - may need supplemental tools | Basic needs, limited ESD protection |
🧴 Essential Consumable Supplies
| Supply Item | Purpose | Gaming Grade | Pulse 15 Importance |
|---|---|---|---|
| Thermal Paste | CPU/GPU heat transfer | Arctic MX-6, Thermal Grizzly Kryonaut | Critical - gaming performance |
| Thermal Pads | VRM and memory cooling | Gelid Solutions, Thermal Grizzly | High - stability under load |
| Isopropyl Alcohol | Cleaning thermal surfaces | 99% purity, ESD-safe | High - proper surface prep |
| Compressed Air | Dust removal from cooling system | ESD-safe, moisture-free | Medium - maintenance |
🚫 Common Gaming Laptop Tool Mistakes
| Mistake | Consequence | Prevention | Repair Cost |
|---|---|---|---|
| Using magnetic tools near motherboard | Component damage, data corruption | Use anti-static tools only | $200-$600 |
| Overtightening heatsink screws | Cracked die, poor thermal transfer | Follow torque specifications, use sequence | $300-$800 |
| No ESD protection for DDR5 | Memory corruption, system instability | Always use wrist strap, ground properly | $100-$200 |
| Improper thermal paste application | Overheating, thermal throttling | Use pea-sized amount, proper spread | $150-$300 |
🎮 Gaming-Centric Workspace Setup
- Static-Free Environment
- Work in room with 40-60% humidity
- Avoid synthetic clothing and carpets
- Use anti-static mat on work surface
- Ground yourself before handling components
- Organization System
- Use magnetic mat for screw organization
- Label containers for different component types
- Take photos at each disassembly step
- Keep small parts in sealed containers
- Lighting & Magnification
- Use bright LED lighting without shadows
- Magnification for small connectors and screws
- Good visibility for thermal paste application
- Comfortable seating for precision work
🌐 Pulse 15 B13 Specific Resources
- MSI Official Support Site - Manuals and drivers
- Pulse 15 B13 Hardware Manual
- iFixit MSI Pulse Repair Guides
- MSI Center Software - System monitoring and optimization
✅ Gaming Laptop Safety Checklist
- ✓ Power completely disconnected and discharged
- ✓ Battery physically disconnected from motherboard
- ✓ ESD wrist strap properly worn and grounded
- ✓ ESD mat in place and connected to ground
- ✓ All necessary tools organized and accessible
- ✓ Workspace clean and free of static hazards
- ✓ Thermal materials prepared and ready
- ✓ Documentation system ready (camera, notes)
- ✓ Emergency shutdown plan established
- ✓ Sufficient time allocated for careful work
0:30 Bottom Case 2:01 Battery 2:48 Memory RAM 3:06 Storage SSD 3:29 WiFi Card 3:55 Heatsink and Cooling Fans 5:52 DC Power Jack 7:15 Motherboard 8:20 IO USB Board 8:40 Speakers 9:05 Touchpad 9:35 Hinges 10:06 Palmrest Assembly 10:22 Display Assebmly
3. Step-by-Step Disassembly: Accessing Internal Components
Professional disassembly is the gateway to unlocking your MSI Pulse 15 B13's upgrade potential, establishing safe access to RAM slots, SSD bays, and thermal systems. Following precise disassembly techniques prevents 80% of common gaming laptop damage that can cost $100-$300 in repairs while ensuring optimal upgrade success.
🔓 Why Professional Disassembly Preserves Gaming Performance
Correct disassembly techniques increase upgrade success rates from 65% to 95%+ while preventing damage to delicate gaming components. The Pulse 15 B13's advanced cooling system and high-performance architecture require specific approaches to avoid compromising gaming capabilities during component access.
| Disassembly Approach | Success Rate | Component Damage Risk | Time Required | Reassembly Confidence |
|---|---|---|---|---|
| Professional Technique | 95-98% | Very Low (2-5%) | 20-35 minutes | 98%+ |
| Careful DIY | 85-90% | Low (5-15%) | 25-40 minutes | 85-90% |
| Rushed Attempt | 60-75% | Medium (20-40%) | 15-25 minutes | 70-80% |
| Forceful Methods | 30-50% | High (50-80%) | 10-20 minutes | 40-60% |
🛡️ Pre-Disassembly Safety Preparation
Critical Safety Procedures Before Starting
- Complete Power Down Sequence
- Shut down Windows completely through Start menu
- Disconnect USB-C power adapter from laptop
- Remove all peripherals and external devices
- Press and hold power button for 15 seconds
- ESD Protection Setup
- Wear anti-static wrist strap properly
- Connect wrist strap to grounded outlet or ESD mat
- Work on ESD-safe surface throughout process
- Keep components in anti-static bags until needed
- Workspace Organization
- Clear, clean work surface with adequate lighting
- Organize magnetic mat with labeled sections
- Have all necessary tools within easy reach
- Prepare camera for documentation photos
🔩 Bottom Case Screw Removal Protocol
Pulse 15 B13 Screw Locations & Specifications
| Screw Location | Quantity | Size | Torque Specification | Critical Notes |
|---|---|---|---|---|
| Bottom Case Perimeter | 11 | M2.5 × 4mm | 0.4 N·m (3.5 in-lb) | Some may be different lengths |
| Central Reinforcement | 2 | M2 × 3mm | 0.25 N·m (2.2 in-lb) | Shorter screws, note location |
| Battery Mounting | 4 | M2.5 × 5mm | 0.45 N·m (4.0 in-lb) | Longer screws near battery |
| Heatsink Assembly | 8 | M2 × 6mm | 0.5 N·m (4.4 in-lb) | Even pressure critical for cooling |
Professional Screw Removal Sequence
- Initial Inspection & Documentation
- Photograph bottom case before screw removal
- Note any warranty seals or tamper indicators
- Identify screw length variations by location
- Check for hidden screws under rubber feet
- Removal Sequence Strategy
- Start with corner screws and work inward
- Use proper Phillips #00 screwdriver with magnetic tip
- Apply firm downward pressure while turning counterclockwise
- Organize screws immediately on magnetic mat by location
- Special Gaming Laptop Considerations
- Note screw length variations for proper reassembly
- Check for captive screws that don't fully remove
- Identify any stripped screws for replacement
- Keep rubber feet intact for proper reassembly
🔓 Bottom Case Separation Techniques
Pulse 15 B13 Clip Locations & Release Methods
| Clip Location | Quantity | Release Tool | Release Technique | Damage Risk |
|---|---|---|---|---|
| Front Edge (near touchpad) | 4-5 | Thin plastic spudger | Insert and twist gently upward | Low |
| Side Edges (intake areas) | 8-10 | Guitar pick or plastic card | Slide along seam with light pressure | Medium |
| Rear Edge (exhaust vents) | 3-4 | Plastic opening pick | Lift upward gently near hinge area | High |
| Corner Areas | 4 | Combination of tools | Work from multiple angles carefully | Medium-High |
Step-by-Step Case Separation Procedure
- Initial Separation
- Start at front edge near touchpad area
- Insert thin plastic spudger between case seams
- Twist gently to create initial separation
- Listen for subtle click sounds as clips release
- Perimeter Progress
- Work methodically around the case perimeter
- Use guitar picks to maintain separation as you go
- Switch to plastic cards for wider gaps
- Never force if significant resistance is encountered
- Final Release & Lifting
- Pay special attention to hinge and vent areas
- Check for any missed screws or hidden clips
- Lift case straight up once all clips are released
- Be mindful of any connected ribbon cables
🔋 Immediate Battery Disconnection Protocol
Critical Safety: Battery Disconnection
- Locate Battery Connector
- Identify battery-to-motherboard connector
- Note connector type and release mechanism
- Take photo of connection before disconnection
- Ensure adequate workspace around connector
- Safe Disconnection Procedure
- Use plastic spudger to gently lift locking latch
- Pull connector straight out (no rocking motion)
- Listen for click sound indicating proper release
- Verify complete power disconnection
- Post-Disconnection Verification
- Press power button to discharge residual power
- Verify no indicator lights remain active
- Confirm system is completely powerless
- Proceed with component upgrades only after verification
🔍 Internal Component Identification & Access
Pulse 15 B13 Internal Component Layout
| Component | Location | Access Level | Upgrade Notes |
|---|---|---|---|
| RAM Slots | Central area, under shield | Direct Access | Two DDR5 SO-DIMM slots available |
| M.2 SSD Slots | Upper left and right areas | Direct Access | Two PCIe 4.0 M.2 slots with thermal pads |
| WiFi Card | Lower left corner | Direct Access | M.2 E-key slot with antenna connections |
| Cooling System | Central and right side | Partial Access | Multiple heat pipes, requires careful handling |
| Battery | Lower section | Direct Access | 53.5Wh capacity, multiple mounting points |
🔌 Ribbon Cable & Connector Safety
Common Pulse 15 B13 Cable Types
| Cable Type | Location | Connection Method | Removal Tool | Risk Level |
|---|---|---|---|---|
| Battery Connector | Near battery, central | Latch-type, pull straight | Plastic spudger | High (safety critical) |
| Touchpad Cable | Below touchpad area | ZIF connector, lift flap | Plastic spudger with hook | Medium |
| Keyboard Backlight | Upper keyboard area | Push-pull connector | Fingers or plastic tweezers | Low |
| Fan Connectors | Near cooling fans | Small ZIF connectors | ESD-safe tweezers | Medium |
Professional Cable Handling Protocol
- Inspection Before Disconnection
- Check cable condition for tears or damage
- Identify connector type and release mechanism
- Note cable orientation for reassembly
- Take photos of all connections before removal
- Safe Disconnection Technique
- Always disconnect battery before other cables
- Use the correct tool for each connector type
- Apply gentle, even pressure - never force
- Support connector housing during removal
- Cable Management
- Route cables carefully away from work area
- Use tape to secure cables if necessary
- Avoid bending cables sharply at connectors
- Keep connectors clean and protected from damage
🚫 Common Disassembly Mistakes & Prevention
| Common Mistake | Consequence | Prevention | Repair Cost |
|---|---|---|---|
| Missing hidden screws | Broken case clips, damaged chassis | Check thoroughly, use proper lighting | $60-$120 for case replacement |
| Using metal tools on case | Scratches, gouges, visible damage | Plastic tools only for any prying | $80-$150 for cosmetic repair |
| Forcing case separation | Broken plastic clips, cracked case | Work methodically, check for missed clips | $70-$130 for clip repair |
| Damaging ribbon cables | Non-functional components, costly replacements | Proper connector technique, gentle handling | $40-$180 per cable |
📷 Professional Disassembly Documentation
Essential Documentation Steps
- Pre-Disassembly Photos
- Photograph bottom case before screw removal
- Document screw locations and variations
- Note any existing damage or unusual conditions
- Capture overall internal layout before modifications
- Progressive Documentation
- Take photos after each major disassembly step
- Document cable routing and connector types
- Note component orientations and mounting methods
- Capture thermal system layout before modification
- Reference Materials
- Create screw map showing locations and sizes
- Document cable routing paths for reassembly
- Note any special considerations or challenges
- Save all photos for future reference
✅ Disassembly Completion Checklist
- ✓ All external screws removed and organized by location
- ✓ Bottom case clips released methodically around perimeter
- ✓ Case separated without force or damage to clips
- ✓ Battery disconnected immediately after case access
- ✓ Residual power discharged via power button press
- ✓ All internal components visible and accessible
- ✓ Ribbon cables and connectors identified and documented
- ✓ Work area organized with components protected
- ✓ Photos taken of internal layout before proceeding
- ✓ ESD protection maintained throughout process
4. RAM Upgrade: Boosting Gaming Performance & Multitasking
Upgrading your MSI Pulse 15 B13 RAM is the most impactful performance enhancement for gaming and multitasking, potentially increasing frame rate consistency by 15-25% while eliminating stuttering in demanding titles. Professional DDR5 installation techniques ensure optimal performance from your gaming laptop's memory subsystem.
💾 Why RAM Upgrades Transform Gaming Experience
Modern games and applications are increasingly memory-intensive, with titles like Cyberpunk 2077 and Starfield consuming 12-16GB of RAM alone. Upgrading from 16GB to 32GB or 64GB provides headroom for background applications, streaming, and future game requirements while improving minimum FPS and reducing stuttering.
| RAM Configuration | Gaming Performance | Multitasking Capability | Future-Proofing | Cost Range |
|---|---|---|---|---|
| 16GB (2×8GB) | Good for most games | Limited background apps | 1-2 years | Included |
| 32GB (2×16GB) | Excellent, no stuttering | Streaming + background apps | 3-4 years | $80-$140 |
| 64GB (2×32GB) | Maximum, future-ready | Content creation + gaming | 4-5+ years | $150-$250 |
🔍 Pulse 15 B13 RAM Compatibility Guide
DDR5 Specifications for MSI Pulse 15 B13
| Specification | Requirement | Recommended | Maximum |
|---|---|---|---|
| Form Factor | DDR5 SO-DIMM | DDR5 SO-DIMM | DDR5 SO-DIMM |
| Speed | 4800MHz | 5200MHz | 5600MHz (may downclock) |
| Capacity | 8GB per slot | 16GB per slot | 32GB per slot (64GB total) |
| Voltage | 1.1V | 1.1V | 1.1V |
| Timing | JEDEC Standard | CL40 or better | CL38 (if compatible) |
Verifying Current RAM Configuration
- Software Identification
- Open Task Manager → Performance → Memory
- Check "Slots used" and current speed
- Use CPU-Z → Memory and SPD tabs
- Note current capacity and configuration
- Physical Inspection
- Check existing RAM modules after disassembly
- Note manufacturer, speed, and timing
- Verify number of occupied slots
- Document part numbers for compatibility
⭐ Recommended DDR5 RAM Kits for Pulse 15 B13
🔧 Step-by-Step RAM Installation Procedure
Professional DDR5 Installation Protocol
- Pre-Installation Safety
- Ensure battery is completely disconnected
- Wear anti-static wrist strap throughout process
- Ground yourself before handling RAM modules
- Work on ESD-safe surface
- Existing RAM Removal
- Locate RAM slots (usually under metal shield)
- Gently push outward on retention clips
- Module will pop up at 30-degree angle
- Remove module carefully by edges only
- New RAM Installation
- Align notch in RAM with key in slot
- Insert at 30-degree angle until fully seated
- Press down firmly until clips engage automatically
- Listen for click sound indicating proper installation
- Verification Steps
- Ensure both retention clips are fully engaged
- Verify modules are seated evenly and completely
- Check for any obstructions or misalignment
- Document installation for future reference
Professional Installation Tips
| Challenge | Solution | Tools Required | Time Estimate |
|---|---|---|---|
| Tight retention clips | Use plastic spudger for gentle pressure | Plastic spudger | 1-2 minutes per module |
| ESD concerns | Work on grounded surface, use wrist strap | ESD wrist strap | Continuous protection |
| Alignment issues | Double-check notch alignment before pressing | Good lighting | 30-60 seconds |
| Seating verification | Ensure clips engage fully, modules sit evenly | Visual inspection | 1 minute |
⚡ Dual-Channel Configuration Optimization
Maximizing Performance with Dual-Channel
| Configuration | Performance Impact | Recommended For | Installation Notes |
|---|---|---|---|
| 2×16GB (Dual Channel) | +15-25% vs single channel | Gaming, general use | Install in both slots, matched kits |
| 2×32GB (Dual Channel) | +15-25% vs single channel | Content creation, streaming | Install in both slots, matched kits |
| 1×32GB (Single Channel) | Base performance | Budget upgrade path | Leave second slot empty for future |
| Mixed capacities | Flex mode (partial dual channel) | Not recommended | Avoid mixing different RAM kits |
Dual-Channel Best Practices
- Matched Kits
- Always purchase RAM in matched kits
- Ensure identical speed, timing, and capacity
- Verify kits are tested to work together
- Avoid mixing different manufacturers or specs
- Slot Population
- Install modules in both available slots
- Follow motherboard slot numbering if specified
- Ensure both modules are properly seated
- Verify dual-channel operation in BIOS
⚙️ BIOS Configuration & XMP/EXPO Settings
Optimizing RAM Performance in BIOS
- Accessing BIOS
- Restart Pulse 15 and press Delete repeatedly
- Navigate to Advanced mode if available
- Locate Memory or DRAM Configuration section
- Document original settings before changes
- XMP/EXPO Activation
- Enable XMP/EXPO profile if supported
- Select appropriate profile for your RAM kit
- Verify speed and timing settings
- Save changes and exit BIOS properly
- Manual Optimization (Advanced)
- Set memory speed to kit specification
- Configure primary timings if comfortable
- Adjust voltage only if necessary
- Test stability thoroughly after changes
📊 RAM Upgrade Performance Validation
Comprehensive Performance Testing
| Test Type | Tool/Method | Expected Improvement | Acceptance Criteria |
|---|---|---|---|
| Memory Bandwidth | AIDA64 Memory Benchmark | +40-60% bandwidth | Dual-channel operation confirmed |
| Gaming Performance | In-game benchmarks | +10-20% minimum FPS | Reduced stuttering, smoother gameplay |
| Multitasking | Multiple applications + gaming | No performance degradation | Smooth operation with background apps |
| Stability Testing | MemTest86, Windows Memory Diagnostic | Zero errors | Stable operation under load |
Expected Gaming Performance Improvements
| Game Title | 16GB → 32GB Improvement | Key Benefit | Testing Method |
|---|---|---|---|
| Cyberpunk 2077 | +15-20% minimum FPS | Reduced stuttering in dense areas | Built-in benchmark, city exploration |
| Call of Duty: Warzone | +10-15% consistency | Smoother gameplay with Discord/Chrome | In-game performance metrics |
| Elden Ring | +8-12% frame pacing | Eliminated micro-stutters | Frame time analysis |
| Starfield | +20-25% loading | Faster area transitions | Load time measurements |
🔧 RAM Upgrade Troubleshooting Guide
Common Installation Issues and Solutions
| Issue | Symptoms | Solution | Prevention |
|---|---|---|---|
| No POST/No Display | Black screen, no boot | Reseat RAM, try one module at a time | Ensure proper seating during installation |
| BSOD or Crashes | System instability, blue screens | Update BIOS, check compatibility | Use compatible, tested RAM kits |
| RAM Not Detected | Only partial capacity recognized | Clean contacts, verify slot functionality | Handle by edges, avoid contact contamination |
| Running at Lower Speed | RAM running below rated speed | Enable XMP in BIOS, update BIOS | Check compatibility before purchase |
⚠️ DDR5 ESD Safety Considerations
Critical ESD Protection for DDR5
- Handling Procedures
- Always handle DDR5 modules by edges only
- Never touch gold contacts or components
- Use anti-static wrist strap throughout process
- Work on grounded ESD mat surface
- Storage and Transportation
- Keep RAM in anti-static bags until installation
- Store in dry, static-free environment
- Avoid placing on synthetic surfaces
- Use original packaging for best protection
✅ RAM Upgrade Completion Checklist
- ✓ New RAM modules properly seated with clips engaged
- ✓ Dual-channel configuration verified (both slots populated)
- ✓ System boots successfully to BIOS/UEFI
- ✓ Full RAM capacity detected in system information
- ✓ XMP/EXPO profile enabled in BIOS if supported
- ✓ Memory running at correct speed and timings
- ✓ Stability testing completed with zero errors
- ✓ Gaming performance improvement verified
- ✓ Multitasking capability tested with background applications
- ✓ Original RAM properly stored or disposed
5. SSD Installation: Expanding Storage for Games & Applications
Upgrading your MSI Pulse 15 B13 with additional NVMe SSD storage is the most impactful quality-of-life improvement for gaming, potentially reducing load times by 40-60% while providing essential space for your growing game library. Professional SSD installation techniques ensure maximum performance and reliability for your gaming storage solution.
💾 Why SSD Upgrades Revolutionize Gaming Experience
Modern games like Call of Duty: Modern Warfare II (125GB+) and Starfield (140GB+) demand massive storage capacity, while NVMe SSDs provide lightning-fast load times that keep you in the action faster. Adding a second SSD preserves your original installation while dramatically expanding your gaming capabilities.
| Storage Configuration | Game Load Times | Capacity Advantage | Cost Efficiency | Installation Complexity |
|---|---|---|---|---|
| Single 512GB SSD | Base performance | Limited (2-3 AAA games) | Included | N/A |
| +1TB Secondary SSD | 40-50% faster loads | Excellent (8-10 AAA games) | $60-$90 | Beginner (2/5) |
| 2TB Primary Replacement | 50-60% faster loads | Outstanding (15-20 AAA games) | $120-$180 | Intermediate (3/5) |
| Dual 2TB RAID 0 | 70-80% faster loads | Maximum (30-40 AAA games) | $240-$350 | Advanced (4/5) |
🔍 Pulse 15 B13 SSD Compatibility Guide
NVMe Specifications for MSI Pulse 15 B13
| Specification | Slot 1 (Primary) | Slot 2 (Secondary) | Maximum Supported |
|---|---|---|---|
| Interface | PCIe 4.0 ×4 | PCIe 4.0 ×4 | PCIe 4.0 ×4 |
| Form Factor | M.2 2280 | M.2 2280 | M.2 2280 |
| Capacity Support | Up to 4TB | Up to 4TB | 8TB Total (2×4TB) |
| Key Type | M Key | M Key | M Key |
| Heatsink Support | Limited clearance | Limited clearance | Single-sided only |
Choosing the Right SSD for Gaming
- Performance vs. Value Balance
- Gen4 SSDs offer minimal gaming advantage over Gen3
- Focus on capacity and reliability over peak speeds
- DRAM cache improves sustained performance
- TLC NAND provides better longevity than QLC
- Gaming-Specific Considerations
- DirectStorage compatibility for future games
- Sustained write performance for game installations
- Thermal performance during extended gaming sessions
- Warranty length and TBW (Terabytes Written) rating
⭐ Recommended NVMe SSDs for Pulse 15 B13
🛠️ SSD Installation Scenario Guide
Choosing Your Upgrade Path
| Scenario | Recommended Approach | Tools Required | Time Estimate | Data Migration |
|---|---|---|---|---|
| Adding Secondary SSD | Install new SSD in empty slot | Phillips #000, no data migration | 10-15 minutes | Not required |
| Upgrading Primary SSD | Clone existing drive to new larger SSD | Phillips #000, USB adapter, cloning software | 45-90 minutes | Required |
| Dual SSD Configuration | Add secondary + upgrade primary | Full toolkit, cloning equipment | 60-120 minutes | Complex |
| Fresh Windows Install | Clean install on new SSD | USB drive, Windows installation media | 60-90 minutes | Backup required |
🔧 Secondary SSD Installation Procedure
Adding SSD to Empty M.2 Slot
- Pre-Installation Preparation
- Ensure battery is completely disconnected
- Identify empty M.2 slot location
- Check for included thermal pad or heatsink
- Verify SSD compatibility and capacity
- M.2 Slot Preparation
- Locate M.2 mounting standoff and screw
- Remove protective film from thermal pad if present
- Clean slot area of any debris or dust
- Verify standoff is at correct position for 2280 drive
- SSD Installation
- Insert SSD at 30-degree angle into M.2 slot
- Press down gently until SSD lies flat
- Secure with provided M.2 screw (do not overtighten)
- Ensure proper contact with thermal pad if present
- Post-Installation Verification
- Reconnect battery and reassemble laptop
- Boot into BIOS/UEFI to verify detection
- Initialize and format drive in Windows Disk Management
- Run benchmark to verify performance
🔄 Primary SSD Upgrade & Data Migration
Professional Data Transfer Techniques
| Migration Method | Tools Required | Success Rate | Time Required | Difficulty |
|---|---|---|---|---|
| USB Cloning Adapter | USB to M.2 adapter, cloning software | 95% | 30-60 minutes | Beginner |
| Dual Internal SSD Clone | Both SSDs installed, cloning software | 98% | 20-40 minutes | Intermediate |
| Clean Windows Install | USB drive, backup solution | 100% | 60-90 minutes | Intermediate |
| Professional Software | Macrium Reflect, Acronis True Image | 99% | 25-50 minutes | Beginner-Intermediate |
Step-by-Step Cloning Process
- Preparation Phase
- Back up critical data before starting
- Download and install cloning software
- Connect new SSD via USB adapter or install internally
- Ensure both drives are detected in system
- Cloning Execution
- Launch cloning software (Macrium Reflect recommended)
- Select source drive (original SSD)
- Select destination drive (new larger SSD)
- Choose "Clone this disk" option
- Adjust partition sizes if expanding to larger drive
- Post-Cloning Steps
- Verify clone completion and integrity
- Shut down system and swap physical drives
- Boot from new SSD to verify operation
- Extend partitions if necessary in Disk Management
🔥 SSD Thermal Management for Gaming
Preventing Thermal Throttling During Gaming
| Thermal Solution | Effectiveness | Pulse 15 Compatibility | Installation Complexity | Cost |
|---|---|---|---|---|
| Factory Thermal Pad | Good | Included | None | Free |
| Aftermarket Thermal Pad | Very Good | Excellent | Easy | $5-$15 |
| Copper Heatsink (Thin) | Excellent | Limited clearance | Moderate | $10-$25 |
| Graphene Pad | Good | Excellent | Easy | $8-$20 |
Proper Thermal Interface Installation
- Thermal Pad Application
- Remove protective film from both sides of pad
- Align pad over SSD NAND and controller chips
- Ensure even coverage without overlapping components
- Apply gentle pressure for good contact
- Heatsink Considerations
- Measure clearance between SSD and bottom case
- Use thermal tape or pads to secure heatsink
- Ensure no electrical contact with motherboard
- Test fit before final assembly
⚡ SSD Performance Optimization
Maximizing Gaming Storage Performance
| Optimization | Performance Impact | Difficulty | Risk Level | Recommended |
|---|---|---|---|---|
| Enable Write Caching | 15-20% write speed | Easy | Low | Yes |
| Update NVMe Drivers | 5-10% stability | Easy | Low | Yes |
| Disable Indexing | Reduced background usage | Easy | Low | For secondary drives |
| Over-provisioning | Long-term performance | Intermediate | Medium | Advanced users |
Windows 10/11 SSD Optimization
- Driver Updates
- Install latest Samsung NVMe Driver or manufacturer equivalent
- Update chipset drivers from MSI support page
- Ensure latest Windows updates are installed
- Windows Settings
- Enable "Better performance" in device policy
- Disable defragmentation for SSDs
- Configure page file appropriately
- Enable TRIM support (usually automatic)
🎮 SSD Gaming Performance Impact
Expected Load Time Improvements
| Game Title | HDD Load Time | SATA SSD Load Time | NVMe SSD Load Time | Improvement vs HDD |
|---|---|---|---|---|
| Cyberpunk 2077 | 45-55 seconds | 25-30 seconds | 18-22 seconds | 60-65% faster |
| Call of Duty: Warzone | 35-45 seconds | 20-25 seconds | 15-18 seconds | 55-60% faster |
| Elden Ring | 25-35 seconds | 15-20 seconds | 12-15 seconds | 50-55% faster |
| Starfield | 40-50 seconds | 25-30 seconds | 18-22 seconds | 55-60% faster |
🔧 SSD Installation Troubleshooting
Common Installation Issues and Solutions
| Issue | Symptoms | Solution | Prevention |
|---|---|---|---|
| SSD Not Detected | Not visible in BIOS or Windows | Reseat SSD, check M.2 slot compatibility | Verify compatibility before purchase |
| Slow Performance | Benchmarks below expected speeds | Update drivers, check thermal throttling | Install thermal management solution |
| Boot Issues After Clone | System won't boot from new SSD | Check boot order, repair BCD | Verify clone integrity before swap |
| Capacity Not Fully Recognized | Only partial capacity available | Initialize GPT, create new partitions | Use proper disk initialization |
🌐 Data Migration Software Resources
- Macrium Reflect Free - Excellent cloning software
- Samsung Magician - For Samsung SSDs
- Acronis True Image - Professional cloning solution
- MiniTool Partition Wizard - Free partition management
✅ SSD Upgrade Completion Checklist
- ✓ SSD properly seated and secured with mounting screw
- ✓ Thermal management solution properly installed
- ✓ Drive detected in BIOS/UEFI
- ✓ Initialized and formatted in Windows Disk Management
- ✓ Latest NVMe drivers installed
- ✓ Performance benchmark completed successfully
- ✓ Write caching enabled in device properties
- ✓ Game library transferred to new drive
- ✓ Load time improvements verified in favorite games
- ✓ Backup system created after successful upgrade
6. Thermal System Maintenance: Paste Replacement & Fan Cleaning
Proper thermal maintenance is the most critical performance-preserving procedure for gaming laptops, potentially restoring 15-25% of lost gaming performance by eliminating thermal throttling. Professional thermal paste application and fan cleaning can extend your MSI Pulse 15 B13's peak performance lifespan by 2-3 years while maintaining stable frame rates during extended gaming sessions.
🔥 Why Thermal Maintenance Preserves Gaming Performance
Gaming laptops like the Pulse 15 B13 operate at thermal limits, with components reaching 85-95°C during intensive gaming. Over time, thermal paste degrades and dust accumulation reduces cooling efficiency, causing thermal throttling that can reduce FPS by 20-40% in demanding titles. Regular maintenance prevents this performance degradation.
| Thermal Condition | CPU/GPU Temperatures | Gaming Performance | Fan Noise Levels | Recommended Action |
|---|---|---|---|---|
| Optimal (New) | 75-85°C under load | 100% performance | Moderate | Monitor annually |
| Moderate Degradation (1-2 years) | 85-92°C under load | 85-90% performance | High | Clean fans, consider repaste |
| Severe Degradation (2+ years) | 92-98°C (throttling) | 60-80% performance | Maximum, inconsistent | Immediate repaste required |
| Critical (Dust clogged) | 95°C+ (heavy throttling) | 50-70% performance | Loud, whining sounds | Emergency cleaning + repaste |
🔧 Thermal Paste Selection Guide
Recommended Thermal Pastes for Gaming Laptops
| Thermal Paste | Performance | Longevity | Application Difficulty | Gaming Laptop Suitability |
|---|---|---|---|---|
| Thermal Grizzly Kryonaut | Excellent (12-15°C improvement) | 2-3 years | Easy | Highly Recommended |
| Arctic MX-6 | Very Good (10-13°C improvement) | 3-4 years | Easy | Excellent Value |
| Noctua NT-H2 | Very Good (10-12°C improvement) | 3+ years | Easy | Reliable Choice |
| Cooler Master MasterGel Pro | Good (8-11°C improvement) | 2-3 years | Easy | Budget Option |
| Thermal Grizzly Conductonaut (Liquid Metal) | Outstanding (15-20°C improvement) | 1-2 years | Expert Only | Not Recommended (Risky) |
Choosing the Right Thermal Paste
- Performance vs. Safety Balance
- Avoid liquid metal - conductive and risky for laptops
- Choose non-conductive, non-capacitive pastes
- Consider viscosity for vertical mounting in laptops
- Prioritize longevity over peak performance
- Gaming-Specific Considerations
- Pump-out effect resistance for mobile components
- Performance under sustained high temperatures
- Easy application for complex laptop heatsinks
- Compatibility with copper and nickel plating
🛠️ Thermal Maintenance Tools & Materials
Essential Thermal Maintenance Supplies
| Item | Purpose | Importance | Recommended Products |
|---|---|---|---|
| High-Quality Thermal Paste | Heat transfer between CPU/GPU and heatsink | Critical | Thermal Grizzly Kryonaut, Arctic MX-6 |
| Isopropyl Alcohol 99% | Cleaning old thermal paste | Critical | Medical grade, ESD-safe preferred |
| Lint-Free Wipes | Surface cleaning and preparation | High | Kimwipes, coffee filters, microfiber |
| Plastic Spudgers | Safe connector disconnection | High | iFixit spudger set |
| Compressed Air | Fan and heatsink cleaning | Medium-High | ESD-safe, moisture-free |
| Soft Brushes | Dust removal from delicate components | Medium | Anti-static brush set |
🔩 Cooling System Disassembly Procedure
Step-by-Step Heatsink Removal
- Pre-Disassembly Preparation
- Complete laptop disassembly to access motherboard
- Document all screw locations with photos
- Identify and disconnect fan power connectors
- Note heatsink screw numbering or patterns
- Heatsink Screw Removal Sequence
- Follow reverse torque sequence (typically criss-cross)
- Loosen screws gradually in multiple passes
- Use proper Phillips #00 screwdriver
- Keep screws organized by location and length
- Heatsink Separation
- Gently lift heatsink straight up once all screws removed
- If resistance encountered, check for missed screws
- Never force or pry heatsink apart
- Be prepared for thermal paste adhesion
Pulse 15 B13 Specific Considerations
| Component | Special Notes | Screw Quantity | Torque Sequence |
|---|---|---|---|
| CPU Heatsink | Four spring-loaded screws, even pressure critical | 4 | Criss-cross pattern, gradual tightening |
| GPU Heatsink | Larger surface area, multiple heat pipes | 4 | Criss-cross pattern, gradual tightening |
| VRM Cooling | Thermal pads (do not remove unless replacing) | 2 | Even pressure |
| Fan Assembly | Multiple connectors, careful ribbon cable handling | 6-8 | Standard removal |
🧹 Component Cleaning & Surface Preparation
Professional Surface Preparation
- Old Thermal Paste Removal
- Apply isopropyl alcohol to lint-free wipe
- Gently wipe old thermal paste from CPU/GPU dies
- Clean heatsink surface thoroughly
- Use plastic spudger for stubborn paste (carefully)
- Fan and Heatsink Cleaning
- Use compressed air to blow dust from fins
- Clean fan blades with soft brush and alcohol
- Check fan bearings for wear or noise
- Ensure all dust is removed from airflow paths
- Final Surface Preparation
- Ensure both surfaces are completely clean and dry
- Inspect for damage or corrosion
- Verify no residue or contaminants remain
- Use magnifying glass for final inspection
Critical Cleaning Safety Protocols
| Risk | Prevention | Consequence | Severity |
|---|---|---|---|
| ESD Damage | Use ESD wrist strap, work on grounded surface | Component failure | High |
| Die Damage | Gentle pressure, no metal tools on dies | CPU/GPU destruction | Critical |
| Liquid Damage | Minimal alcohol, ensure complete drying | Short circuit | High |
| Capacitor Damage | Avoid contact with small components | Motherboard issues | Medium-High |
🎯 Thermal Paste Application Techniques
Professional Application Methods for Laptops
| Method | Procedure | Success Rate | Recommended For |
|---|---|---|---|
| Pea/Grain Method | Small dot center (grain of rice size) | 95% | Beginner, most laptops |
| Cross Method | Thin line forming X pattern | 98% | Rectangular laptop dies |
| Spread Method | Evenly spread thin layer with applicator | 90% | Experienced users only |
| Multi-Dot Method | 5-7 small dots in pattern | 96% | Large GPU dies |
Pulse 15 B13 Specific Application Guide
- CPU Application (Intel Core i7-13700H)
- Use pea/grain method - rice grain sized dot
- Place precisely in center of CPU die
- Avoid excess - laptop mounting pressure spreads paste
- Expected spread: 25-30mm diameter
- GPU Application (NVIDIA RTX 40-series)
- Use cross method for rectangular GPU die
- Apply thin line forming X pattern
- Slightly more paste than CPU (larger surface area)
- Ensure coverage to edges but not overflowing
- Paste Quantity Guidelines
- CPU: 0.05-0.08ml (grain of rice)
- GPU: 0.08-0.12ml (slightly larger)
- Total per application: 0.15-0.25ml
- Better slightly more than too little
🔧 Heatsink Reassembly & Mounting Pressure
Professional Reassembly Procedure
- Heatsink Placement
- Align heatsink carefully over CPU/GPU
- Lower straight down without sliding
- Ensure proper alignment with screw holes
- Verify no cable interference
- Screw Tightening Sequence
- Follow manufacturer torque sequence (usually numbered)
- Use criss-cross pattern if no sequence specified
- Tighten gradually in multiple passes
- Final torque: firm but not excessive force
- Mounting Pressure Verification
- Ensure even contact across entire die surface
- Check for paste squeeze-out (should be minimal)
- Verify heatsink sits flush with motherboard
- Reconnect all fan and sensor cables
Pulse 15 B13 Torque Specifications
| Component | Screw Type | Torque Specification | Tightening Sequence |
|---|---|---|---|
| CPU Heatsink | M2 × 6mm (spring) | 0.5 N·m (4.4 in-lb) | 1-3-2-4 (criss-cross) |
| GPU Heatsink | M2 × 6mm (spring) | 0.5 N·m (4.4 in-lb) | 1-3-2-4 (criss-cross) |
| VRM Heatsink | M2 × 4mm | 0.3 N·m (2.6 in-lb) | Even pressure |
| Fan Assembly | M2 × 3mm | 0.25 N·m (2.2 in-lb) | Standard pattern |
📊 Post-Maintenance Performance Testing
Comprehensive Thermal Performance Validation
| Test Type | Tool/Method | Expected Improvement | Acceptance Criteria |
|---|---|---|---|
| Idle Temperatures | HWInfo64, MSI Center | 5-10°C reduction | CPU/GPU 40-50°C at idle |
| Gaming Load Temperatures | In-game monitoring | 10-20°C reduction | CPU/GPU under 85°C sustained |
| Stress Test Temperatures | Cinebench, FurMark | 15-25°C reduction | No thermal throttling |
| Fan Noise Levels | Acoustic measurement | 10-20% reduction | Quieter operation at same temps |
Recommended Thermal Testing Software
- HWInfo64 - Comprehensive sensor monitoring
- MSI Center - Manufacturer monitoring suite
- Cinebench R23 - CPU stress testing
- FurMark - GPU stress testing
- GPU-Z - Graphics card monitoring
🎮 Thermal Maintenance Gaming Impact
Expected Gaming Performance Improvements
| Game Title | Before Maintenance FPS | After Maintenance FPS | Improvement | Key Benefit |
|---|---|---|---|---|
| Cyberpunk 2077 | 45-55 FPS (throttling) | 65-75 FPS (stable) | +35-45% | Eliminated CPU throttling |
| Call of Duty: Warzone | 80-100 FPS (inconsistent) | 110-130 FPS (stable) | +25-35% | Stable frame times |
| Elden Ring | 40-50 FPS (stuttering) | 55-60 FPS (smooth) | +30-40% | Eliminated micro-stutters |
| Starfield | 35-45 FPS (CPU bound) | 50-60 FPS (stable) | +40-50% | CPU thermal headroom |
🔧 Thermal Maintenance Troubleshooting
Common Issues and Solutions
| Issue | Symptoms | Solution | Prevention |
|---|---|---|---|
| High Temperatures Persist | No improvement after repaste | Check mounting pressure, repaste quantity | Follow torque sequence, proper paste amount |
| Uneven Temperatures | Hot spots, core temperature variations | Improper paste spread, uneven mounting | Use recommended application method |
| Paste Pump-Out | Good initially, degrades quickly | Use higher viscosity paste, proper amount | Choose paste with pump-out resistance |
| Fan Issues | Noise, vibration, poor airflow | Clean thoroughly, replace if damaged | Regular cleaning every 6-12 months |
📅 Recommended Thermal Maintenance Schedule
- Every 3-6 months: External fan vent cleaning with compressed air
- Every 12 months: Basic internal dust cleaning (if comfortable with disassembly)
- Every 18-24 months: Complete thermal paste replacement and deep cleaning
- As needed: Fan replacement if bearings become noisy or performance degrades
✅ Thermal Maintenance Completion Checklist
- ✓ Old thermal paste completely removed from CPU and GPU
- ✓ Heatsink fins and fan blades thoroughly cleaned
- ✓ New thermal paste applied using proper method and quantity
- ✓ Heatsink reinstalled with correct torque sequence
- ✓ All fan and sensor cables properly reconnected
- ✓ System boots normally with all fans operational
- ✓ Idle temperatures verified (40-50°C range)
- ✓ Load temperatures tested (under 85°C sustained)
- ✓ Gaming performance improvement confirmed
- ✓ Fan noise levels reduced to acceptable levels
7. Battery Replacement: Restoring Mobile Gaming Capability
Replacing your MSI Pulse 15 B13's battery is essential for restoring true mobile gaming capability and preventing unexpected shutdowns during crucial gaming moments. A fresh battery can extend your unplugged gaming sessions by 60-90 minutes while eliminating the performance anxiety that comes with aging power cells.
🔋 Why Battery Replacement Matters for Gaming Laptops
Gaming laptops experience accelerated battery degradation due to high heat exposure and frequent high-power discharge cycles. A degraded battery not only reduces mobile gaming time but can also cause unexpected shutdowns during GPU-intensive scenes and system instability when switching between power sources.
| Battery Health | Gaming Time (Unplugged) | Performance Impact | Risk of Sudden Shutdown | Recommended Action |
|---|---|---|---|---|
| Excellent (90-100%) | 2-2.5 hours | None | Very Low | Monitor annually |
| Good (70-89%) | 1.5-2 hours | Minor throttling possible | Low | Plan replacement in 6-12 months |
| Fair (50-69%) | 1-1.5 hours | Noticeable performance drops | Medium | Replace within 3-6 months |
| Poor (30-49%) | 30-60 minutes | Frequent throttling, instability | High | Replace immediately |
| Critical (Under 30%) | 15-30 minutes | Severe performance issues | Very High | Emergency replacement required |
🔍 Assessing Your Current Battery Health
Professional Battery Health Evaluation
| Assessment Method | Procedure | Accuracy | Tools Required |
|---|---|---|---|
| Windows Battery Report | Run "powercfg /batteryreport" in Command Prompt | High | Windows built-in tools |
| MSI Center Monitoring | Check battery health in MSI Center software | Medium-High | MSI Center installed |
| Physical Inspection | Check for swelling, discoloration, or damage | Visual only | Disassembly tools |
| Third-party Software | Use HWInfo64 or BatteryInfoView | High | Free software download |
Understanding Windows Battery Report
- Generating the Report
- Open Command Prompt as Administrator
- Type:
powercfg /batteryreport /output "C:\battery-report.html" - Open the generated HTML file in your browser
- Review "Battery Life Estimates" section
- Key Metrics to Monitor
- DESIGN CAPACITY vs. FULL CHARGE CAPACITY
- CYCLE COUNT (if available)
- Recent usage patterns and drain rates
- Battery age and manufacturing date
- Replacement Thresholds
- Replace if full charge capacity < 70% of design capacity
- Consider replacement at 70-80% if gaming performance affected
- Emergency replacement if swelling or physical damage detected
🔌 Pulse 15 B13 Battery Compatibility Guide
Original Battery Specifications
| Specification | Original MSI Battery | Compatible Replacements | Important Notes |
|---|---|---|---|
| Model Number | BTY-M6H | BTY-M6H or equivalent | Must match exactly for compatibility |
| Capacity | 53.5Wh | 53.5Wh (standard) | Higher capacity may not fit physically |
| Voltage | 15.2V | 15.2V ± 0.2V | Critical for system safety |
| Connector Type | 4-pin proprietary | Must match exactly | Check pin configuration before purchase |
| Physical Dimensions | 205mm × 70mm × 5mm | Must match within 1mm tolerance | Larger batteries won't fit chassis |
Recommended Battery Sources
| Source Type | Price Range | Warranty | Reliability | Recommended For |
|---|---|---|---|---|
| MSI Official Parts | $120-$180 | 1 year | Excellent | Maximum reliability, budget not constrained |
| Authorized Resellers | $90-$140 | 6-12 months | Very Good | Balance of cost and reliability |
| Reputable Third-party | $60-$100 | 3-6 months | Good | Budget-conscious, verified reviews |
| Generic/Unbranded | $40-$70 | 0-3 months | Risky | Not recommended for gaming laptops |
⚠️ Battery Replacement Safety Protocols
Critical Safety Procedures
- Pre-Replacement Safety Checks
- Power down completely and disconnect AC adapter
- Check for physical damage or swelling on old battery
- Have Class D fire extinguisher accessible
- Work in well-ventilated area
- Handling Damaged Batteries
- If battery is swollen, do not puncture or bend
- Place in fire-proof container if possible
- Wear safety glasses and gloves
- Dispose at proper battery recycling facility
- New Battery Precautions
- Inspect new battery for damage before installation
- Ensure connector matches exactly
- Verify voltage and capacity specifications
- Keep away from metal objects during installation
Required Safety Equipment
| Equipment | Purpose | Critical Level | Alternatives |
|---|---|---|---|
| ESD Wrist Strap | Prevent static discharge to motherboard | High | Frequent grounding touches |
| Safety Glasses | Protect eyes from potential battery rupture | High | None - essential safety item |
| Non-metallic Tools | Prevent short circuits during handling | High | Plastic spudgers only |
| Fire Extinguisher | Lithium battery fire suppression | Medium-High | Bucket of sand, baking soda |
🔧 Step-by-Step Battery Replacement
Old Battery Removal Procedure
- Initial Access
- Complete laptop disassembly to access internal components
- Locate battery in lower section of chassis
- Identify battery connector and mounting points
- Take photos for reassembly reference
- Battery Disconnection
- Using plastic spudger, gently disconnect battery connector
- Pull straight out - no rocking or twisting motion
- Wait 30 seconds for capacitors to discharge
- Verify complete power disconnection
- Battery Removal
- Remove 4 mounting screws (typically M2.5 × 5mm)
- Lift battery straight up from chassis
- If adhesive present, use gentle prying with plastic tools
- Clean battery compartment of any residue
New Battery Installation
- Pre-Installation Verification
- Verify new battery model number matches
- Check connector orientation matches old battery
- Ensure no physical damage to new battery
- Test fit in battery compartment
- Battery Placement
- Place new battery in compartment
- Align screw holes and connector precisely
- Secure with 4 mounting screws (do not overtighten)
- Ensure battery sits flush with no pressure points
- Final Connection
- Connect battery connector with firm, even pressure
- Listen for click indicating proper connection
- Verify connector is fully seated
- Perform visual inspection of entire installation
⚡ Battery Calibration & Optimization
Professional Battery Calibration Process
| Calibration Step | Procedure | Duration | Purpose |
|---|---|---|---|
| Initial Charge | Charge to 100% without interruption | 2-3 hours | Activate battery management system |
| Full Discharge | Use until system shuts down (5% battery) | 1.5-2.5 hours | Calibrate battery fuel gauge |
| Deep Recharge | Charge to 100% without using laptop | 2-3 hours | Reset charge cycle counter |
| Verification | Check battery report for accurate reporting | 15 minutes | Confirm calibration success |
MSI Center Battery Optimization
- Battery Health Settings
- Open MSI Center → Battery Master
- Enable "Battery Health Charging" if available
- Set maximum charge limit to 80% for extended lifespan
- Configure battery saver modes for different scenarios
- Windows Power Settings
- Set "Best power efficiency" for battery mode
- Configure screen timeout to 3-5 minutes
- Enable battery saver at 20% remaining
- Adjust background app permissions
🎮 Battery Health Gaming Impact
Battery Health vs. Gaming Performance
| Battery Condition | Unplugged Gaming Time | Performance Consistency | Risk of Sudden Shutdown | Recommended Usage |
|---|---|---|---|---|
| New Battery (100%) | 2-2.5 hours | Stable performance | Very Low | Full mobile gaming capability |
| Good (80%) | 1.5-2 hours | Mostly stable | Low | Casual gaming, productivity |
| Fair (60%) | 1-1.5 hours | Occasional throttling | Medium | Light gaming only |
| Poor (40%) | 30-60 minutes | Frequent performance drops | High | Avoid gaming, AC power only |
🔧 Battery Replacement Troubleshooting
Common Installation Issues and Solutions
| Issue | Symptoms | Solution | Prevention |
|---|---|---|---|
| Battery Not Detected | "No battery detected" message | Reseat connector, check for bent pins | Verify compatibility before purchase |
| Rapid Power Drain | Battery drains much faster than expected | Run calibration cycle, check for background processes | Proper calibration after installation |
| Not Charging | Battery doesn't charge when plugged in | Check AC adapter, try different outlet | Verify charger compatibility |
| Inaccurate Charge Reporting | Percentage jumps or reports incorrectly | Run full calibration cycle, update BIOS | Complete calibration procedure |
📈 Maximizing New Battery Lifespan
Professional Battery Care Recommendations
| Practice | Impact on Lifespan | Difficulty | Recommended Frequency |
|---|---|---|---|
| Avoid Deep Discharges | High (prevents cell damage) | Easy | Always |
| Limit Maximum Charge (80%) | High (reduces stress) | Easy (MSI Center setting) | When plugged in for extended periods |
| Keep Cool During Charging | Medium-High (reduces heat degradation) | Moderate | Always, especially during gaming |
| Monthly Calibration | Medium (maintains accuracy) | Easy | Once per month |
♻️ Proper Battery Disposal & Recycling
Environmental Responsibility
- Preparation for Disposal
- Discharge old battery to 30-50% if possible
- Cover terminals with electrical tape
- Place in original packaging or separate bag
- Label as "Used Lithium Battery"
- Recycling Options
- Best Buy, Staples, or Office Depot electronics recycling
- Local hazardous waste collection facilities
- MSI take-back programs (check website)
- Call2Recycle drop-off locations
- Safety Precautions
- Never dispose in regular household trash
- Avoid puncturing or damaging battery casing
- Keep away from heat sources and water
- Transport in protective container
✅ Battery Replacement Completion Checklist
- ✓ Old battery safely disconnected and removed
- ✓ New battery verified for compatibility and physical condition
- ✓ Battery properly seated and secured with all mounting screws
- ✓ Connector fully engaged and properly seated
- ✓ System boots normally and detects new battery
- ✓ Initial charge cycle completed to 100%
- ✓ Battery calibration cycle performed successfully
- ✓ MSI Center battery optimization settings configured
- ✓ Windows power settings adjusted for optimal battery life
- ✓ Old battery properly prepared for recycling
8. Professional Reassembly & System Testing
Proper reassembly and comprehensive system testing are critical final steps that determine the success of your MSI Pulse 15 B13 upgrades, ensuring all components function correctly together and identifying any issues before they impact your gaming experience. Professional reassembly techniques can prevent 80% of post-upgrade problems while systematic testing validates your upgrade investment.
⚙️ Why Professional Reassembly Matters for Gaming Performance
Gaming laptops require precise reassembly to maintain optimal thermal performance, structural integrity, and component reliability. Improper reassembly can cause thermal issues, connectivity problems, and premature component failure that undermine your upgrade investments and gaming experience.
| Reassembly Approach | Success Rate | Long-Term Reliability | Thermal Performance | Common Issues |
|---|---|---|---|---|
| Professional Method | 95-98% | Excellent | Optimal | Minimal |
| Careful DIY | 85-90% | Good | Good | Minor thermal issues |
| Rushed Assembly | 70-80% | Fair | Compromised | Overheating, loose connections |
| Incomplete Assembly | 50-60% | Poor | Severely compromised | Multiple failures, damage risk |
🔍 Pre-Reassembly Verification Checklist
Critical Pre-Assembly Checks
| Check Category | Specific Items to Verify | Importance | Tools Required |
|---|---|---|---|
| Component Installation | RAM fully seated, SSDs secured, battery connected | Critical | Visual inspection, photos |
| Cable Management | All ribbons routed correctly, no pinched cables | High | Photos, plastic tools |
| Thermal System | Heatsink properly mounted, paste coverage adequate | Critical | Torque screwdriver, thermal camera |
| Debris & Contamination | No loose screws, thermal paste spills, or debris | High | Compressed air, magnifier |
Pulse 15 B13 Specific Cable Routing
- Battery Cable
- Route under motherboard, not over components
- Ensure no tension on connector
- Secure with existing clips or routing channels
- Verify clearance from cooling fans
- Fan Cables
- Follow original routing paths exactly
- Ensure cables don't contact fan blades
- Use existing adhesive anchors if present
- Check both CPU and GPU fan connections
- Display & Touchpad Cables
- Route through designated channels only
- Avoid sharp bends near hinge mechanism
- Secure with original tape or clips
- Verify full range of motion for display
🔧 Step-by-Step Reassembly Procedure
Professional Reassembly Sequence
- Internal Component Verification
- Double-check all upgrades are properly installed
- Verify no tools or foreign objects remain inside
- Ensure all connectors are fully seated
- Take final pre-assembly photos
- Bottom Case Alignment
- Align case carefully with top assembly
- Start with front edge near touchpad
- Work around perimeter, engaging clips gradually
- Verify even alignment before screw installation
- Screw Installation Sequence
- Install screws in reverse of removal sequence
- Start with corner screws to establish alignment
- Use criss-cross pattern for even pressure distribution
- Final torque: firm but not excessive
Pulse 15 B13 Screw Torque Specifications
| Screw Location | Quantity | Size | Torque Specification | Critical Notes |
|---|---|---|---|---|
| Bottom Case Perimeter | 11 | M2.5 × 4mm | 0.4 N·m (3.5 in-lb) | Even sequence, criss-cross pattern |
| Central Reinforcement | 2 | M2 × 3mm | 0.25 N·m (2.2 in-lb) | Shorter screws, specific locations |
| Battery Area | 4 | M2.5 × 5mm | 0.45 N·m (4.0 in-lb) | Longer screws, secure mounting |
🔌 Initial Power-On Testing Protocol
Safe Initial Power-On Sequence
| Test Phase | Procedure | Expected Results | Failure Response |
|---|---|---|---|
| Pre-Power Visual | Check for smoke, sparks, unusual smells | No visual or olfactory issues | Immediate power disconnect, investigation |
| Battery-Only Test | Press power button without AC adapter | Power LED lights, system attempts boot | Check battery connection, charge state |
| AC Adapter Test | Connect power adapter, attempt boot | Charging LED activates, system boots | Verify adapter compatibility, connections |
| BIOS Access | Enter BIOS/UEFI (Delete key during boot) | BIOS screen displays, all hardware detected | Check component seating, compatibility |
BIOS Hardware Verification Checklist
- Memory Detection
- Verify total RAM capacity matches upgrade
- Check RAM speed and timing detection
- Confirm dual-channel operation if applicable
- Note any error messages or warnings
- Storage Detection
- Verify all SSD drives are detected
- Check boot order priority
- Confirm RAID configuration if applicable
- Note drive model numbers and capacities
- Temperature Monitoring
- Check idle CPU and GPU temperatures
- Verify fan operation and RPM readings
- Monitor for rapid temperature increases
- Note any thermal warnings
📊 Comprehensive Performance Benchmarking
Professional Benchmark Testing Suite
| Benchmark Type | Software Tool | Testing Focus | Expected Results |
|---|---|---|---|
| CPU Performance | Cinebench R23 | Multi-core and single-core performance | Consistent with i7-13700H specifications |
| GPU Performance | 3DMark Time Spy | Gaming graphics capability | Appropriate for RTX 4050/4060/4070 model |
| Storage Performance | CrystalDiskMark | SSD read/write speeds | PCIe 4.0 speeds for upgraded drives |
| Memory Performance | AIDA64 Memory Benchmark | RAM bandwidth and latency | DDR5 speeds with dual-channel operation |
Thermal & Cooling Performance Validation
| Thermal Test | Procedure | Acceptable Range | Monitoring Tools |
|---|---|---|---|
| Idle Temperatures | System at desktop for 15 minutes | CPU: 40-50°C, GPU: 35-45°C | HWInfo64, MSI Center |
| Gaming Load | 30 minutes of demanding game | CPU: 75-85°C, GPU: 70-80°C | In-game overlays, logging |
| Stress Test | Combined CPU+GPU stress test | Under 95°C, no thermal throttling | HWInfo64 throttling detection |
| Fan Operation | Monitor fan speeds and noise | Smooth ramp-up, no bearing noise | Acoustic monitoring, RPM reading |
🎮 Real-World Gaming Performance Testing
Comprehensive Game Testing Protocol
| Game Title | Test Duration | Performance Metrics | Expected Results |
|---|---|---|---|
| Cyberpunk 2077 | 30 minutes | Average FPS, 1% lows, temperatures | 60-75 FPS at High settings, DLSS Quality |
| Call of Duty: Warzone | 20 minutes | Frame times, stability, thermal performance | 90-110 FPS at Medium-High settings |
| Elden Ring | 25 minutes | Consistency, stuttering, load times | 55-70 FPS at High settings, stable |
| Fortnite | 15 minutes | Competitive performance, response times | 120-144 FPS at Epic settings with DLSS |
Key Gaming Performance Metrics
- Frame Rate Analysis
- Average FPS should meet or exceed expectations
- 1% and 0.1% low FPS indicate smoothness
- Frame time consistency more important than peaks
- Compare with pre-upgrade benchmarks if available
- Thermal Performance
- Monitor CPU and GPU temperatures during gaming
- Check for thermal throttling during extended sessions
- Verify fan curves provide adequate cooling
- Ensure temperatures stabilize, not continuously rise
- System Stability
- No crashes, driver timeouts, or system freezes
- Consistent performance across multiple gaming sessions
- Proper sleep/wake functionality
- No audio or input lag issues
🔋 Battery & Power Management Testing
Comprehensive Power System Validation
| Power Test | Procedure | Success Criteria | Tools Required |
|---|---|---|---|
| Battery Calibration | Full charge/discharge/charge cycle | Accurate percentage reporting | Windows battery report |
| Charging Performance | Monitor charge rate from 20% to 80% | Consistent charging, no interruptions | Charge time measurement |
| Power Mode Switching | Test all MSI Center power profiles | Proper performance scaling | Performance monitoring software |
| Battery Life | Video playback test on battery | 4-5 hours for media consumption | Video loop, power monitoring |
✅ Final System Validation Checklist
Professional System Certification
| Validation Category | Specific Tests | Status | Notes |
|---|---|---|---|
| Hardware Detection | All RAM, storage, and peripherals detected | □ Pass □ Fail | Verify capacities and speeds |
| Thermal Performance | Idle and load temperatures within spec | □ Pass □ Fail | No throttling during extended use |
| Gaming Performance | Frame rates meet expectations, stable | □ Pass □ Fail | Compare with expected results |
| System Stability | No crashes, freezes, or error messages | □ Pass □ Fail | 24-hour stability test recommended |
| Power Management | Proper charging, battery life, power modes | □ Pass □ Fail | Verify all MSI Center functions |
🔧 Common Reassembly & Testing Issues
Frequently Encountered Problems
| Issue | Symptoms | Likely Causes | Solutions |
|---|---|---|---|
| No Power / No Boot | No lights, no fan spin, completely dead | Battery not connected, main power issue | Check battery connection, verify AC adapter |
| Overheating | Rapid temperature rise, immediate throttling | Heatsink not seated, poor paste application | Recheck heatsink mounting, repaste if needed |
| Intermittent Detection | Components detected sometimes but not always | Loose connections, seating issues | Reseat all upgrades, check connectors |
| Performance Below Expectations | Benchmarks lower than expected for hardware | Driver issues, power settings, thermal limits | Update drivers, check power profiles, monitor thermals |
📋 Post-Upgrade Documentation
Essential Documentation to Maintain
- Performance Records
- Before-and-after benchmark comparisons
- Gaming performance metrics with specific titles
- Temperature profiles under different loads
- Battery life measurements
- Warranty Documentation
- Receipts for all purchased upgrade components
- Serial numbers of installed parts
- Warranty registration confirmations
- Installation dates for future reference
- System Configuration
- Current driver versions and BIOS settings
- MSI Center configuration profiles
- Custom power plans and performance settings
- Backup of critical system configurations
✅ Reassembly & Testing Completion Checklist
- ✓ All internal components properly installed and secured
- ✓ Cables correctly routed and connected
- ✓ Bottom case properly aligned and securely fastened
- ✓ System boots successfully to BIOS and Windows
- ✓ All upgraded components detected and functioning
- ✓ Latest drivers installed and verified
- ✓ Thermal performance validated under load
- ✓ Gaming performance meets or exceeds expectations
- ✓ Battery charging and power management working correctly
- ✓ System stability confirmed through extended testing
- ✓ All documentation completed and filed
- ✓ Workspace cleaned and tools properly stored
9. Gaming Performance Optimization & Benchmarking
Professional performance optimization can unlock 15-25% additional gaming performance from your upgraded MSI Pulse 15 B13, transforming hardware upgrades into tangible frame rate improvements and smoother gaming experiences. Systematic optimization ensures your investment delivers maximum gaming returns through software tuning, driver optimization, and performance benchmarking.
🚀 Why Performance Optimization Maximizes Gaming ROI
Hardware upgrades provide the foundation, but software optimization determines actual gaming performance. Proper optimization can increase average FPS by 15-25% and improve 1% lows by 30-40% in demanding titles, eliminating stuttering and providing competitive advantages in fast-paced games.
| Optimization Category | Performance Impact | Difficulty Level | Time Investment | Risk Level |
|---|---|---|---|---|
| Driver & Software Optimization | 10-15% FPS improvement | Beginner | 30-45 minutes | Low |
| Windows & System Tuning | 5-10% system responsiveness | Beginner-Intermediate | 45-60 minutes | Low-Medium |
| MSI Center & BIOS Settings | 8-12% gaming performance | Intermediate | 20-30 minutes | Medium |
| Advanced GPU & CPU Tuning | 15-25% maximum performance | Advanced | 60-90 minutes | Medium-High |
| Game-Specific Optimization | 20-30% in specific titles | Intermediate | 15-30 minutes per game | Low |
🔧 Driver Optimization & Management
Critical Gaming Performance Drivers
| Driver Type | Importance | Update Frequency | Recommended Source | Performance Impact |
|---|---|---|---|---|
| NVIDIA Graphics Drivers | Critical | Monthly (Game Ready) | NVIDIA GeForce Experience | High (10-20%) |
| Intel Chipset Drivers | High | Quarterly | MSI Support Page | Medium (5-10%) |
| Audio & Network Drivers | Medium | As needed | MSI Support or Manufacturer | Low (2-5%) |
| BIOS/Firmware Updates | High | 6-12 months | MSI Support (careful updating) | Variable (5-15%) |
NVIDIA Control Panel Optimization
- Global Settings (3D Settings)
- Image Scaling: Off (use DLSS instead)
- Ambient Occlusion: Performance
- Antialiasing - FXAA: Off
- Antialiasing - Mode: Application-controlled
- Background Application Max Frame Rate: Off
- Low Latency Mode: Ultra (competitive games)
- Power Management Mode: Prefer Maximum Performance
- Texture Filtering - Quality: High Performance
- Threaded Optimization: On
- Vertical Sync: Use the 3D application setting
- Program Settings (Game-Specific)
- Create individual profiles for each game
- Set preferred graphics processor: High-performance NVIDIA
- Configure Shader Cache Size: 10GB (default)
- Monitor Technology: G-SYNC if available
⚙️ Windows 10/11 Gaming Optimization
Essential Windows Gaming Features
| Feature | Setting | Performance Impact | Recommended |
|---|---|---|---|
| Game Mode | Windows Settings → Gaming → Game Mode | Medium (5-8%) | On |
| Hardware-accelerated GPU Scheduling | System → Display → Graphics Settings | Variable (0-10%) | Test individually per game |
| Variable Refresh Rate | System → Display → Advanced Display | High for smoothness | On if monitor supports |
| Xbox Game Bar | Gaming → Xbox Game Bar | Negative if enabled | Off for maximum performance |
Performance-Enhancing Windows Tweaks
- Visual Effects Optimization
- Right-click This PC → Properties → Advanced System Settings
- Performance Settings → Visual Effects
- Select "Adjust for best performance" or customize:
- Enable only: "Smooth edges of screen fonts"
- Disable all animations and transparency effects
- Power Plan Configuration
- Control Panel → Hardware and Sound → Power Options
- Select "High performance" plan
- Change plan settings → Change advanced power settings
- Processor power management → Minimum processor state: 100%
- PCI Express → Link State Power Management: Off
- Background Process Management
- Settings → Privacy → Background apps
- Turn off "Let apps run in the background"
- Task Manager → Startup → Disable non-essential applications
- Services.msc → Disable unnecessary services (research first)
🎮 MSI Center Performance Profiles
MSI Center Gaming Performance Modes
| Performance Mode | CPU/GPU Power Limits | Fan Profile | Use Case | Performance Impact |
|---|---|---|---|---|
| Extreme Performance | Maximum (CPU: 75W, GPU: 140W) | Aggressive (loud) | Competitive gaming, benchmarks | +15-20% FPS |
| Balanced | Moderate (CPU: 45W, GPU: 100W) | Moderate | General gaming, mixed use | Base performance |
| Silent | Conservative (CPU: 25W, GPU: 60W) | Quiet | Office work, media consumption | -20-30% FPS |
| User Defined | Customizable | Custom fan curve | Advanced users, specific needs | Variable |
MSI Center Feature Optimization
- Scenario Profiles
- Create custom profiles for different game types
- Set different power limits for FPS vs RPG games
- Configure automatic profile switching
- Save multiple configurations for quick switching
- Cooler Boost Control
- Enable Cooler Boost for maximum cooling during gaming
- Use Auto fan control for balanced noise/performance
- Create custom fan curves for specific temperature targets
- Monitor fan speeds and temperatures in real-time
- Display Optimization
- Configure True Color profiles for accurate colors
- Set refresh rate to 144Hz for gaming
- Enable anti-ghosting features if available
- Calibrate display for your gaming environment
⚡ BIOS Performance Settings
Critical BIOS Settings for Gaming Performance
| BIOS Setting | Recommended Value | Performance Impact | Risk Level |
|---|---|---|---|
| XMP Memory Profile | Enabled (Profile 1) | High (10-15%) | Low |
| VT-x/VT-d Virtualization | Disabled (unless needed) | Low (2-5%) | Low |
| SpeedStep/Speed Shift | Enabled | Medium (power efficiency) | Low |
| Hyper-Threading | Enabled | High for multi-threaded games | Low |
| Integrated Graphics | Disabled (dedicated GPU only) | Low (frees system memory) | Low |
| Power & Performance | Performance mode | Medium (5-8%) | Low |
Advanced BIOS Tuning (Expert Users)
- CPU Power Limits
- PL1 (Long Duration Power Limit): 65-75W
- PL2 (Short Duration Power Limit): 90-115W
- Turbo Time Limit: 56-128 seconds
- Monitor temperatures carefully with increased limits
- Memory Timings
- Enable XMP for rated speeds
- Manual timings only for experienced overclockers
- Test stability with MemTest86 after changes
- Document original settings before modifications
🎯 Game-Specific Optimization Guide
Optimization Settings for Popular Games
| Game Title | Critical Settings | Recommended Preset | DLSS/FSR Setting | Expected FPS (Pulse 15 B13) |
|---|---|---|---|---|
| Cyberpunk 2077 | Volumetric Clouds: Medium, Shadow Quality: High | High + Ray Tracing: Medium | DLSS Quality | 65-80 FPS |
| Call of Duty: Warzone | Texture Resolution: Normal, Cache Spot/Sun Shadows: On | Balanced (Custom) | DLSS Balanced | 100-130 FPS |
| Elden Ring | Motion Blur: Off, Depth of Field: Medium | High (Maximum Textures) | N/A (No DLSS) | 55-70 FPS |
| Fortnite | View Distance: Far, Shadows: Off | Medium + High Textures | DLSS Performance | 120-144 FPS |
| Apex Legends | Texture Filtering: Anisotropic 4X, Model Detail: Low | Mostly Low (Competitive) | DLSS Balanced | 130-165 FPS |
Graphics Settings Performance Impact
- High Impact Settings (Prioritize)
- Shadows: High performance cost, minimal visual gain
- Anti-aliasing: Use DLSS/FSR instead of traditional AA
- Reflections: Screen space reflections less demanding
- View distance: Balance based on game type
- Medium Impact Settings (Balance)
- Textures: Use High (VRAM dependent)
- Post-processing: Moderate cost, visual improvement
- Lighting: Important for atmosphere, moderate cost
- Particle effects: Game-dependent impact
- Low Impact Settings (Maximize)
- Texture filtering: Minimal cost, set to High
- Motion blur: Personal preference, minimal performance
- Depth of field: Minimal performance impact
- Chromatic aberration: Disable for cleaner image
📊 Professional Gaming Benchmarking
Essential Benchmarking Software Suite
| Benchmark Tool | Purpose | Testing Focus | Performance Metrics |
|---|---|---|---|
| 3DMark | Overall gaming performance | GPU, CPU, Ray Tracing | Graphics score, CPU score, combined |
| Cinebench R23 | CPU rendering performance | Single & multi-core CPU | Points (higher better), temperature |
| Superposition | GPU stress testing | GPU performance, stability | Score, FPS, temperature |
| UserBenchmark | System component analysis | All components relative performance | Percentile rankings, bottlenecks |
Professional Benchmarking Procedure
- Pre-Benchmark Preparation
- Close all background applications
- Set MSI Center to Extreme Performance mode
- Ensure latest drivers are installed
- Perform system restart before benchmarking
- Benchmark Execution
- Run each benchmark 3 times for consistency
- Allow 5-minute cooldown between runs
- Monitor temperatures and clock speeds
- Document all scores and observations
- Performance Analysis
- Compare results with expected performance
- Identify any performance anomalies
- Check for thermal throttling or power limits
- Create baseline for future comparisons
🎯 MSI Pulse 15 B13 Performance Expectations
Expected Benchmark Scores (Upgraded System)
| Benchmark | RTX 4050 Model | RTX 4060 Model | RTX 4070 Model | Performance Notes |
|---|---|---|---|---|
| 3DMark Time Spy | 7,800-8,500 | 9,500-10,500 | 11,000-12,000 | Graphics score, higher is better |
| Cinebench R23 Multi | 14,500-15,500 | 14,500-15,500 | 14,500-15,500 | CPU performance (same CPU) |
| Superposition 1080p High | 9,000-10,000 | 11,500-12,500 | 13,500-14,500 | GPU-focused benchmark |
| PCMark 10 Extended | 7,200-7,800 | 7,400-8,000 | 7,600-8,200 | Overall system performance |
📈 Real-Time Performance Monitoring
Essential Performance Monitoring Tools
| Monitoring Tool | Key Features | Gaming Use Case | Performance Overhead |
|---|---|---|---|
| HWInfo64 | Comprehensive sensors, logging | Thermal monitoring, power limits | Low (1-2%) |
| MSI Center | Manufacturer integration | Performance modes, fan control | Medium (2-4%) |
| CPU-Z & GPU-Z | Component information | Verification, basic monitoring | Negligible |
| RivaTuner Statistics Server | In-game overlay, frame timing | Real-time FPS monitoring | Low (1-3%) |
✅ Performance Optimization Completion Checklist
- ✓ Latest NVIDIA Game Ready drivers installed and configured
- ✓ Windows Game Mode and gaming features optimized
- ✓ MSI Center performance profiles configured for gaming
- ✓ BIOS settings optimized for maximum performance
- ✓ Power plan set to High Performance mode
- ✓ Background applications and services minimized
- ✓ Game-specific graphics settings optimized
- ✓ Performance benchmarking completed and documented
- ✓ Real-time monitoring tools configured and tested
- ✓ System stability verified under gaming loads
- ✓ Temperature and performance baselines established
- ✓ Optimization changes documented for future reference
10. Maximizing Resale Value After Professional Upgrades
Strategic upgrades and professional documentation can increase your MSI Pulse 15 B13's resale value by 40-60% over an unmodified system, transforming your upgrade investment into tangible financial returns. Properly executed upgrades with comprehensive documentation make your gaming laptop significantly more attractive to buyers while commanding premium pricing in the secondary market.
💰 Why Professional Upgrades Increase Resale Value
Upgraded gaming laptops appeal to buyers seeking immediate performance without the complexity of DIY upgrades. Professional documentation, warranty preservation, and strategic component selection can recover 80-120% of your upgrade costs while making your laptop stand out in competitive marketplaces.
| Upgrade Type | Cost Recovery % | Market Appeal | Documentation Importance | Recommended Platforms |
|---|---|---|---|---|
| RAM Upgrade (16GB → 32GB) | 90-110% | High | Medium | All major platforms |
| SSD Addition (Secondary Drive) | 80-100% | High | Medium | eBay, Facebook Marketplace |
| Thermal System Refresh | 60-80% | Medium-High | High | Specialized forums, Reddit |
| Battery Replacement | 70-90% | High | Medium | All platforms |
| Comprehensive Upgrade Package | 85-120% | Very High | Critical | eBay, specialized buyers |
📈 Upgrade Cost vs. Resale Value Analysis
MSI Pulse 15 B13 Upgrade Value Retention
| Upgrade Scenario | Upgrade Cost | Value Added | Net ROI | Market Demand |
|---|---|---|---|---|
| Base System (No Upgrades) | $0 | $0 | N/A | Medium |
| 32GB RAM Upgrade Only | $80-$120 | $100-$140 | +25% | High |
| 1TB Secondary SSD Only | $60-$90 | $70-$100 | +22% | High |
| RAM + SSD Combo | $140-$210 | $180-$260 | +29% | Very High |
| Full Premium Upgrade | $250-$350 | $300-$450 | +32% | Premium Market |
Optimal Resale Timing Strategy
- Immediate Resale (0-3 months post-upgrade)
- Maximum value recovery (95-110% of upgrade costs)
- Components still under full manufacturer warranty
- Fresh performance benchmarks most relevant
- Best for: Quick upgrades before next-gen releases
- Medium-Term Resale (4-12 months)
- Good value recovery (80-95% of upgrade costs)
- Upgrades still recent with proven reliability
- Performance benefits well-documented
- Best for: Gradual upgrade cycles
- Long-Term Resale (13-24 months)
- Moderate value recovery (60-80% of upgrade costs)
- Focus on functional benefits over recency
- Emphasize reliability and proven performance
- Best for: Extended usage before upgrade
📋 Professional Documentation for Maximum Value
Essential Resale Documentation Package
| Document Type | Content Requirements | Value Impact | Creation Time |
|---|---|---|---|
| Upgrade Receipts & Invoices | All component purchases with dates | High (+15-20%) | 5-10 minutes |
| Before/After Benchmarks | 3DMark, Cinebench, game performance | High (+20-25%) | 30-45 minutes |
| Professional Photos | Upgrade process, component condition | Medium (+10-15%) | 15-20 minutes |
| Warranty Documentation | Manufacturer warranties, transfer info | High (+15-25%) | 10-15 minutes |
| Performance Verification | Current temps, stability tests, gaming FPS | Very High (+25-30%) | 45-60 minutes |
Essential Performance Documentation
- Comprehensive Benchmark Suite
- 3DMark Time Spy (Overall gaming performance)
- Cinebench R23 (CPU multi-core performance)
- CrystalDiskMark (SSD read/write speeds)
- Memory bandwidth tests (AIDA64 or equivalent)
- Temperature profiles under gaming load
- Real-World Gaming Performance
- 5-7 popular games with FPS measurements
- Settings used and average/maximum FPS
- Temperature stability during extended sessions
- Frame time consistency (1% and 0.1% lows)
🛒 Strategic Resale Platform Selection
Resale Platform Performance Analysis
| Platform | Average Sale Price | Time to Sell | Fee Structure | Best For |
|---|---|---|---|---|
| eBay | 95-105% of market value | 7-14 days | 12.9% + $0.30 | Premium upgraded systems |
| Facebook Marketplace | 85-95% of market value | 3-10 days | 0% (local sales) | Quick local sales |
| Reddit HardwareSwap | 90-100% of market value | 2-7 days | PayPal fees only (2.9%) | Enthusiast buyers |
| SellLaptopBack | 70-85% of market value | 1-3 days | Built into offer | Quick, guaranteed sales |
| SellLaptopBack | 65-80% of market value | Instant quote | Built into offer | Immediate cash needs |
Choosing the Right Resale Platform
- For Maximum Value: eBay & Reddit
- Best for comprehensive upgrade documentation
- Attract knowledgeable buyers who value upgrades
- Higher effort required for listings and communication
- Best ROI for professionally upgraded systems
- For Quick Local Sales: Facebook Marketplace
- Ideal for demonstrating upgrades in person
- No fees, but lower average selling prices
- Faster sales with local pickup options
- Good for basic RAM/SSD upgrades
- For Guaranteed Sales: Buyback Services
- SellLaptopBack and SellLaptopBack for immediate offers
- Lower prices but guaranteed sales
- Minimal documentation requirements
- Best when time is more important than maximum value
🏷️ Professional Pricing Strategy
Pricing Calculation Formula
| Price Component | Calculation Method | Weight | Example Value |
|---|---|---|---|
| Base System Value | Recent eBay sold listings (same specs) | 60% | $900 (RTX 4060 model) |
| Upgrade Component Value | Current retail price × 0.8 | 25% | $160 (32GB RAM + 1TB SSD) |
| Professional Labor Premium | $25-50 per upgrade hour | 10% | $75 (3 hours labor) |
| Documentation & Testing Premium | 15-25% of upgrade value | 5% | $40 (comprehensive docs) |
| Total Target Price | Sum of all components | 100% | $1,175 |
Market Competitive Pricing Analysis
- Premium Positioning (10-15% above market)
- Requires comprehensive documentation
- Professional photography and benchmarking
- Targets enthusiasts and knowledgeable buyers
- Longer sales cycle but higher returns
- Competitive Pricing (Market average)
- Good documentation with key upgrades highlighted
- Appeals to broader buyer base
- Faster sales with good value recovery
- Balanced approach for most sellers
- Quick Sale Pricing (10-15% below market)
- Basic documentation of upgrades
- Focus on speed over maximum value
- Ideal for time-sensitive situations
- Still recovers most upgrade costs
📝 Professional Listing Creation
High-Conversion Listing Elements
| Listing Element | Best Practices | Conversion Impact | Implementation Time |
|---|---|---|---|
| Title Optimization | "MSI Pulse 15 B13 | RTX 4060 | 32GB RAM | 2TB SSD | Professionally Upgraded" | High | 5 minutes |
| Professional Photography | 8-12 high-quality images: exterior, upgrades, benchmarks | Very High | 20-30 minutes |
| Upgrade Documentation | Before/after benchmarks, component receipts | High | 15-20 minutes |
| Performance Claims | Specific FPS in popular games, temperature data | Medium-High | 10-15 minutes |
| Warranty Information | Remaining manufacturer warranties, upgrade dates | Medium | 5-10 minutes |
Essential Listing Photography
- Exterior Condition Shots
- Front, back, and side profiles with good lighting
- Close-ups of any wear or perfect condition
- Screen functionality with desktop visible
- Keyboard and touchpad condition
- Upgrade Documentation
- System information showing upgraded components
- Benchmark results on screen
- Component boxes and receipts (if available)
- Temperature monitoring during load
- Performance Verification
- Gameplay with FPS counter visible
- MSI Center showing performance modes
- Storage capacity verification
- RAM capacity and speed confirmation
💬 Professional Buyer Communication
Pre-Written Response Templates
| Inquiry Type | Professional Response Template | Key Information to Include |
|---|---|---|
| Performance Questions | "The upgraded system achieves [X FPS] in [Game] at [Settings]. I've included benchmark results in the listing and can provide additional performance data if needed." | Specific games, settings, FPS averages, temperatures |
| Upgrade Details | "All upgrades were professionally installed with anti-static precautions. Components include [Brand] [Model] purchased on [Date] with receipts available." | Component brands, installation dates, warranty info |
| Price Negotiation | "The price reflects [X%] of upgrade costs plus professional installation. Compared to stock systems, you're getting [Y] better performance for [Z] less than new." | Upgrade cost recovery %, performance/value comparison |
| Warranty Questions | "The original MSI warranty is valid until [Date]. Upgraded components have [X] months remaining. All upgrades were non-invasive and warranty-friendly." | Warranty end dates, component warranty periods |
🏛️ Government & Educational Resources
Consumer Protection & Market Resources
| Resource | Purpose | Relevance to Resale | Key Features |
|---|---|---|---|
| FTC.gov | Consumer protection guidelines | High (legal compliance) | Used electronics selling guidelines, warranty rules |
| USA.gov Online Safety | Safe online transaction practices | High (seller protection) | Payment security, fraud prevention |
| ConsumerFinance.gov | Financial transaction guidelines | Medium (payment processing) | Payment method security, dispute resolution |
| IRS.gov 1099-K | Tax reporting requirements | Medium (financial compliance) | Resale income reporting thresholds |
🛡️ Resale Risk Mitigation Strategies
Common Resale Risks and Prevention
| Risk Type | Prevention Strategy | Impact Severity | Recovery Options |
|---|---|---|---|
| Payment Fraud | Use platform-protected payments only, no wire transfers | High | Platform protection programs |
| False Item Not Received Claims | Require signature confirmation, photographic evidence | Medium-High | Shipping insurance, tracking documentation |
| Component Swapping Returns | Photograph serial numbers, use tamper-evident seals | High | Serial number documentation |
| Undisclosed Damage Claims | Comprehensive pre-shipping video documentation | Medium | Shipping insurance claims |
✅ Resale Preparation Completion Checklist
- ✓ All upgrade receipts and documentation organized
- ✓ Comprehensive benchmark and performance testing completed
- ✓ Professional photography of system and upgrades
- ✓ Competitive market analysis and pricing strategy established
- ✓ Optimal resale platform selected based on goals
- ✓ Detailed listing created with upgrade benefits highlighted
- ✓ System thoroughly cleaned and restored to factory settings
- ✓ All personal data securely wiped from storage devices
- ✓ Shipping materials and insurance options prepared
- ✓ Communication templates ready for buyer inquiries
- ✓ Risk mitigation strategies implemented
- ✓ Tax and legal considerations addressed
Need to Sell Your MSI Laptop? Get Instant Cash!
If your MSI Pulse 15 B13 (or other MSI gaming laptop) has performance issues or you're upgrading to a newer model, we offer competitive cash payouts for your device. We buy broken, used, and refurbished MSI gaming laptops—including all Pulse 15 B13 configurations—with free insured shipping and hassle-free evaluations.
Sell Popular MSI Models Now: