On this page
- 1. Acer Nitro AN515 Pre-Repair Preparation & Safety Guidelines
- ⚠️ Critical Safety Precautions
- 🔍 Pre-Repair Diagnostic Assessment
- 🎮 Acer Nitro AN515-Specific Features
- 💰 2024 Gaming Laptop Market Valuation
- 📋 Pre-Repair Documentation
- 🔧 Repair Cost-Benefit Analysis
- 💾 Gaming Data Backup Procedure
- 📄 Warranty & Serial Number Verification
- 🎮 Gamer Market Considerations
- ⏰ Realistic Repair Timeline
- 2. Essential Tools for Acer Nitro AN515 Gaming Laptop Disassembly
- 🔧 Basic Repair Toolkit
- ⚙️ Specialized Gaming Laptop Equipment
- 🔩 Acer Nitro AN515-Specific Tool Requirements
- 🧴 Consumables & Gaming Laptop Supplies
- 🛠️ Household Alternatives for Gamers
- ⚠️ Gaming Laptop Tool Safety & Best Practices
- 🏆 Recommended Tool Kits for Gamers
- 🛒 Where to Purchase Gaming Laptop Tools
- ⚡ Acer Service & Warranty Considerations
- 🎮 Gaming-Specific Tool Considerations
- 🔧 Tool Maintenance & Care
- 3. Acer Nitro AN515 Battery Removal & Power Safety Procedures
- 🔋 Battery Specifications & Gaming Laptop Compatibility
- ⚠️ Critical Safety Precautions for Gaming Laptops
- 🔌 Safe Battery Disconnection Process
- 🔧 Battery Removal Procedure
- 🔄 New Battery Installation Procedure
- 📊 Gaming Laptop Battery Health Management
- ⚙️ New Battery Calibration Process
- 🛒 Battery Purchasing Guide for Gamers
- ⚡ Acer NitroSense Power Management
- ♻️ Proper Battery Disposal & Recycling
- 🔍 Gaming Laptop Battery Troubleshooting
- 🎮 Gaming Performance Impact
- 💰 Gaming Laptop Resale Value Impact
- 4. Acer Nitro AN515 Bottom Cover Removal: Gaming Laptop Access Guide
- ⚠️ Pre-Removal Safety Checklist
- 🔩 Gaming Laptop Screw Identification & Mapping
- 🔧 Step-by-Step Gaming Laptop Removal Process
- 🎮 Acer Nitro AN515-Specific Features
- 🚧 Common Gaming Laptop Challenges & Solutions
- 🔍 Gaming Component Access Points
- 🛡️ Gaming Laptop Damage Prevention Techniques
- 📋 Gaming Laptop Service Documentation
- 🔁 Gaming Laptop Reassembly Preparation
- 🔍 Gaming Laptop Troubleshooting Common Issues
- 5. Acer Nitro AN515 RAM Installation & Gaming Memory Upgrade Guide
- 🔋 Memory Specifications & Gaming Compatibility
- ⚠️ Gaming Laptop Safety Precautions
- ⚙️ Gaming Memory Configuration Options
- 🔧 Gaming RAM Installation Process
- 🚀 Gaming Performance Optimization
- 🛒 Gaming Memory Selection Guide
- ⚡ Speed vs Capacity: Gaming Decision Guide
- 🔧 Gaming Laptop Memory Troubleshooting
- 📊 Gaming Performance Validation
- 💰 Gaming Laptop Value Impact Analysis
- 🎯 Gaming Configuration Recommendations
- 🎮 Real Gaming Performance Impact
- 6. Acer Nitro AN515 Storage Solutions: Gaming HDD, SSD & M.2 Installation
- 🔋 Storage Specifications & Gaming Compatibility
- ⚠️ Gaming Laptop Safety Precautions
- 💾 Gaming Storage Configuration Options
- 🔧 Gaming Storage Installation Process
- 🛒 Gaming Drive Selection Guide
- 🚀 Gaming Performance Optimization
- ⏱️ Real Gaming Load Time Comparisons
- 📁 Gaming Data Migration Methods
- 🔧 Gaming Storage Troubleshooting
- 📊 Gaming Performance Validation
- 💰 Gaming Laptop Value Impact Analysis
- 🎯 Gaming Storage Configuration Recommendations
- ⚡ Gaming Setup Optimization Tips
- 7. Acer Nitro AN515 Cooling System Maintenance & Gaming Thermal Paste Application
- ❄️ Cooling System Specifications & Gaming Features
- ⚠️ Gaming Laptop Safety Precautions
- 🧴 Gaming Thermal Material Selection
- 🔧 Gaming Cooling System Disassembly
- 🎯 Gaming Thermal Paste Application Techniques
- 📏 Gaming Thermal Pad Management
- 🔄 Gaming Reassembly Process
- 🚀 Gaming Thermal Performance Optimization
- 🌡️ Gaming Temperature Targets
- 🔧 Gaming Cooling Troubleshooting
- 📊 Gaming Thermal Testing & Validation
- 💰 Gaming Laptop Value Impact Analysis
- 📅 Gaming Maintenance Schedule
- 🎯 Gaming Thermal Management Recommendations
- 8. Acer Nitro AN515 Keyboard & Top Case Assembly Removal Guide
- ⌨️ Keyboard Specifications & Gaming Features
- ⚠️ Gaming Laptop Safety Precautions
- 🔄 Gaming Keyboard Replacement Options
- 🔧 Gaming Top Case Removal Process
- ⌨️ Gaming Keyboard Removal Process
- 💡 Gaming Backlight Troubleshooting
- 🔄 Gaming Installation Process
- 🚧 Common Gaming Keyboard Issues
- 🔧 Gaming Keyboard Troubleshooting
- 📊 Gaming Keyboard Testing & Validation
- 💰 Gaming Laptop Value Impact Analysis
- 🎯 Gaming Keyboard Replacement Recommendations
- 🛡️ Gaming Keyboard Preventive Maintenance
- 9. Acer Nitro AN515 Motherboard Access & Gaming Component-Level Repair
- 🔌 Motherboard Specifications & Gaming Features
- ⚠️ Advanced Gaming Laptop Safety Precautions
- 📋 Pre-Motherboard Access Checklist
- 🔧 Gaming Motherboard Removal Process
- 🔍 Gaming Component-Level Repair Guide
- 🔬 Gaming Motherboard Diagnostic Techniques
- 🔌 Advanced Soldering & Repair Techniques
- 🔧 Gaming Motherboard Troubleshooting
- 💾 Gaming BIOS Recovery & Programming
- 🔄 Gaming Motherboard Reassembly Process
- 📊 Gaming Motherboard Testing & Validation
- 💰 Gaming Motherboard Repair Cost Analysis
- ⚡ Professional Repair Considerations
- 10. Where to Sell Your Repaired Acer Nitro AN515 for Maximum Gaming Value
- 📊 Current Acer Nitro AN515 Gaming Market Analysis
- 🏆 Premium Selling Platforms for Gaming Equipment
- 🛒 Mainstream Gaming Marketplace Options
- 💰 Gaming Laptop Pricing Strategy
- 📈 Gaming Laptop Listing Optimization
- ⚖️ Gaming Platform Comparison & Recommendations
- ⏰ Optimal Gaming Sales Timing
- 🎯 Gaming Laptop Presentation Tips
- 📦 Gaming Laptop Shipping & Packaging
- 🎮 Maximizing Gamer Buyer Appeal
- 🛡️ Gaming Sales Risk Management
- ⚡ Quick Gaming Sale Strategies
- 💰 Maximizing Gaming Laptop Value
- Need to Sell Your Acer Laptop? Get Instant Cash!
1. Acer Nitro AN515 Pre-Repair Preparation & Safety Guidelines
⚠️ Critical Safety Precautions
- Power Management:
- Complete shutdown through Windows menu
- Disconnect AC adapter and all gaming peripherals
- Remove battery if easily accessible
- Hold power button for 15 seconds to discharge capacitors
- Check that all RGB lighting is completely off
- Workspace Setup:
- Clean, static-free surface large enough for 15.6" gaming laptop
- Use anti-static wrist strap
- Have magnetic project mat ready for screw organization
- Ensure adequate lighting for detailed gaming laptop repair
- Keep work area free of liquids and debris
🔍 Pre-Repair Diagnostic Assessment
- System Diagnostics:
- Run Acer Care Center diagnostics
- Test GPU with 3DMark or FurMark
- Check storage health with CrystalDiskInfo
- Monitor temperatures with HWiNFO
- Test keyboard and RGB lighting functionality
- Gaming Performance Check:
- Run in-game benchmarks for FPS validation
- Test cooling system under gaming load
- Check display for dead pixels or backlight issues
- Verify all ports and connectivity options
🎮 Acer Nitro AN515-Specific Features
- Gaming Features:
- NitroSense cooling and performance control
- Red backlit keyboard (AN515-52/53/54 models)
- Dual fan cooling with Acer CoolBoost technology
- Waves MaxxAudio sound enhancement
- Performance Indicators:
- Intel Core i5/i7 or AMD Ryzen processors
- NVIDIA GeForce GTX/RTX graphics cards
- Upgradeable RAM and storage options
- Multiple display configurations available
💰 2024 Gaming Laptop Market Valuation
| Condition Grade | Specification Impact | Value Range | Gaming Premium |
|---|---|---|---|
| Excellent (Like New) | i7, RTX 3060, 16GB RAM, SSD | $700-$900 | +20% for collectors |
| Good (Minor Wear) | i5, GTX 1650, 8GB RAM, HDD+SSD | $450-$600 | +15% for gamers |
| Fair (Visible Wear) | Older GPU, 8GB RAM, HDD only | $300-$400 | +10% with documentation |
| For Parts/Repair | Any configuration with issues | $150-$250 | Minimal gaming premium |
📋 Pre-Repair Documentation
- Visual Documentation:
- High-resolution photos from all angles
- Close-ups of keyboard RGB lighting
- Screen functionality videos
- Gaming performance footage
- Document any existing damage or wear
- Performance Records:
- 3DMark benchmark scores
- Game FPS measurements
- Temperature readings under load
- Keyboard RGB functionality proof
- NitroSense performance metrics
🔧 Repair Cost-Benefit Analysis
| Repair/Upgrade | Cost | Value Added | ROI | Gamer Appeal |
|---|---|---|---|---|
| HDD to SSD Conversion | $50-$80 | $100-$150 | 100-200% | Very High |
| RAM Upgrade to 16GB | $40-$70 | $80-$120 | 100-200% | High |
| Thermal Repaste | $15-$25 | $50-$80 | 233-400% | Extreme |
| Screen Replacement | $80-$150 | $120-$200 | 50-150% | High |
| Keyboard Replacement | $60-$100 | $80-$140 | 33-140% | Very High |
💾 Gaming Data Backup Procedure
- Game Save Backup:
- Backup Steam game saves to cloud
- Save Epic Games, Origin, and Battle.net data
- Export game configurations and settings
- Backup mod files and custom content
- System Backup:
- Use Macrium Reflect for system image
- Backup Acer NitroSense profiles
- Save RGB keyboard lighting configurations
- Export overclocking profiles if used
📄 Warranty & Serial Number Verification
- Serial Number Check:
- Locate Serial Number on bottom cover or in BIOS
- Check Acer Support Site for warranty status
- Verify remaining standard or extended warranty
- Check for accidental damage protection
- Parts Compatibility:
- Verify specific AN515 model number
- Check RAM and storage compatibility
- Confirm display panel specifications
- Ensure genuine Acer parts for warranty preservation
🎮 Gamer Market Considerations
- Gamer Buyer Preferences:
- Value performance and cooling over cosmetics
- Appreciate upgrade documentation and benchmarks
- Pay premium for thermal improvements
- Prefer RGB lighting functionality
- Student Gamer Factors:
- Budget-conscious but value performance
- Appreciate portability for LAN parties
- Value good condition and reliability
- Prefer recent gaming capabilities
⏰ Realistic Repair Timeline
- Basic Upgrades (1-2 hours):
- RAM and storage upgrades
- Thermal paste replacement
- Basic cleaning and maintenance
- Intermediate Repairs (2-4 hours):
- Keyboard replacement
- Screen replacement
- Cooling system maintenance
- Advanced Repairs (4+ hours):
- Motherboard access and repair
- Complete disassembly
- Major component replacement
2. Essential Tools for Acer Nitro AN515 Gaming Laptop Disassembly
🔧 Basic Repair Toolkit
- Screwdrivers:
- Phillips #00 (primary for most internal screws)
- Phillips #0 (for larger components and chassis)
- Torx T5 (for display hinges and some brackets)
- Magnetic tip recommended for easier handling
- Prying Tools:
- Plastic spudger set (prevents case damage)
- Nylon opening tools for delicate components
- Guitar picks for clip release around bezels
- Metal spudger (for stubborn clips, use with caution)
⚙️ Specialized Gaming Laptop Equipment
| Tool | Purpose | Budget Option | Professional Option |
|---|---|---|---|
| Anti-static Wrist Strap | ESD protection for gaming components | $5-10 basic model | $20-30 with mat included |
| Precision Tweezers | Small connector and ribbon cable handling | $8-12 basic set | $25-40 anti-magnetic set |
| Spudger & Pry Tool Set | Case opening and clip release | $10-15 basic kit | $30-50 comprehensive kit |
| Magnetic Project Mat | Screw organization by component | $12-18 basic mat | $35-60 with compartments |
| ESD-Safe Brush | Dust removal from cooling system | $5-8 basic brush | $15-25 professional set |
| Thermal Paste Applicator | Precise thermal compound application | $3-5 basic spreader | $12-20 application kit |
🔩 Acer Nitro AN515-Specific Tool Requirements
- Model-Specific Tools:
- Phillips #00 for majority of internal screws
- Torx T5 for display hinge assembly
- Plastic cards for bottom case clips
- Spudger for ribbon cable connectors
- Special attention for RGB keyboard cables
- Recommended Kits:
- iFixit Pro Tech Toolkit
- iFixit Essential Electronics Toolkit
- Generic precision screwdriver sets with plastic tools
🧴 Consumables & Gaming Laptop Supplies
- Thermal Materials:
- High-quality thermal paste (Arctic MX-6, Thermal Grizzly Kryonaut)
- Isopropyl alcohol 90%+ for cleaning
- Lint-free cloths or coffee filters
- Thermal pads (various thicknesses for VRMs)
- Adhesives & Tapes:
- Double-sided tape for reassembly
- Kapton tape for insulation
- Battery adhesive strips
- Rubbing alcohol for adhesive removal
🛠️ Household Alternatives for Gamers
- Emergency Solutions:
- Small flathead screwdriver for Phillips heads (carefully)
- Business cards or playing cards for screw organization
- Plastic container with compartments for parts
- Rubber band for grip on stripped screws
- Old credit card for prying clips
- Safety Notes:
- Avoid metal tools on motherboard circuitry
- Use minimal force with improvised tools
- When in doubt, wait for proper tools
- Never force components that resist
- Be extra careful with RGB lighting connections
⚠️ Gaming Laptop Tool Safety & Best Practices
- Always disconnect power and remove battery before beginning work
- Use anti-static protection for sensitive gaming components
- Keep magnets away from storage devices and memory
- Organize screws systematically by component and location
- Use appropriate force - gaming laptop plastics can be brittle
- Work in a well-lit, clean, organized gaming setup area
- Keep tools organized and within reach during disassembly
- Handle RGB lighting cables with extreme care
🏆 Recommended Tool Kits for Gamers
- Beginner Gamer Kit ($25-40):
- iFixit Essential Electronics Toolkit
- Covers 90% of Acer Nitro AN515 repair needs
- Lifetime warranty on tools
- Good for occasional upgrades and cleaning
- Advanced Gamer Kit ($60-100):
- iFixit Pro Tech Toolkit
- Includes specialized tools for all repairs
- Magnetic mat and extended driver bits
- Ideal for frequent upgrades and maintenance
- Budget DIY Kit ($15-25):
- Generic precision screwdriver set
- Basic plastic prying tools
- Anti-static wrist strap
- Good for basic RAM and storage upgrades only
🛒 Where to Purchase Gaming Laptop Tools
- Online Retailers:
- iFixit.com (premium kits and guides)
- Amazon (variety of options and reviews)
- Micro Center (local pickup available)
- Local Stores:
- Best Buy (limited selection)
- Home Depot or Lowe's (basic tools)
- Local electronics repair shops
- Harbor Freight (budget options)
⚡ Acer Service & Warranty Considerations
- Warranty Status:
- Check Acer Warranty Status before disassembly
- Self-service may void remaining warranty
- Consider Acer official service for in-warranty devices
- Document original condition with photos
- Genuine Parts:
- Use Acer Parts Store for official parts
- Genuine Acer parts ensure best compatibility
- Third-party parts may vary in quality
- Verify part numbers before purchase
🎮 Gaming-Specific Tool Considerations
- RGB Lighting Components:
- Extra care with keyboard backlight connectors
- Use plastic tools around LED strips
- Test RGB functionality after reassembly
- Document cable routing for proper reassembly
- Cooling System Tools:
- Compressed air for dust removal
- Small brush for heat sink cleaning
- Thermal paste cleaner and applicator
- Fan bearing lubricant if accessible
🔧 Tool Maintenance & Care
- Regular Maintenance:
- Clean tools after each use
- Store in organized case or container
- Check for worn tips and replace as needed
- Keep magnetic tips clean and strong
- Longevity Tips:
- Use tools only for intended purposes
- Avoid excessive force that can damage tips
- Store in dry environment to prevent rust
- Replace worn plastic tools to prevent case damage
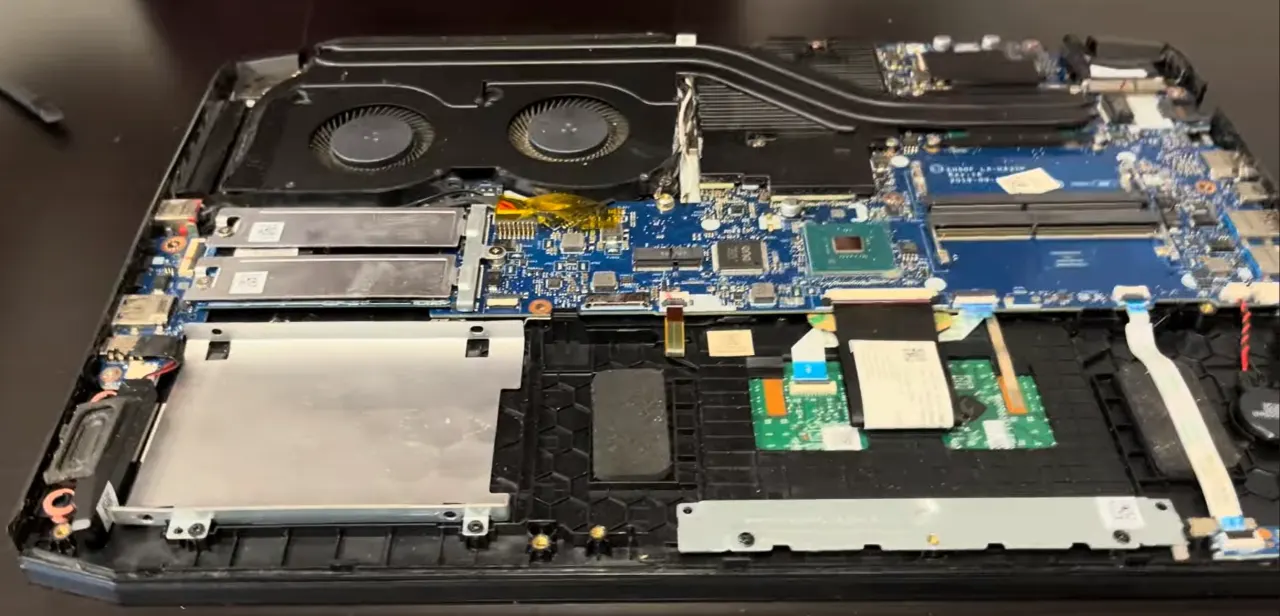
0:28 Battery 1:38 Battery 2:12 Memory RAM 2:27 WiFi Card 2:54 SSD Storage 3:32 DC Power Jack 4:00 Speakers 4:36 Heatsink and Cooling Fans 5:43 Processor CPU 5:45 GPU Graphics Chip 6:35 Motherboard 7:00 IO USB Board 7:57 Palmrest Assembly 8:08 Touchpad 8:41 Keyboard 8:57 Display Assembly 9:00 Front Bezel 9:40 Hinges 10:40 Video Cable 10:57 LCD Screen 11:03 Back Cover 11:11 Video Cable 11:26 Web Camera
3. Acer Nitro AN515 Battery Removal & Power Safety Procedures
🔋 Battery Specifications & Gaming Laptop Compatibility
- Original Specifications:
- 4-cell Lithium-Ion battery (typical)
- Part number: AP18C4K or similar (verify with your model)
- Voltage: 11.4V or 15.2V depending on configuration
- Capacity: 48Wh to 55Wh (varies by model year)
- Approximate runtime: 4-6 hours (normal use), 1-2 hours (gaming)
- Compatibility Notes:
- Must use AN515-specific battery model
- Verify Acer Parts Compatibility for exact match
- Different models may have varying connector types
- Check physical dimensions before purchase
⚠️ Critical Safety Precautions for Gaming Laptops
- Complete shutdown through Windows menu or power button
- Disconnect AC adapter and all gaming peripherals
- Remove bottom cover (refer to previous section)
- Wait 3-5 minutes after disconnection for capacitor discharge
- Use anti-static wrist strap
- Work on non-conductive, clean surface
- Have fire extinguisher nearby (Class D for lithium fires)
🔌 Safe Battery Disconnection Process
- Locate Battery Connector:
- Find white or black 3-4 pin connector near battery center
- Identify locking mechanism (usually sliding tab)
- Note cable routing under and around battery compartment
- Observe any adhesive or tape securing power cables
- Professional Disconnection Technique:
- Slide locking tab away from connector (if present)
- Pull connector straight out parallel to motherboard
- If stuck, use plastic spudger to assist release
- Never pull by wires - grasp connector body only
- Listen for subtle click indicating proper release
- Discharge Residual Power:
- Press and hold power button for 20 seconds
- Wait additional 2 minutes before proceeding
- Verify no LED activity anywhere on motherboard
- Check that all RGB lighting remains off
🔧 Battery Removal Procedure
- Remove Mounting Screws:
- Remove 3-4 Phillips #00 screws securing battery
- Note screw lengths for proper reassembly
- Some models may have adhesive strips under battery
- Keep screws organized in magnetic project mat
- Release Adhesive and Brackets:
- Gently lift battery from connection end first
- If resistance felt, check for adhesive strips
- Use plastic card to release adhesive if needed
- Apply steady upward pressure at 15-degree angle
- Lift Out Battery Safely:
- Lift at 20-degree angle to clear surrounding components
- Note cable routing pattern for reassembly reference
- Place old battery on non-conductive, fire-resistant surface
- Inspect battery bay for debris, corrosion, or damage
🔄 New Battery Installation Procedure
- Prepare New Battery:
- Inspect for physical damage, swelling, or defects
- Check connector alignment matches original orientation
- If using higher capacity model, verify physical fit
- Remove protective films and shipping materials
- Position Battery Correctly:
- Align with mounting holes and chassis guides
- Ensure connector faces correct direction toward motherboard
- Lower into place without forcing or bending
- Verify no cables will be trapped underneath battery
- Secure and Connect Professionally:
- Install mounting screws (snug but not overtightened)
- Connect battery connector until audible click is heard
- Verify secure connection with gentle tug test
- Secure any adhesive strips if included with new battery
📊 Gaming Laptop Battery Health Management
| Health Status | Capacity Indicator | Recommended Action | Gaming Value Impact |
|---|---|---|---|
| Excellent (90-100%) | Windows reports "Excellent" | Maintain 20-80% charge habit | +$80-$120 value |
| Good (70-89%) | Shows "Good" with moderate wear | Monitor degradation rate | +$40-$70 value |
| Poor (50-69%) | Suggests replacement soon | Replace battery recommended | -20% value if not replaced |
| Critical (<50%) | Significant runtime reduction | Immediate replacement required | -35% value and safety concern |
⚙️ New Battery Calibration Process
- Charge to 100% without interruption using Acer AC adapter
- Use on battery until system automatically shuts down (~5%)
- Charge to 100% again without using the laptop
- Check Acer Care Center for accurate health readings
- Reset battery gauge in BIOS if capacity reporting seems inaccurate
- Configure optimal charging settings for gaming use
🛒 Battery Purchasing Guide for Gamers
- Genuine Acer Batteries:
- Acer Parts Store (premium price, guaranteed compatibility)
- Authorized Acer retailers and service centers
- Includes full warranty and support
- Guaranteed gaming performance compatibility
- Quality Third-Party Options:
- Look for UL, CE, and RoHS certifications
- Check customer reviews specifically for AN515 models
- Verify return policy and warranty coverage
- Ensure compatible part number and connector type
- Gamer Red Flags:
- Prices significantly below Acer MSRP
- No brand identification or safety certifications
- Vague compatibility claims without specific models
- No customer reviews or established seller history
⚡ Acer NitroSense Power Management
- Gaming Power Profiles:
- Power Saver: Maximum battery life, reduced performance
- Balanced: Good performance with decent battery life
- High Performance: Maximum gaming performance
- Custom: User-defined power and fan settings
- Gaming Benefits:
- Extends battery lifespan for LAN parties
- Maintains consistent gaming performance
- Optimizes power delivery for different game types
- Provides detailed battery health analytics
♻️ Proper Battery Disposal & Recycling
- Recycling Options:
- Call2Recycle drop-off locations
- Best Buy electronics recycling
- Local hazardous waste facilities
- Battery manufacturer take-back programs
- Safety Precautions for Storage/Transport:
- Cover battery terminals with electrical tape
- Store in cool, dry place away from flammable materials
- Use original packaging or fire-proof battery bags
- Never dispose in regular trash or compactors
- Handle swollen batteries with extreme caution
🔍 Gaming Laptop Battery Troubleshooting
- Battery Not Detected:
- Reseat connector firmly until click is heard
- Check for bent pins in motherboard connector
- Test with known-good battery if possible
- Update BIOS to latest version from Acer Support
- Not Charging or Rapid Drain:
- Verify Acer AC adapter functionality
- Check charging port and DC-in cable connection
- Update BIOS and chipset drivers from Acer
- Test with different power outlet and cable
- Calibrate battery through full charge cycles
- Gaming Performance Issues:
- Set NitroSense to High Performance mode
- Close background applications when gaming on battery
- Lower graphics settings for longer gameplay sessions
- Monitor battery temperature during gaming
🎮 Gaming Performance Impact
- Battery Gaming Considerations:
- Reduced GPU performance on battery power
- Enable "High Performance" mode in NitroSense
- Lower graphics settings for extended gameplay
- Monitor battery temperature during gaming sessions
- Optimal Gaming Settings:
- Use "Balanced" power plan for mixed usage
- Enable battery conservation features if available
- Adjust RGB lighting brightness for power savings
- Close background applications when gaming on battery
💰 Gaming Laptop Resale Value Impact
- Value Enhancement Factors:
- New genuine Acer battery: +$100-$150 value
- Documented replacement: +$50 value
- 90%+ health reading: +$60 value
- Full calibration documentation: +$25 value
- Gamer Confidence Factors:
- LAN party attendees value battery life
- Students appreciate classroom portability
- All buyers prefer recent battery replacement
- Documentation reduces buyer hesitation
4. Acer Nitro AN515 Bottom Cover Removal: Gaming Laptop Access Guide
⚠️ Pre-Removal Safety Checklist
- Power Management:
- Complete shutdown through Windows menu
- Disconnect AC adapter and all gaming peripherals
- Remove battery following previous section procedures
- Hold power button for 15 seconds to discharge capacitors
- Verify all RGB lighting and status LEDs are completely off
- Gaming Workspace Setup:
- Clean, static-free surface large enough for 15.6" gaming laptop
- Have magnetic project mat ready
- Prepare anti-static wrist strap for component protection
- Ensure adequate gaming setup lighting for detailed work
- Use soft cloth to protect display during disassembly
🔩 Gaming Laptop Screw Identification & Mapping
| Screw Location | Type | Quantity | Length | Gaming Laptop Notes |
|---|---|---|---|---|
| Front Edge (Short) | Phillips #00 | 3 | 4mm | Standard length, near status indicators |
| Rear Edge (Long) | Phillips #00 | 4 | 6mm | Longer screws near cooling exhaust vents |
| Side Edges | Phillips #00 | 4 | 5mm | Medium length, near port connections |
| Center Reinforcement | Phillips #00 | 2 | 5mm | Additional structural support points |
| Battery Compartment | Phillips #00 | 3 | 4mm | Battery bracket and security screws |
| Warranty Sticker | N/A | 1 | N/A | Check Acer Warranty Status before removal |
🔧 Step-by-Step Gaming Laptop Removal Process
- Screw Removal Sequence:
- Remove all 16 Phillips #00 screws in cross pattern
- Start from corners and work toward center systematically
- Use magnetic screwdriver to prevent screw loss
- Organize screws by location using magnetic mat sections
- Note: Different screw lengths for specific locations
- Gaming Laptop Clip Release Technique:
- Start at front-right corner near status LED indicators
- Insert plastic pry tool at 30-degree angle
- Gently twist to release first clip (listen for subtle click)
- Work around perimeter, releasing clips every 2-3 inches
- Use guitar pick for better leverage on gaming laptop clips
- Alternate sides to prevent case warping or stress
- Professional Panel Separation:
- Lift from front edge first (near touchpad area)
- Angle upward at 25 degrees to clear rear port connections
- Check for any missed clips or internal connections
- Set panel aside on clean, soft, static-free surface
- Note internal cable routing for reassembly reference
🎮 Acer Nitro AN515-Specific Features
- Gaming Design Elements:
- Reinforced chassis for gaming durability
- Dual fan cooling system with Acer CoolBoost technology
- Easy-access upgrade compartments for gaming components
- Dedicated cooling vents for CPU and gaming GPU
- Strategic airflow channels for optimal thermal performance
- Gaming Internal Layout:
- Two DDR4 SODIMM slots for up to 32GB RAM
- Dual storage bays (2.5" SATA + M.2 NVMe)
- Dedicated gaming graphics card with cooling solution
- Wi-Fi card with Intel or Killer networking
- RGB keyboard lighting controller board
🚧 Common Gaming Laptop Challenges & Solutions
- Stubborn Gaming Laptop Clips:
- Apply gentle heat with hairdryer (low setting, 10 seconds)
- Use plastic playing card for better leverage
- Alternate sides every 2-3 clips to prevent permanent deformation
- Never force - reposition tool if resistance increases suddenly
- Check for hidden screws or missed retention points
- Stripped Screws in Gaming Equipment:
- Use rubber band between screw and driver for enhanced grip
- Try slightly larger Phillips head if available
- As last resort, use screw extraction kit
- Replace damaged screws during reassembly
- Document any damaged hardware for transparency
- Gaming Warranty Considerations:
- Check Acer Warranty Status before disassembly
- Some regions allow self-service without voiding warranty
- Document original condition with high-resolution photos
- Consider Acer certified service for in-warranty gaming laptops
🔍 Gaming Component Access Points
- Immediately Accessible Components:
- Two DDR4 memory slots (supports up to 32GB)
- Dual storage bays (2.5" SATA and M.2 NVMe SSD)
- Wi-Fi/Bluetooth card
- Battery connector and mounting bracket
- Cooling system and dual fan assemblies
- RGB keyboard controller board
- Requires Further Gaming Laptop Disassembly:
- Gaming GPU and CPU heatsinks
- Keyboard assembly and RGB lighting components
- Display assembly and gaming hinges
- Audio board and gaming speaker system
- Motherboard and DC-in power assembly
🛡️ Gaming Laptop Damage Prevention Techniques
- Clip Preservation for Gaming Equipment:
- Work slowly and methodically around entire perimeter
- Use plastic tools only against plastic components
- If clip breaks, note location for reassembly adjustment
- Apply even, consistent pressure to prevent bending
- Document any clip damage for records
- Component Protection for Gaming Grade:
- Avoid touching motherboard circuitry with metal tools
- Keep screws organized and away from internal components
- Use ESD protection at all times
- Don't force connectors or ribbon cables
- Handle gaming graphics card with care
- Surface Protection for Gaming Appearance:
- Use microfiber cloth under laptop during service
- Avoid sliding cover across surfaces to prevent scratches
- Keep work area free of debris, dust, and liquids
- Handle bottom cover by edges only to maintain appearance
- Clean contact surfaces before reassembly
📋 Gaming Laptop Service Documentation
- Gaming Service Records:
- Photograph screw locations before removal
- Document clip condition around perimeter
- Record any pre-existing damage or wear
- Maintain detailed service notes for future reference
- Include before/after photos for resale value
- Gaming Quality Assurance Checklist:
- Verify all screws are properly removed
- Check for hidden retention points or clips
- Ensure no cables are attached to bottom cover
- Confirm clean separation without forced removal
- Document any challenges encountered during process
🔁 Gaming Laptop Reassembly Preparation
- Clean panel edges and contact surfaces with isopropyl alcohol
- Inspect all clips for damage before reassembly
- Test fit cover before installing any screws
- Ensure all internal cables are properly routed and secured
- Verify no tools, debris, or foreign objects inside chassis
- Check that all gaming components are properly seated and connected
🔍 Gaming Laptop Troubleshooting Common Issues
- Cover Won't Sit Flush After Service:
- Check for missed clips or internal obstructions
- Verify all internal components are properly seated
- Ensure no cables are trapped under cover edges
- Inspect for bent or damaged clip receptacles
- Gaps or Misalignment After Reassembly:
- Check clip alignment around entire perimeter
- Verify all screws are proper length for locations
- Ensure no damage to mating surfaces or guides
- Confirm proper screw tightening sequence
- Gaming Appearance Concerns:
- Clean all surfaces before final assembly
- Check for scratches or damage from tools
- Verify all labels and stickers remain intact
- Ensure gaming aesthetic is maintained
5. Acer Nitro AN515 RAM Installation & Gaming Memory Upgrade Guide
🔋 Memory Specifications & Gaming Compatibility
- Technical Specifications:
- DDR4 SODIMM memory technology
- Speed: 2666MHz, 2933MHz, or 3200MHz (varies by model)
- Maximum Capacity: 32GB (2x16GB modules)
- Voltage: 1.2V standard operating voltage
- Dual-channel architecture support
- Gaming Compatibility Notes:
- Check specific AN515 model number for exact speed support
- Verify Acer Memory Compatibility for exact models
- Mixed memory speeds run at slowest module speed
- Intel and AMD models may have different memory controllers
⚠️ Gaming Laptop Safety Precautions
- Complete shutdown and disconnect all power sources
- Remove bottom cover following previous section procedures
- Disconnect battery to ensure complete power isolation
- Use anti-static wrist strap at all times
- Work on clean, static-free gaming setup surface
- Handle memory modules by edges only to prevent damage
⚙️ Gaming Memory Configuration Options
| Configuration | Total Capacity | Module Layout | Gaming Performance | Best For |
|---|---|---|---|---|
| Dual Channel | 16GB (2x8GB) | Both slots populated | Optimal gaming performance | Most gamers, excellent value |
| Single Channel | 8GB (1x8GB) | One slot populated | Basic gaming, upgradable | Budget builds, future upgrades |
| Maximum Gaming | 32GB (2x16GB) | Both slots populated | Future-proof, multitasking | Streaming, content creation |
| Mixed Upgrade | 12GB-24GB | Mixed capacity modules | Variable, not recommended | Emergency upgrades only |
🔧 Gaming RAM Installation Process
- Slot Identification:
- Locate two DDR4 SODIMM slots on motherboard
- Identify slots typically labeled or color-coded
- Note existing memory configuration and module placement
- Check for slot keying and orientation markers
- Gaming Removal Technique:
- Gently push outward on retention clips at both ends
- Module will pop up at 30-degree angle automatically
- Lift module straight out without twisting or bending
- Place removed modules in anti-static bags for storage
- Handle modules by edges only, avoid touching gold contacts
- Gaming Installation Method:
- Align module notch with slot key to ensure proper orientation
- Insert module at 30-degree angle into slot
- Apply even pressure to both ends until fully seated
- Gently push down until retention clips snap into place
- Listen for audible click indicating proper installation
🚀 Gaming Performance Optimization
- Dual Channel Benefits for Gaming:
- Install identical modules in both slots for dual-channel
- Use same capacity, speed, and timing for optimal performance
- Dual-channel provides up to 15-20% gaming performance boost
- Check BIOS settings for memory speed optimization
- Gaming Application Benefits:
- 8GB minimum for modern gaming titles
- 16GB recommended for optimal gaming experience
- 32GB ideal for streaming and content creation
- Higher speeds benefit CPU-intensive games
🛒 Gaming Memory Selection Guide
| Memory Type | Gaming Benefits | Cost Range | Recommended Brands | Gaming Performance |
|---|---|---|---|---|
| Premium Gaming RAM | High speeds, low latency, RGB options | $80-$120 (16GB) | Corsair, G.Skill, TeamGroup | Excellent |
| Performance RAM | Good speeds, reliable performance | $60-$90 (16GB) | Crucial, Kingston, ADATA | Very Good |
| Budget Gaming RAM | Basic speeds, cost-effective | $40-$70 (16GB) | Silicon Power, Patriot | Good |
| Used/Refurbished | Budget option, tested reliability | $30-$50 (16GB) | Various, verify testing | Variable |
⚡ Speed vs Capacity: Gaming Decision Guide
- Speed Advantages:
- Higher FPS in CPU-bound games
- Faster loading times and asset streaming
- Better performance in simulation games
- Improved minimum frame rates
- Capacity Advantages:
- Better multitasking while gaming
- Future-proof for upcoming game titles
- Ideal for streaming and recording
- Prevents stuttering in memory-heavy games
🔧 Gaming Laptop Memory Troubleshooting
- Memory Not Detected:
- Reseat module firmly until retention clips engage
- Clean gold contacts with isopropyl alcohol if necessary
- Test modules individually to identify faulty units
- Update BIOS to latest version from Acer Support
- Check for bent pins in memory slots
- Gaming Boot Issues:
- Ensure all modules are properly seated and secured
- Verify memory compatibility with Acer documentation
- Reset BIOS to default settings and retest
- Test with known-good memory modules if available
- Check for beep codes or diagnostic LED patterns
- Gaming Performance Problems:
- Verify dual-channel operation in BIOS
- Check memory speed settings and timing optimization
- Run MemTest86 for memory stability testing
- Ensure proper cooling for high-speed memory modules
- Update chipset drivers from Acer Support site
📊 Gaming Performance Validation
- Benchmarking Tools:
- Run MemTest86 for stability verification
- Use AIDA64 Memory Benchmark for performance metrics
- Test with gaming benchmarks like 3DMark and PCMark
- Monitor memory usage during gaming sessions
- Validate dual-channel operation in CPU-Z
- Gaming Application Testing:
- Test FPS in demanding games (Cyberpunk, RDR2)
- Check loading times in open-world games
- Monitor stuttering and frame time consistency
- Test multitasking performance while gaming
- Validate streaming performance if applicable
💰 Gaming Laptop Value Impact Analysis
| Upgrade Configuration | Cost Investment | Value Added | ROI Percentage | Gaming Appeal |
|---|---|---|---|---|
| 8GB to 16GB Upgrade | $40-$70 | $80-$120 | 100-200% | High |
| 16GB to 32GB Upgrade | $80-$140 | $100-$160 | 25-100% | Very High |
| Single to Dual Channel | $40-$80 | $60-$100 | 50-150% | Excellent |
| Speed Upgrade | $20-$40 premium | $30-$50 | 50-150% | Moderate |
🎯 Gaming Configuration Recommendations
- Competitive Esports Gaming:
- Recommended: 16GB (2x8GB) 3200MHz
- Optimal for: CS:GO, Valorant, Fortnite, Overwatch
- Benefits: Maximum FPS, low latency, stable performance
- Brands: Corsair Vengeance, G.Skill Ripjaws
- AAA Gaming & Streaming:
- Recommended: 32GB (2x16GB) 2933MHz+
- Optimal for: Cyberpunk, RDR2, streaming, recording
- Benefits: Future-proof, multitasking, content creation
- Brands: Crucial Ballistix, Kingston Fury
- Budget Gaming:
- Recommended: 16GB (2x8GB) 2666MHz
- Optimal for: Most games, good value
- Benefits: Cost-effective, reliable performance
- Brands: TeamGroup, Silicon Power
🎮 Real Gaming Performance Impact
- FPS Improvements:
- 8GB to 16GB: 10-25% FPS increase in modern titles
- Single to Dual Channel: 15-20% performance boost
- Higher speeds: 5-15% improvement in CPU-bound games
- Reduced stuttering and frame time variance
- Loading Time Benefits:
- Faster game level loading
- Reduced asset streaming stutter
- Quick alt-tab performance
- Better background task handling
6. Acer Nitro AN515 Storage Solutions: Gaming HDD, SSD & M.2 Installation
🔋 Storage Specifications & Gaming Compatibility
- Technical Specifications:
- 2.5-inch SATA III bay (6Gb/s)
- M.2 NVMe PCIe 3.0 x4 slot (2280 size)
- Support for RAID 0 configurations (some models)
- Maximum theoretical capacity: 4TB+ (2TB SATA + 2TB NVMe)
- Intel Rapid Storage Technology support
- Gaming Compatibility Notes:
- M.2 2280 form factor required for NVMe slot
- SATA III supports both HDD and SSD 2.5-inch drives
- Verify Acer Storage Compatibility for exact models
- Some models may have dual M.2 slots
⚠️ Gaming Laptop Safety Precautions
- Complete shutdown and disconnect all power sources
- Remove bottom cover following established procedures
- Disconnect battery to ensure complete power isolation
- Use anti-static wrist strap at all times
- Handle storage devices by edges to prevent static damage
- Backup all game saves and data before storage replacement
🔧 Gaming Storage Installation Process
2.5-inch SATA Drive Installation
- Drive Preparation:
- Remove existing drive from metal caddy if present
- Transfer rubber vibration dampeners to new drive
- Align screw holes on drive with caddy mounting points
- Use four screws to secure drive in caddy
- Gaming Connection:
- Align SATA data connector with motherboard port
- Connect SATA power cable from motherboard
- Slide drive assembly into bay until fully seated
- Secure with single retention screw at front
- Ensure cables are properly routed and not pinched
M.2 NVMe SSD Installation
- Slot Preparation:
- Locate M.2 slot near center of motherboard
- Remove retention screw if present
- Clean slot area of any dust or debris
- Note keying notch position for proper orientation
- Gaming Installation:
- Insert NVMe SSD at 30-degree angle into slot
- Gently press down until drive lies flat
- Secure with retention screw and standoff
- Ensure screw is snug but not overtightened
- Some gaming models may include thermal pad
🛒 Gaming Drive Selection Guide
| Drive Type | Gaming Benefits | Cost per GB | Recommended Brands | Gaming Performance |
|---|---|---|---|---|
| NVMe PCIe 3.0 | Fastest loading, minimal stutter | $0.06-$0.10 | Samsung, WD Black, Sabrent | Excellent |
| SATA SSD | Fast loading, reliable | $0.05-$0.08 | Crucial MX500, Samsung 870 | Very Good |
| Gaming HDD | High capacity, cost-effective | $0.02-$0.04 | WD Black, Seagate Barracuda | Good (storage only) |
| Budget SSD | Cost-effective performance | $0.04-$0.07 | TeamGroup, PNY, ADATA | Good |
🚀 Gaming Performance Optimization
- Gaming Storage Configuration:
- Use NVMe drive for OS and frequently played games
- Configure SATA drive for game library and storage
- Enable write caching in device manager for performance
- Use Acer Care Center for drive health monitoring
- Regularly update storage drivers and firmware
- Gaming Application Optimization:
- Competitive games: Install on NVMe for fastest loading
- Single-player games: SATA SSD provides great performance
- Game library: HDD for older or less-played titles
- Streaming assets: NVMe for smooth asset streaming
⏱️ Real Gaming Load Time Comparisons
| Game Title | HDD Load Time | SATA SSD Load Time | NVMe SSD Load Time | Performance Gain |
|---|---|---|---|---|
| Cyberpunk 2077 | 45-60 seconds | 20-30 seconds | 15-22 seconds | 67-73% faster |
| Call of Duty: Warzone | 35-50 seconds | 18-25 seconds | 12-18 seconds | 66-71% faster |
| Red Dead Redemption 2 | 60-90 seconds | 30-45 seconds | 25-35 seconds | 58-67% faster |
| Fortnite | 25-35 seconds | 12-18 seconds | 8-12 seconds | 68-76% faster |
📁 Gaming Data Migration Methods
- Clone Existing Drive:
- Use Macrium Reflect for sector-by-sector cloning
- Samsung Data Migration for Samsung SSDs
- Acronis True Image for comprehensive backup
- Clonezilla for open-source solution
- Fresh Gaming Installation:
- Download latest drivers from Acer Support site
- Create Windows installation media
- Install OS on new drive
- Reinstall gaming platforms and games
- Restore game saves from cloud backup
🔧 Gaming Storage Troubleshooting
- Drive Not Detected:
- Check drive is properly seated and connected
- Verify drive initialization in Disk Management
- Update storage controller drivers from Acer
- Check BIOS settings for SATA/NVMe configuration
- Test drive in another system if possible
- Gaming Performance Issues:
- Run CrystalDiskMark to benchmark performance
- Check CrystalDiskInfo for drive health
- Update NVMe driver and firmware
- Ensure proper cooling for sustained gaming performance
- Check for background processes affecting I/O
- Boot Problems:
- Verify boot order in BIOS settings
- Check UEFI/Legacy boot mode compatibility
- Ensure OS is properly installed on boot drive
- Test with single drive configuration
- Update BIOS to latest version
📊 Gaming Performance Validation
- Benchmarking Tools:
- CrystalDiskMark for sequential and random performance
- AS SSD Benchmark for NVMe specific testing
- ATTO Disk Benchmark for transfer size analysis
- Real-world game loading time measurements
- Gaming Application Testing:
- Measure game level loading times
- Test asset streaming performance
- Check for stuttering during gameplay
- Verify fast travel times in open-world games
- Test alt-tab performance
💰 Gaming Laptop Value Impact Analysis
| Storage Upgrade | Cost Investment | Value Added | ROI Percentage | Gaming Benefit |
|---|---|---|---|---|
| HDD to SATA SSD | $50-$80 (1TB) | $100-$150 | 100-200% | Massive gaming performance improvement |
| SATA SSD to NVMe | $60-$100 (1TB) | $80-$120 | 33-100% | Faster loading and asset streaming |
| Dual Drive Setup | $120-$180 | $150-$220 | 25-83% | Optimal gaming workflow separation |
| Capacity Upgrade | $80-$150 | $100-$180 | 25-125% | More game storage and flexibility |
🎯 Gaming Storage Configuration Recommendations
- Competitive Esports Gaming:
- Primary: 1TB NVMe SSD (OS and competitive games)
- Secondary: Optional SATA SSD for other games
- Benefits: Fastest loading, minimal stutter
- Brands: Samsung 970/980, WD Black SN750
- AAA Gaming & Content Creation:
- Primary: 1TB NVMe SSD (OS and active projects)
- Secondary: 2TB SATA SSD (game library and files)
- Benefits: Fast editing, large storage capacity
- Brands: Crucial P5, Sabrent Rocket
- Budget Gaming:
- Primary: 512GB-1TB SATA SSD
- Secondary: Optional HDD for additional storage
- Benefits: Cost-effective, good performance
- Brands: Crucial MX500, TeamGroup GX2
⚡ Gaming Setup Optimization Tips
- Game Installation Strategy:
- Install competitive games on fastest drive
- Use secondary drive for single-player games
- Keep recording/streaming files on separate drive
- Regularly clean up temporary files and cache
- Performance Settings:
- Enable TRIM support for SSD maintenance
- Disable defragmentation on SSDs
- Set appropriate page file size
- Enable write caching for better performance
7. Acer Nitro AN515 Cooling System Maintenance & Gaming Thermal Paste Application
❄️ Cooling System Specifications & Gaming Features
- Technical Specifications:
- Dual-fan cooling system with Acer CoolBoost technology
- CPU cooling: Dual heat pipes with copper fins
- GPU cooling: Dedicated heat pipes for gaming graphics
- NitroSense software control for fan profiles
- Four exhaust vents for optimal airflow
- Gaming Performance Notes:
- Supports Intel Core i7 and AMD Ryzen 7 processors
- Optimized for NVIDIA GTX/RTX gaming graphics cards
- Acer CoolBoost increases fan speed by 10% when enabled
- Dust-deflection technology for long-term performance
⚠️ Gaming Laptop Safety Precautions
- Complete shutdown and disconnect all power sources
- Remove battery following established safety procedures
- Allow gaming laptop to cool completely before disassembly
- Use anti-static wrist strap throughout process
- Work on clean, static-free gaming setup surface
- Handle heat pipes and fins with care to avoid damage
🧴 Gaming Thermal Material Selection
| Thermal Compound | Gaming Benefits | Thermal Conductivity | Application Difficulty | Gaming Reliability |
|---|---|---|---|---|
| Arctic MX-6 | Excellent longevity, non-conductive | 10.6 W/mK | Easy | Outstanding (8+ years) |
| Thermal Grizzly Kryonaut | Maximum performance, high-end gaming | 12.5 W/mK | Medium | Excellent (5-7 years) |
| Noctua NT-H2 | Reliable, easy application | 8.9 W/mK | Easy | Excellent (6+ years) |
| Cooler Master MasterGel | Good performance, budget-friendly | 11 W/mK | Easy | Very Good (4-6 years) |
🔧 Gaming Cooling System Disassembly
Heat Sink Assembly Removal
- Initial Preparation:
- Remove bottom cover following established procedures
- Disconnect battery to ensure complete power isolation
- Remove all visible screws securing heat sink assembly
- Document screw locations and lengths for reassembly
- Gaming Disconnection:
- Carefully disconnect CPU and GPU fan power cables
- Note cable routing for proper reassembly
- Identify heat sink mounting screw sequence (typically numbered)
- Loosen screws in reverse numerical order (8-7-6-5-4-3-2-1)
- Heat Sink Separation:
- Gently twist heat sink to break thermal compound seal
- Lift heat sink assembly straight up to avoid damage
- Inspect thermal pads on VRMs and memory chips
- Clean old thermal compound from CPU and GPU dies
Fan Assembly Maintenance
- Fan Removal:
- Remove screws securing fan assemblies to chassis
- Disconnect fan power cables from motherboard
- Carefully lift fan assemblies from mounting points
- Note orientation and cable routing for reassembly
- Gaming Cleaning:
- Use compressed air to remove dust from fan blades
- Clean fan vents and heat sink fins thoroughly
- Check fan bearings for wear or noise issues
- Lubricate fan bearings if accessible and necessary
🎯 Gaming Thermal Paste Application Techniques
Surface Preparation
- Cleaning Process:
- Use 99% isopropyl alcohol and lint-free cloths
- Clean both CPU/GPU dies and heat sink surfaces
- Remove all old thermal compound completely
- Ensure surfaces are completely dry before application
- Gaming Inspection:
- Check CPU and GPU dies for scratches or damage
- Inspect heat sink base for flatness and condition
- Verify thermal pad thickness and condition
- Replace damaged thermal pads with correct thickness
Gaming Application Methods
- Pea Method (Recommended):
- Apply rice-sized dot in center of CPU die
- Use slightly larger dot for GPU die
- Pressure from heat sink spreads compound evenly
- Ideal for most gaming applications
- Spread Method (Advanced):
- Use plastic applicator to spread thin, even layer
- Ensure complete coverage without excess
- Recommended for experienced users only
- Good for direct-die cooling applications
- X Method (Alternative):
- Draw thin X pattern across CPU/GPU dies
- Effective for larger die surfaces
- Ensures corner coverage
- Good for high-performance gaming
📏 Gaming Thermal Pad Management
- Critical Pad Locations:
- VRM power stages (typically 1.0mm thickness)
- GPU memory chips (typically 0.5mm-1.0mm)
- PCH chipset (typically 0.5mm)
- VRAM modules (typically 1.0mm)
- Gaming Replacement Guidelines:
- Measure original pad thickness with calipers
- Use high-conductivity thermal pads (6.0 W/mK+)
- Ensure proper compression without excessive force
- Cut pads slightly larger than components for coverage
- Remove protective films from both sides before installation
🔄 Gaming Reassembly Process
- Heat Sink Installation:
- Apply thermal paste using preferred method
- Position heat sink assembly over CPU and GPU
- Align screw holes and lower heat sink gently
- Install screws in numerical sequence (1-2-3-4-5-6-7-8)
- Use proper torque - snug but not overtightened
- Fan Assembly Installation:
- Position fan assemblies in chassis mounts
- Secure with appropriate screws
- Connect fan power cables to motherboard
- Ensure proper cable routing to avoid interference
- Final Gaming Verification:
- Verify all connections are secure
- Check that no cables are pinched
- Ensure heat sink makes full contact with dies
- Test fan operation before final closure
🚀 Gaming Thermal Performance Optimization
- NitroSense Settings:
- Auto: Balanced performance and acoustics
- Max: Maximum cooling with higher fan speeds
- Custom: User-defined fan curves and speeds
- CoolBoost: Increases fan speed by 10% when enabled
- Gaming Workload Optimization:
- Competitive Gaming: Max or Custom high-speed profile
- Single Player: Auto for balanced experience
- Streaming: Custom profile for sustained performance
- Office Work: Auto for quiet operation
🌡️ Gaming Temperature Targets
| Component | Ideal Gaming Temp | Acceptable Temp | Throttling Temp | Danger Zone |
|---|---|---|---|---|
| CPU (Gaming) | 70-80°C | 81-85°C | 86-95°C | 96°C+ |
| GPU (Gaming) | 75-82°C | 83-87°C | 88-94°C | 95°C+ |
| CPU (Idle) | 40-50°C | 51-60°C | N/A | 80°C+ |
| GPU (Idle) | 35-45°C | 46-55°C | N/A | 75°C+ |
🔧 Gaming Cooling Troubleshooting
- Overheating Problems:
- Check thermal paste application and coverage
- Verify heat sink mounting pressure and flatness
- Clean dust from vents and heat sink fins
- Update BIOS and NitroSense software
- Test with different thermal performance profiles
- Fan Noise Issues:
- Clean fan blades and bearings
- Check for cable interference with fan blades
- Update BIOS for improved fan control algorithms
- Replace worn fan bearings if necessary
- Adjust fan curves in NitroSense
- Gaming Performance Throttling:
- Monitor temperatures with HWiNFO
- Check power limits and thermal throttling flags
- Verify adequate ventilation during gaming sessions
- Consider laptop cooling pad for additional airflow
- Repaste with higher performance thermal compound
📊 Gaming Thermal Testing & Validation
- Gaming Stress Testing:
- Gaming Benchmarking:
- Record idle and gaming load temperatures
- Measure thermal throttling occurrences
- Document fan noise levels at various speeds
- Compare before/after thermal performance
- Validate sustained gaming performance under load
💰 Gaming Laptop Value Impact Analysis
| Thermal Service | Cost Investment | Value Added | ROI Percentage | Gaming Benefit |
|---|---|---|---|---|
| Professional Repaste | $15-$30 | $80-$140 | 433-800% | Maximum gaming performance restoration |
| Complete Cleaning | $10-$20 | $60-$100 | 500-900% | Improved cooling and gaming reliability |
| Fan Replacement | $30-$50 | $70-$110 | 133-267% | Quiet operation and cooling capacity |
| Thermal Pad Upgrade | $20-$35 | $50-$80 | 150-300% | Enhanced VRM and memory cooling |
📅 Gaming Maintenance Schedule
- Routine Gaming Maintenance (Every 3-6 months):
- Dust cleaning of vents and fans
- Visual inspection of cooling system
- Gaming performance validation under load
- Fan bearing noise assessment
- Comprehensive Gaming Service (Every 1-2 years):
- Complete disassembly and cleaning
- Thermal paste replacement
- Thermal pad inspection and replacement
- Fan performance testing and replacement if needed
🎯 Gaming Thermal Management Recommendations
- Competitive Gaming Setup:
- Thermal Compound: Thermal Grizzly Kryonaut
- Thermal Pads: Gelid GP-Extreme 6.0 W/mK
- Maintenance: Quarterly cleaning, annual repaste
- NitroSense Setting: Max or Custom high-speed
- Balanced Gaming Use:
- Thermal Compound: Arctic MX-6
- Thermal Pads: Arctic Thermal Pad 6.0 W/mK
- Maintenance: Semi-annual cleaning, biennial repaste
- NitroSense Setting: Auto or Custom balanced
- Casual Gaming:
- Thermal Compound: Noctua NT-H2
- Thermal Pads: Standard replacement pads
- Maintenance: Annual cleaning as needed
- NitroSense Setting: Auto
8. Acer Nitro AN515 Keyboard & Top Case Assembly Removal Guide
⌨️ Keyboard Specifications & Gaming Features
- Technical Specifications:
- Full-size keyboard with numeric keypad
- Red backlit illumination (4-zone RGB on some models)
- 1.6mm key travel for gaming responsiveness
- Spill-resistant design with drainage system
- Acer NitroSense keyboard lighting control
- Gaming Compatibility Notes:
- Verify Acer Parts Compatibility for exact model match
- Different models may have varying backlight configurations
- International keyboard layouts require specific part numbers
- Some models include dedicated Nitro key
⚠️ Gaming Laptop Safety Precautions
- Complete shutdown and disconnect all power sources
- Remove battery following established safety procedures
- Use anti-static wrist strap throughout process
- Document screw locations and cable routing with photos
- Work on clean, static-free gaming setup surface
- Handle ribbon cables with extreme care to prevent damage
🔧 Gaming Top Case Removal Process
Initial Preparation Steps
- Complete Disassembly:
- Remove bottom cover following previous procedures
- Disconnect battery to ensure complete power isolation
- Remove all internal components (RAM, storage, Wi-Fi card)
- Document component locations and cable routing
- Motherboard Preparation:
- Disconnect all cables connected to motherboard
- Remove motherboard mounting screws
- Carefully lift motherboard from chassis
- Set aside on anti-static surface
Top Case Assembly Removal
- Screw Identification:
- Locate 8-10 Phillips #00 screws securing top case
- Remove screws from around display hinges
- Remove screws from front edge near status LEDs
- Note screw lengths and locations for reassembly
- Clip Release Technique:
- Use plastic pry tools to release retention clips
- Start from front edge and work around perimeter
- Apply even pressure to prevent case damage
- Listen for subtle clicks indicating clip release
- Top Case Separation:
- Lift top case assembly carefully from chassis
- Check for any hidden cables or connections
- Set top case aside on clean, static-free surface
- Inspect clip condition for reassembly reference
⌨️ Gaming Keyboard Removal Process
- Keyboard Mounting:
- Locate 6-8 plastic retention clips around keyboard perimeter
- Identify metal bracket screws securing keyboard frame
- Remove any visible screws from keyboard area
- Note screw and clip locations for reassembly
- Professional Release Technique:
- Use plastic spudger to gently release retention clips
- Work from top edge downward in sequence
- Apply even pressure to prevent plastic damage
- Listen for audible clicks as clips release
- Keyboard Disconnection:
- Carefully lift keyboard assembly at 30-degree angle
- Locate keyboard ribbon cable on back of keyboard
- Release locking mechanism (typically sliding or flip type)
- Gently pull ribbon cable straight out from connector
💡 Gaming Backlight Troubleshooting
- Common Backlight Problems:
- No backlight illumination
- Inconsistent lighting across keyboard zones
- Backlight flickering or intermittent operation
- Specific keys not lighting properly
- Gaming Solutions:
- Check Acer NitroSense keyboard lighting settings
- Update keyboard drivers and BIOS firmware
- Test backlight functionality in BIOS settings
- Check ribbon cable connection for backlight power
- Verify backlight settings in Windows Mobility Center
🔄 Gaming Installation Process
- New Keyboard Preparation:
- Inspect new keyboard for any shipping damage
- Verify ribbon cable length and connector type
- Test keyboard functionality before installation if possible
- Remove protective films from adhesive areas
- Gaming Connection:
- Route ribbon cable through proper channels
- Connect ribbon cable to motherboard connector
- Secure locking mechanism (slide or flip into place)
- Ensure cable is not pinched or overly tensioned
- Keyboard Positioning:
- Align keyboard with chassis mounting points
- Lower keyboard into position evenly
- Ensure all edges seat properly in chassis grooves
- Verify no cables are trapped under keyboard
- Final Assembly:
- Install keyboard retention screws in proper sequence
- Reconnect top case assembly and secure clips
- Reinstall motherboard and all internal components
- Test all keyboard functions before final closure
🚧 Common Gaming Keyboard Issues
- Mechanical Problems:
- Stuck or unresponsive keys
- Keycap damage from gaming use
- Spill damage affecting multiple keys
- Worn key switches from heavy gaming
- Electrical Problems:
- Backlight LED failure
- Ribbon cable damage
- Controller board issues
- Power delivery problems
🔧 Gaming Keyboard Troubleshooting
- Keys Not Responding:
- Reseat ribbon cable connection firmly
- Check for debris under non-responsive keys
- Test keyboard in BIOS to isolate software issues
- Update chipset and keyboard drivers from Acer
- Check for physical damage to membrane or key switches
- Ghost Key Presses:
- Clean keyboard thoroughly with compressed air
- Check for spill residue causing short circuits
- Test with external keyboard to confirm issue
- Inspect membrane for wear or damage points
- Update BIOS to latest version from Acer Support
- Backlight Not Working:
- Check function key combinations (Fn + F9 typically)
- Verify backlight settings in Acer NitroSense
- Test in BIOS to confirm hardware functionality
- Check ribbon cable connection for backlight circuit
- Update keyboard firmware if available
📊 Gaming Keyboard Testing & Validation
- Functional Testing:
- Test every key using on-screen keyboard or testing software
- Verify numeric keypad and function key operation
- Test backlight functionality and brightness controls
- Check special function keys (volume, brightness, etc.)
- Verify gaming-specific key combinations
- Gaming Application Testing:
- Test common gaming shortcut keys and macros
- Verify WASD and arrow key responsiveness
- Test simultaneous key presses for gaming
- Check anti-ghosting functionality
- Validate typing comfort and key travel consistency
💰 Gaming Laptop Value Impact Analysis
| Replacement Type | Cost Investment | Value Added | ROI Percentage | Gaming Impact |
|---|---|---|---|---|
| Genuine Acer Gaming | $60-$100 | $80-$120 | 33-100% | Maximum gaming appearance and function |
| Certified Refurbished | $35-$65 | $50-$80 | 43-129% | Good gaming quality and reliability |
| Third-Party Basic | $25-$50 | $30-$60 | 20-140% | Functional but lower gaming quality |
| Professional Repair | $15-$30 | $40-$70 | 133-367% | Cost-effective for specific gaming issues |
🎯 Gaming Keyboard Replacement Recommendations
- Competitive Gaming:
- Recommended: Genuine Acer Replacement
- Optimal for: Esports, streaming, professional gaming
- Benefits: Full warranty, guaranteed compatibility
- Features: Red backlit, spill-resistant, premium feel
- Casual Gaming:
- Recommended: Certified Refurbished
- Optimal for: General gaming, cost-conscious projects
- Benefits: Reliable performance, significant cost savings
- Features: Tested reliability, gaming quality
- Budget Gaming:
- Recommended: Third-party compatible
- Optimal for: Personal gaming, secondary systems
- Benefits: Lowest cost, functional replacement
- Features: Basic functionality, variable quality
🛡️ Gaming Keyboard Preventive Maintenance
- Regular Cleaning:
- Use compressed air to remove dust and debris
- Clean keycaps with isopropyl alcohol and cotton swabs
- Avoid liquid cleaners that can damage electronics
- Use keyboard covers for spill protection
- Usage Best Practices:
- Avoid eating or drinking near gaming laptop
- Use gentle pressure during intense gaming sessions
- Keep hands clean to prevent oil buildup
- Store laptop in protective case when transporting
9. Acer Nitro AN515 Motherboard Access & Gaming Component-Level Repair
🔌 Motherboard Specifications & Gaming Features
- Technical Specifications:
- Model-specific motherboard design for AN515 series
- Intel HM470 or AMD equivalent chipset
- Dual-channel DDR4 memory support (up to 32GB)
- PCIe 3.0 x4 for NVMe storage
- Integrated audio codec with gaming enhancements
- Gaming Component Integration:
- Direct GPU mounting for gaming graphics cards
- Multiple power phases for CPU and GPU stability
- Enhanced thermal sensor array for gaming loads
- RGB lighting controller integration
- Killer Ethernet or Intel Wi-Fi controller
⚠️ Advanced Gaming Laptop Safety Precautions
- Complete shutdown and disconnect all power sources
- Remove battery and discharge any residual power
- Use professional anti-static equipment
- Work on certified ESD-safe work surface
- Document every step with high-resolution photography
- Have fire extinguisher and first aid kit accessible
📋 Pre-Motherboard Access Checklist
- Component Removal Required:
- Bottom cover and battery
- RAM modules and storage devices
- Wi-Fi card and any expansion cards
- Cooling system and heat sinks
- Keyboard and top case assembly
- Cable Disconnection:
- All display and backlight cables
- Touchpad and keyboard ribbons
- Speaker and audio connections
- Power button and status LED cables
- USB and port board connections
🔧 Gaming Motherboard Removal Process
Motherboard Screw Identification
| Screw Location | Type | Quantity | Length | Gaming Importance |
|---|---|---|---|---|
| CPU/GPU Area | Phillips #00 | 4-6 | 5mm | Critical for thermal performance |
| Perimeter Mounting | Phillips #00 | 8-10 | 4mm | Structural integrity |
| Port Brackets | Phillips #00 | 3-4 | 3mm | I/O stability |
| Grounding Points | Phillips #00 | 2-3 | 4mm | Electrical safety |
Step-by-Step Removal
- Initial Preparation:
- Remove all components following previous guides
- Document every cable connection with photos
- Label cables and connectors for reassembly
- Create screw organization map
- Motherboard Release:
- Remove all mounting screws in cross pattern
- Gently lift motherboard from corner nearest RAM slots
- Check for any hidden clips or adhesive
- Support motherboard during full extraction
- Final Extraction:
- Lift motherboard at 45-degree angle
- Clear any remaining cable connections
- Place on anti-static mat for inspection
- Inspect chassis for damage or wear
🔍 Gaming Component-Level Repair Guide
Common Motherboard Issues
- Power Delivery Problems:
- DC power jack damage or loose connection
- Failed power MOSFETs or voltage regulators
- Corroded power circuitry from liquid damage
- Burned charging IC or protection circuits
- Graphics and Display Issues:
- Failed GPU BGA connections
- Damaged display connector or circuitry
- Corroded LVDS/eDP display interfaces
- Backlight power circuit failures
Advanced Repair Equipment
| Tool | Gaming Application | Skill Level | Cost Range | Professional Use |
|---|---|---|---|---|
| Hot Air Rework Station | BGA rework, component replacement | Expert | $200-$800 | Essential |
| Digital Multimeter | Circuit testing, voltage measurement | Intermediate | $50-$200 | Essential |
| Microscope | Component inspection, soldering | Advanced | $100-$500 | Recommended |
| DC Power Supply | Power circuit testing, current limiting | Expert | $100-$300 | Recommended |
🔬 Gaming Motherboard Diagnostic Techniques
- Visual Inspection:
- Check for burned components or discoloration
- Inspect capacitors for bulging or leakage
- Look for cracked solder joints or PCB damage
- Examine connectors for bent pins or corrosion
- Electrical Testing:
- Test power rails for shorts to ground
- Measure resistance on critical circuits
- Check diode readings on protection circuits
- Verify voltage presence at key test points
🔌 Advanced Soldering & Repair Techniques
- Surface Mount Component Replacement:
- Use appropriate flux for clean solder flow
- Apply correct temperature profiles for components
- Use solder wick for clean pad preparation
- Verify component orientation before soldering
- BGA Rework Procedures:
- Use stencil for precise solder ball application
- Follow manufacturer reflow temperature profiles
- Verify alignment with optical inspection
- Test functionality before full reassembly
🔧 Gaming Motherboard Troubleshooting
- No Power Issues:
- Check DC-in jack and power circuitry
- Test power button and related circuits
- Verify BIOS chip and programming
- Inspect charging IC and related components
- Display Problems:
- Test display connector and cabling
- Check GPU power delivery and clock signals
- Verify display initialization in BIOS
- Inspect backlight circuitry and inverters
- Performance Issues:
- Check thermal sensor readings
- Test power delivery under load
- Verify clock generator functionality
- Inspect voltage regulator modules
💾 Gaming BIOS Recovery & Programming
- BIOS Recovery Methods:
- Use Acer recovery key combinations
- Program BIOS chip with external programmer
- Recovery from backup BIOS if available
- Use Acer support tools for recovery
- Programming Equipment:
- CH341A programmer for common BIOS chips
- RT809H advanced programmer
- SOIC8 clip for in-circuit programming
- Verify checksums after programming
🔄 Gaming Motherboard Reassembly Process
- Motherboard Preparation:
- Clean motherboard with isopropyl alcohol
- Apply new thermal paste to CPU and GPU
- Replace any damaged thermal pads
- Verify all repairs are complete and tested
- Installation:
- Lower motherboard into chassis at 45-degree angle
- Align all mounting holes and port openings
- Install screws in proper sequence and torque
- Verify no cables are pinched during installation
- Reconnection:
- Reconnect all cables following documentation
- Verify locking mechanisms are secure
- Test basic functionality before full reassembly
- Install components in reverse removal order
📊 Gaming Motherboard Testing & Validation
- Basic Functionality Test:
- Power on without battery (AC adapter only)
- Check for POST and display initialization
- Verify basic input/output functionality
- Test charging circuit with battery installed
- Gaming Performance Test:
- Run 3DMark for graphics performance
- Test CPU performance with Cinebench
- Monitor temperatures under gaming load
- Verify all ports and connectivity options
💰 Gaming Motherboard Repair Cost Analysis
| Repair Type | Parts Cost | Labor Time | Total Cost | Success Rate | Gaming Value |
|---|---|---|---|---|---|
| DC Jack Replacement | $10-$20 | 1-2 hours | $80-$120 | 90% | High |
| BIOS Recovery | $5-$15 | 30-60 minutes | $50-$80 | 95% | Very High |
| GPU Reballing | $30-$60 | 3-4 hours | $200-$300 | 70% | Moderate |
| Motherboard Replacement | $200-$400 | 2-3 hours | $400-$600 | 98% | Maximum |
⚡ Professional Repair Considerations
- Warranty Implications:
- Component-level repair typically voids manufacturer warranty
- Consider Acer authorized service for in-warranty devices
- Document all work for future reference
- Consider repair vs replacement cost analysis
- Skill Requirements:
- Advanced soldering and desoldering skills
- Understanding of laptop power delivery systems
- Experience with BGA rework equipment
- Knowledge of schematic reading and board view
10. Where to Sell Your Repaired Acer Nitro AN515 for Maximum Gaming Value
📊 Current Acer Nitro AN515 Gaming Market Analysis
- 2024 Gaming Laptop Demand:
- Strong demand from students and budget gamers
- Growing interest from entry-level content creators
- Small businesses seeking affordable workstation alternatives
- Parents buying first gaming laptops for teenagers
- Pricing Trends for Repaired Units:
- Base models (GTX 1650, 8GB RAM): $400-$550
- Mid-range (GTX 1660 Ti, 16GB RAM): $550-$700
- High-end (RTX 3060, 16GB+ RAM): $700-$900
- Fully upgraded (max RAM, dual SSD): $900-$1,200
🏆 Premium Selling Platforms for Gaming Equipment
Specialized Tech Buyers
- SellLaptopBack:
- Specializes in gaming laptops and electronics
- Free shipping labels and quick payment processing
- Excellent prices for Acer Nitro series
- Typically pays 15-20% above market average for repaired units
- Best for: Quick, professional gaming equipment sales
- SellLaptopBack:
- Focuses on refurbished and repaired laptops
- Premium prices for documented repairs and upgrades
- Free diagnostic and valuation services
- Competitive offers for gaming laptops with upgrades
- Best for: Maximum value for professionally repaired systems
Institutional & Educational Channels
- Government Surplus Auctions (.gov):
- GovDeals - Official government surplus platform
- Public Surplus - Municipal and state equipment
- Higher prices due to verified equipment condition
- Attracts schools and small businesses
- Best for: Bulk sales or high-specification gaming units
- Educational Institutions (.edu):
- University computer labs and IT departments
- High school STEM programs and gaming clubs
- Educational technology refresh cycles
- Often pay premium for gaming-capable equipment
- Best for: Recent models with gaming capabilities
🛒 Mainstream Gaming Marketplace Options
| Platform | Gaming Advantage | Fee Structure | Average Sale Price | Time to Sell |
|---|---|---|---|---|
| eBay | Global reach, gaming category specialization | 12.9% + $0.30 | Market value +15% | 5-14 days |
| Facebook Marketplace | Local gamers, no fees, cash transactions | 0% | Market value -10% | 3-10 days |
| OfferUp | Mobile-friendly, local gaming community | 0% | Market value -12% | 7-14 days |
| Craigslist | Local professionals and students | 0% | Market value -15% | 7-21 days |
💰 Gaming Laptop Pricing Strategy
- Value-Added Pricing Factors:
- Recent thermal paste application: +$60-$90
- SSD upgrade with fresh Windows installation: +$80-$120
- RAM upgrades to 16GB+: +$70-$110
- Professional repair documentation: +$40-$70
- Original packaging and accessories: +$50-$80
- Gaming Market Positioning:
- Premium pricing for esports-ready configurations
- Competitive pricing for student gaming setups
- Bundle pricing with gaming accessories
- Seasonal pricing adjustments (back-to-school, holidays)
📈 Gaming Laptop Listing Optimization
- Gaming Keyword Strategy:
- Primary: "Acer Nitro AN515 gaming laptop"
- Secondary: "GTX laptop", "RTX gaming computer"
- Tertiary: "esports ready", "gaming student laptop"
- Features: "red backlit keyboard", "NitroSense cooling"
- Gaming Photography Essentials:
- High-resolution images showing red backlighting
- Close-ups of gaming-specific features and ports
- Photos showing display quality during gaming
- Documentation of repairs and upgrades performed
⚖️ Gaming Platform Comparison & Recommendations
| Platform | Best For Gamers | Price Expectation | Risk Level | Gaming Rating |
|---|---|---|---|---|
| SellLaptopBack | Quick professional sale | 90-95% market value | Low | ★★★★★ |
| SellLaptopBack | Upgraded gaming configurations | 85-90% market value | Low | ★★★★☆ |
| GovDeals | Bulk or institutional sales | 80-85% market value | Medium | ★★★☆☆ |
| eBay | Maximum price potential | 95-110% market value | High | ★★★☆☆ |
| Facebook Marketplace | Local quick sale to gamers | 80-85% market value | Medium | ★★☆☆☆ |
⏰ Optimal Gaming Sales Timing
- Seasonal Gaming Opportunities:
- August-September: Back-to-school and college semesters
- November-December: Holiday gaming gifts and upgrades
- January-February: Post-holiday budget spending
- June-July: Summer gaming and student purchases
- Market Timing Strategies:
- List on Friday evenings for weekend gaming shoppers
- End auctions on Sunday nights for highest gaming bids
- Avoid major gaming release dates
- Monitor competitor gaming laptop pricing
🎯 Gaming Laptop Presentation Tips
- Gaming Documentation Package:
- Include Acer serial number and repair documentation
- Provide gaming benchmark results and FPS measurements
- Document all upgrades and maintenance performed
- Include before/after repair photos
- Professional Gaming Cleaning:
- Thorough external cleaning and keyboard sanitization
- Screen cleaning for maximum visual appeal
- Port cleaning and inspection
- Fresh Windows installation with latest gaming drivers
📦 Gaming Laptop Shipping & Packaging
- Secure Gaming Packaging:
- Use original Acer packaging if available
- Double-box with adequate foam padding
- Include silica gel packs for moisture control
- Use "Fragile" and "Gaming Equipment" labels
- Shipping Insurance:
- Always insure for full replacement value
- Use signature confirmation for high-value items
- Photograph packaging process for insurance claims
- Choose reputable carriers with tracking
🎮 Maximizing Gamer Buyer Appeal
- Gaming-Focused Features:
- Highlight gaming performance and benchmark results
- Emphasize cooling system improvements
- Showcase upgrade potential for future gaming
- Document thermal management and stability
- Gamer Assurance:
- Offer short-term technical support
- Provide detailed gaming specifications
- Include popular game performance data
- Offer gaming accessory bundles
🛡️ Gaming Sales Risk Management
- Payment Security:
- Use PayPal Goods & Services for buyer protection
- Wait for payments to clear before shipping
- Verify buyer profiles and gaming community reputation
- Use escrow services for high-value transactions
- Documentation:
- Keep records of all communications
- Photograph laptop condition before shipping
- Save tracking numbers and shipping receipts
- Maintain serial number records
💰 Maximizing Gaming Laptop Value
- Performance Enhancements:
- Clean installation of Windows with gaming optimizations
- Latest graphics drivers and gaming software
- Gaming benchmark results documentation
- Thermal performance validation under load
- Presentation Excellence:
- Professional photography in gaming setup
- Detailed specifications and upgrade documentation
- Before/after repair comparisons
- Gaming accessory compatibility information
Need to Sell Your Acer Laptop? Get Instant Cash!
If your Acer Nitro AN515 (or other Nitro gaming laptop) has performance issues or you're upgrading to a newer model, we offer competitive cash payouts for your device. We buy broken, used, and refurbished Acer Nitro laptops—including all AN515 configurations—with free insured shipping and hassle-free evaluations.
Sell Popular Acer Models Now: