On this page
- 1. ThinkPad E14 Gen 5: Business-Class Modular Engineering
- 🎯 ThinkPad Legacy & Engineering Philosophy
- ⭐ Key Business Features
- 🧩 Modular Component Design
- 📊 Technical Specifications
- 🏢 Enterprise-Specific Features
- 🔧 Serviceability Advantages
- 🎯 Target Business Market
- 🛟 Lenovo Support Resources
- 🚀 Upgrade Potential
- ✅ Compatibility Notes
- 2. Essential Toolkit for ThinkPad E14 Gen 5 Repairs
- 🛠️ ThinkPad's Service-Friendly Design
- 🔧 Essential Repair Toolkit
- ⚙️ ThinkPad-Specific Tool Requirements
- ⭐ Tool Quality Recommendations
- 🔍 Specialized Repair Equipment
- 🏠 Household Alternatives
- 🎯 ThinkPad Serviceability Features
- 📦 Recommended Tool Kits
- ⚠️ Tool Safety & Best Practices
- 🛒 Where to Purchase Tools
- 📝 Lenovo Warranty Considerations
- 💰 Tool Investment Value
- 3. Pre-Disassembly Preparation & Data Security for ThinkPad E14 Gen 5
- ⚠️ Enterprise Security Protocols
- 💾 Enterprise Data Backup Strategies
- 🎯 ThinkPad-Specific Backup Considerations
- 🔧 Recovery Media Preparation
- 📋 System Inventory & Documentation
- 🛡️ Physical Preparation Steps
- 🔒 Enterprise Security Considerations
- ⏰ Time Management & Planning
- 🚨 Enterprise Contingency Planning
- ✅ Pre-Disassembly Verification Checklist
- 🔗 ThinkPad Enterprise Resources
- 📊 Business Value Documentation
- 4. ThinkPad E14 Gen 5 Bottom Cover Removal Process
- 🎯 ThinkPad's Service-Friendly Design
- 🔩 Bottom Cover Fastener Specifications
- 🔧 Step-by-Step Removal Process
- ⚙️ ThinkPad's Captive Screw Advantage
- 🚧 Common Challenges & Solutions
- 🔍 Immediately Accessible Components
- ⚠️ Safety Precautions
- 🔁 Reassembly Instructions
- 💡 Immediate Upgrade Opportunities
- 🔍 Troubleshooting Common Issues
- 🛠️ Maintenance Tips
- 🔗 ThinkPad Service Resources
- 5. ThinkPad E14 Gen 5 Memory Installation & Compatibility Guide
- 💾 ThinkPad E14 Gen 5 Memory Specifications
- 🔍 RAM Compatibility Chart
- 🏆 Recommended RAM for Business Use
- 🔧 Step-by-Step Installation
- ⚡ Flex Mode & Performance Optimization
- 📊 Performance Testing & Validation
- 🔍 Troubleshooting Common Issues
- 💼 Business Performance Impact
- 💰 Resale Value Impact
- 🎯 ThinkPad-Specific Considerations
- ✅ Compatibility Verification
- 📝 Lenovo Warranty Considerations
- 6. ThinkPad E14 Gen 5 SSD Replacement & Storage Expansion Guide
- 💾 ThinkPad E14 Gen 5 Storage Specifications
- 🔍 SSD Compatibility Chart
- 🏆 Recommended SSD Options
- 🔧 Step-by-Step Installation
- 📦 Data Migration Options
- ⚡ SSD Performance Optimization
- 🎯 ThinkPad-Specific Storage Features
- 🔍 Troubleshooting Common Issues
- 📊 Expected Performance
- 💼 Business Storage Recommendations
- 💰 Resale Value Impact
- ❤️ SSD Health Monitoring
- 📝 Lenovo Warranty Considerations
- 7. ThinkPad E14 Gen 5 Battery Removal & Replacement Guide
- 🔋 ThinkPad E14 Gen 5 Battery Specifications
- 🔍 Battery Compatibility Chart
- 🛒 Replacement Battery Options
- ⚠️ Critical Safety Precautions
- 🔧 Step-by-Step Replacement Process
- 🔌 Battery Connection Details
- 📊 Battery Health Management
- ⚙️ New Battery Calibration
- 🎯 ThinkPad Power Management Features
- 🔍 Troubleshooting Common Issues
- ⚡ Battery Performance Optimization
- ♻️ Proper Battery Disposal
- 💰 Resale Value Impact
- 📝 Lenovo Warranty Considerations
- ❤️ Battery Health Monitoring
- 8. ThinkPad E14 Gen 5 Keyboard & Top Cover Access: Professional Business Laptop Service Guide
- ⚠️ Advanced Procedure Warning
- 🛠️ Specialized Tools Required
- 📋 Preparation Steps
- 🔧 Step-by-Step Keyboard Removal
- 🔌 Keyboard Connector Access
- 🔍 Common Keyboard Issues & Solutions
- 🔄 Keyboard Replacement Options
- 💰 Resale Value Considerations
- ⚙️ Professional Reassembly Tips
- ➡️ Next Steps in Your ThinkPad Upgrade
- 9. ThinkPad E14 Gen 5 Cooling System Maintenance & Thermal Repasting: Boost Performance for Maximum Resale Value
- 🚀 Why Thermal Maintenance Boosts Resale Value
- ⚠️ Critical Safety Precautions
- 🛠️ Required Tools & Materials
- 🔧 Cooling System Access Procedure
- 🧹 Professional Cleaning Process
- 🎨 Professional Thermal Repasting Technique
- 📏 Thermal Pad Replacement Guide
- ⚙️ Reassembly & Performance Testing
- 📊 Expected Performance Improvements
- 📸 Documentation for Resale Value
- ⏰ Recommended Maintenance Schedule
- ➡️ Continue Your ThinkPad Upgrade Journey
- 10. ThinkPad E14 Gen 5 LCD Screen & Bezel Replacement: Premium Display Upgrade for Maximum Resale Value
- 💎 Why Display Quality Drives Resale Value
- ⚠️ Critical Display Replacement Precautions
- 🔍 ThinkPad E14 Gen 5 Display Compatibility
- 🛠️ Specialized Display Tools Required
- 🔧 Step-by-Step Display Replacement
- 🔌 eDP Cable & Connector Guide
- 🔄 Display Upgrade Options & Value Impact
- 🧪 Post-Replacement Quality Testing
- 📐 Professional Bezel Replacement Guide
- 💰 Display Replacement Cost vs. Value Analysis
- 📸 Display Quality Presentation for Resale
- 🔧 Common Display Issues & Solutions
- ➡️ Continue Your ThinkPad Restoration
- 11. ThinkPad E14 Gen 5 Professional Reassembly Techniques: Final Assembly for Maximum Resale Value
- ⚙️ Why Professional Reassembly Impacts Resale Value
- ✅ Pre-Reassembly Quality Control Checklist
- 🔩 Professional Screw Management System
- 🔧 Step-by-Step Professional Reassembly Sequence
- 🔌 Professional Cable Management Techniques
- 🔍 Post-Reassembly Quality Control Checklist
- 🚫 Common Reassembly Mistakes to Avoid
- 🎯 Professional Finishing Touches
- 🧪 Comprehensive Final Testing Protocol
- 💰 Final Resale Value Maximization
- ✅ Final Reassembly Completion Checklist
- ➡️ Ready for Maximum Resale Value
- 12. ThinkPad E14 Gen 5 Testing & Performance Validation: Verifying Upgrade Success for Maximum Resale Value
- 🔍 Why Comprehensive Testing Boosts Resale Value
- 🎯 Testing Philosophy for Business Laptops
- 🛠️ Essential Testing Software Suite
- ✅ Phase 1: Basic Functionality Validation
- 📊 Phase 2: Performance Benchmarking
- 🌡️ Phase 3: Thermal & Cooling Validation
- 🔋 Phase 4: Battery & Power Management
- 📡 Phase 5: Connectivity & Peripheral Testing
- 📋 Professional Documentation Protocol
- 🏢 Enterprise-Grade Validation (Premium Option)
- 🔧 Common Post-Upgrade Issues & Resolution
- 🏆 Final Performance Certification
- ➡️ Ready for Market Presentation
- 13. Maximizing ThinkPad E14 Gen 5 Resale Value: Strategic Upgrade ROI & Premium Positioning
- 💰 Strategic Value Maximization Framework
- 📈 Upgrade ROI Analysis by Component
- 🏆 Premium Resale Positioning Strategies
- 📋 Value-Added Documentation Package
- 💵 Strategic Pricing & Market Positioning
- 🛒 Premium Resale Platform Strategy
- 📝 High-Conversion Listing Optimization
- ⏰ Strategic Timing for Maximum Return
- 🎁 Value-Added Services for Premium Pricing
- 🔍 Competitive Market Positioning
- 🏛️ Specialized Channels: .gov & .edu Markets
- ✅ Final Resale Value Maximization Checklist
- ➡️ Ready for Premium Market Placement
- Need to Sell Your Lenovo Laptop? Get Instant Cash!
1. ThinkPad E14 Gen 5: Business-Class Modular Engineering
🎯 ThinkPad Legacy & Engineering Philosophy
The ThinkPad E14 Gen 5 continues Lenovo's commitment to business-grade modular design, combining the iconic ThinkPad durability with accessible serviceability. This model represents the perfect balance of enterprise features and user-maintainable components.
⭐ Key Business Features
- Security & Management:
- ThinkShield security suite
- dTPM 2.0 hardware security
- Lenovo Commercial Vantage management
- Optional fingerprint reader & IR camera
- Durability & Reliability:
- Military-grade testing (MIL-STD-810H)
- Spill-resistant keyboard with drainage
- Reinforced port connections
- Extended lifecycle components
🧩 Modular Component Design
| Component | Access Level | Serviceability | Upgrade Potential |
|---|---|---|---|
| RAM | Bottom Cover | Excellent | Up to 40GB |
| SSD | Bottom Cover | Excellent | Dual M.2 Slots |
| Battery | Bottom Cover | Good | Easy Replacement |
| Keyboard | Top Cover Removal | Moderate | Full Replacement |
| Display | Bezel Removal | Moderate | Panel Upgrade |
📊 Technical Specifications
- Processor Options:
- AMD Ryzen 5 7530U
- AMD Ryzen 7 7730U
- Integrated Radeon Graphics
- 15W TDP for efficiency
- Memory & Storage:
- DDR4 3200MHz SODIMM (2 slots)
- Dual M.2 SSD slots (2280 + 2242)
- PCIe NVMe support
- Storage options up to 2TB
🏢 Enterprise-Specific Features
- Connectivity Options:
- WiFi 6E AX211
- Optional 4G/5G WWAN
- Bluetooth 5.2
- Multiple USB-C/Thunderbolt ports
- ThinkPad Enhancements:
- Legendary ThinkPad keyboard
- TrackPoint pointing device
- Physical camera shutter
- Rapid Charge technology
🔧 Serviceability Advantages
- Easy Access Components:
- Quick-service bottom cover
- Labeled internal components
- Standard screw types
- Modular daughterboards
- Lenovo Service Features:
- Lenovo Vantage diagnostics
- BIOS recovery features
- Comprehensive service manuals
- Global part availability
🎯 Target Business Market
- Enterprise Users:
- Small to medium businesses
- Educational institutions
- Government agencies
- Remote work solutions
- Professional Applications:
- Business productivity
- Field service operations
- Educational environments
- Enterprise security compliance
🛟 Lenovo Support Resources
- Official Resources:
- Lenovo Support Site
- Lenovo Community Forum
- ThinkPad Product Page
- Lenovo Technical Support
- Documentation:
- Hardware Maintenance Manual
- Technical Reference Guide
- BIOS Update Guides
- Driver Packages
🚀 Upgrade Potential
- Performance Upgrades:
- RAM expansion to 40GB
- Dual SSD configuration
- WWAN addition
- Display panel upgrades
- Longevity Features:
- Extended part availability
- Enterprise lifecycle support
- Docking station compatibility
- Future-proof connectivity
✅ Compatibility Notes
- ThinkPad-Specific Components:
- Proprietary power connector
- ThinkPad-specific BIOS requirements
- Optional security features
- Docking station compatibility
- Enterprise Considerations:
- Windows 11 Pro requirements
- BitLocker compatibility
- Remote management features
- Group policy support
2. Essential Toolkit for ThinkPad E14 Gen 5 Repairs
🛠️ ThinkPad's Service-Friendly Design
ThinkPad laptops are engineered for enterprise serviceability with standardized components and IT-friendly repair processes. The E14 Gen 5 continues this tradition with thoughtful design that balances accessibility with durability.
🔧 Essential Repair Toolkit
| Tool | Purpose | ThinkPad-Specific Notes | Recommended Type |
|---|---|---|---|
| Phillips #0 Screwdriver | Most internal screws | Primary screw type for ThinkPad | Magnetic tip, precision grade |
| Torx T5 | Bottom cover screws | Security screws on some models | Security bit set recommended |
| Plastic Spudgers | Case prying and clip release | ThinkPad uses plastic retention clips | Non-conductive set essential |
| Anti-Static Wrist Strap | ESD protection | Critical for enterprise components | Professional grade with mat |
| Tweezers | Connector handling | Small ribbon cables and jumpers | ESD-safe, anti-magnetic |
⚙️ ThinkPad-Specific Tool Requirements
- Screw Types:
- Phillips #0 for majority of screws
- Torx T5 for security screws (if present)
- Captive screws on bottom cover
- Varying lengths - organization critical
- Specialized Tools:
- Plastic opening tools for bezel removal
- Spudgers for keyboard ribbon cables
- Suction cup for display handling
- Nylon spudgers for delicate connectors
⭐ Tool Quality Recommendations
- Professional Grade:
- Wiha or Wera precision screwdrivers
- iFixit Pro Tech Toolkit
- ESD-safe professional tools
- Lifetime warranty tools
- Budget Options:
- iFixit Essential Electronics Toolkit
- Amazon basic tool kits
- Local hardware store options
- Branded consumer tool sets
🔍 Specialized Repair Equipment
- For Thermal Maintenance:
- High-quality thermal paste (Arctic MX-6)
- Isopropyl alcohol 90%+
- Lint-free wipes or coffee filters
- Thermal pad assortment (various thicknesses)
- For Display Work:
- Suction cups for screen handling
- Plastic opening tools
- Double-sided adhesive tape
- Microfiber cleaning cloths
🏠 Household Alternatives
- Basic Repairs:
- Small Phillips screwdriver set
- Guitar picks for prying
- Old credit cards for spudging
- Small containers for screw organization
- Safety Notes:
- Avoid metal tools near circuitry
- Use minimal force with improvised tools
- Ground yourself before handling components
- When in doubt, use proper tools
🎯 ThinkPad Serviceability Features
- IT-Friendly Design:
- Labeled internal components
- Standardized screw types
- Color-coded connectors
- Service manuals available
- Quick Service Features:
- Easy-access bottom cover
- Modular component design
- Tool-less access to some components
- Service tags for part identification
📦 Recommended Tool Kits
- Beginner Kit (Basic Upgrades):
- Phillips #0 screwdriver
- Plastic spudger set ($5-10)
- Anti-static wrist strap ($5-8)
- Total: ~$15-20 investment
- Professional Kit (Full Repairs):
- iFixit Pro Tech Toolkit ($70-80)
- Torx security bit set
- Magnetic project mat
- Total: ~$90-110 professional setup
⚠️ Tool Safety & Best Practices
- Always disconnect power before beginning work
- Use anti-static protection for enterprise components
- Keep magnets away from storage devices
- Organize screws using magnetic mat or containers
- Use appropriate force - ThinkPad plastics are durable but not indestructible
- Work in clean, well-lit area with ample space
- Keep tools organized and within reach
🛒 Where to Purchase Tools
📝 Lenovo Warranty Considerations
- Warranty Status:
- Check Lenovo Warranty Status
- Some repairs may void remaining warranty
- Consider Lenovo On-site Service for in-warranty devices
- Keep original screws and components
- Genuine Parts:
- Use Lenovo Parts Store
- Genuine ThinkPad parts ensure compatibility
- Third-party parts may vary in quality
- Verify part numbers before purchase
💰 Tool Investment Value
- Cost Savings:
- Professional repair avoidance: $150-300 per incident
- DIY upgrades vs buying new: $600-1000+ savings
- Multiple device use across enterprise equipment
- Long-term investment: quality tools last years
- Business Value Impact:
- Professional-looking repairs increase resale value
- No tool marks or damage from improper tools
- Ability to demonstrate repair quality to corporate buyers
- Documentation of professional tool use builds confidence
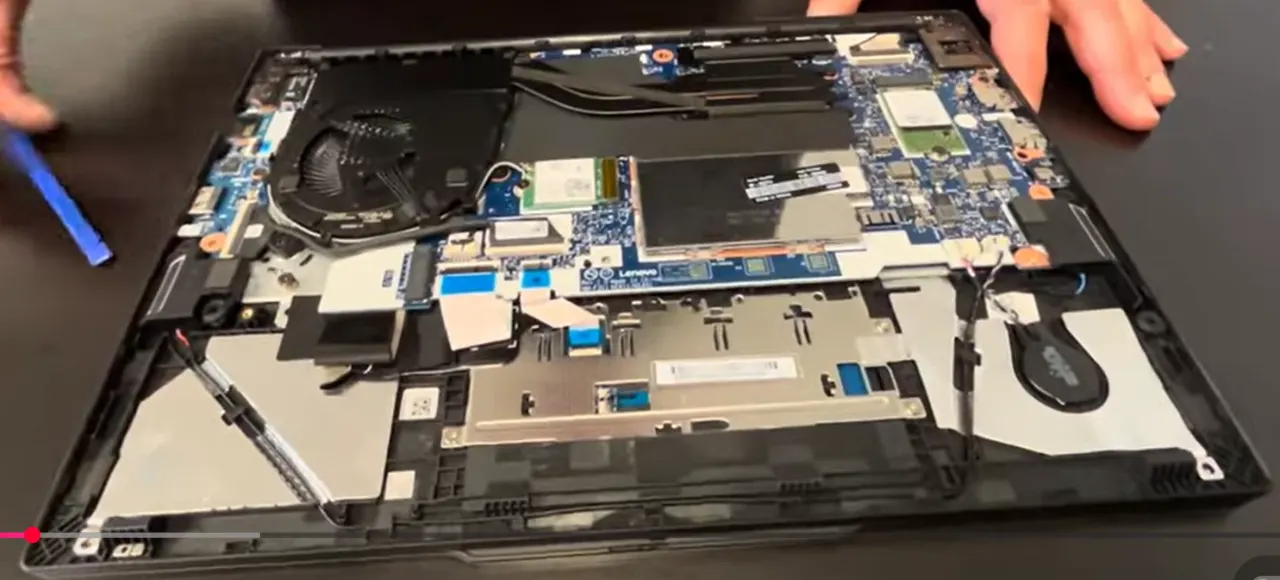
0:17 Bottom Case 1:27 Battery 2:00 Memory RAM 2:27 Storage SSD 9:30 WiFi Card 3:20 Cooling Fan 4:05 Heatsink 4:48 Hinges 5:05 Motherboard 6:14 Speakers 7:14 Processor 7:24 IO USB Board 7:47 Trackpad 8:46 Keyboard 8:55 Palmrest Assembly 9:08 Display Assembly
3. Pre-Disassembly Preparation & Data Security for ThinkPad E14 Gen 5
⚠️ Enterprise Security Protocols
- Power Management:
- Complete shutdown through Windows
- Disconnect AC adapter and all peripherals
- Hold power button for 10 seconds to discharge capacitors
- Remove any docking station connections
- Verify all status lights are off
- Workspace Setup:
- Clean, static-free surface large enough for laptop and parts
- ESD-safe mat recommended for enterprise components
- Good lighting for seeing small components and labels
- Organized containers for screws and small parts
💾 Enterprise Data Backup Strategies
| Backup Type | Recommended Tools | Scope | Ideal For |
|---|---|---|---|
| Full System Image | Macrium Reflect | Complete system including OS and settings | Enterprise environments, IT departments |
| File-Level Backup | Veeam Agent | Documents and user data only | Individual users, quick backups |
| Cloud Sync | OneDrive, Google Drive, Dropbox Business | Critical files synchronization | Business continuity, remote access |
| ThinkPad Specific | Lenovo Rescue and Recovery | ThinkPad-optimized backup solution | ThinkPad enterprise environments |
🎯 ThinkPad-Specific Backup Considerations
- Lenovo Software Configuration:
- Backup Lenovo Vantage settings
- Export BIOS configuration settings
- Save ThinkPad specific driver configurations
- Document power management settings
- Enterprise Security Features:
- BitLocker recovery key backup
- TPM configuration documentation
- Windows Hello setup backup
- Security chip settings preservation
🔧 Recovery Media Preparation
- Windows Recovery:
- Create Windows 11 Installation Media
- 16GB+ USB drive required
- Test boot from USB before disassembly
- Download ThinkPad-specific drivers beforehand
- ThinkPad Driver Preparation:
- Download ThinkPad Drivers & Downloads
- Save to separate USB drive or network location
- Include chipset, storage, and enterprise drivers
- Download latest BIOS updates
📋 System Inventory & Documentation
- Hardware Inventory:
- Current RAM configuration (use CPU-Z)
- Storage drive details and health status
- BIOS version and settings
- Peripheral configurations
- Performance Baseline:
- Run UserBenchmark for system baseline
- Record boot times and system responsiveness
- Note current temperatures with HWInfo
- Document any existing issues or enterprise configurations
🛡️ Physical Preparation Steps
- Clean Workspace:
- Clear, clean, static-free surface
- Adequate lighting for detailed work
- Space for organized parts placement
- No food, drinks, or liquids nearby
- Personal Preparation:
- Use anti-static wrist strap (critical for enterprise components)
- Wear comfortable, non-static clothing
- Remove jewelry that might scratch surfaces
- Wash hands to remove oils and dirt
- Equipment Readiness:
- Verify all tools are available and organized
- Prepare containers for different screw types
- Have camera ready for documentation photos
- Keep ThinkPad service manual accessible
🔒 Enterprise Security Considerations
- Data Protection:
- Ensure BitLocker is suspended before disassembly
- Back up TPM recovery information
- Document security chip configurations
- Secure backup media with encryption
- Compliance Requirements:
- Follow company data handling policies
- Maintain chain of custody documentation
- Secure storage of backup media
- Proper disposal of old components
⏰ Time Management & Planning
- Realistic Time Estimates:
- RAM/SSD upgrade: 20-40 minutes
- Battery replacement: 30-60 minutes
- Keyboard replacement: 45-90 minutes
- Display replacement: 60-120 minutes
- First-time disassembly: add 50% buffer time
- Business Considerations:
- Schedule during maintenance windows
- Have backup equipment available
- Consider business impact of extended downtime
- Plan for testing and validation after repairs
🚨 Enterprise Contingency Planning
- Emergency Resources:
- Lenovo Technical Support
- Lenovo On-site Service contact information
- Local IT service provider contacts
- Backup equipment availability
- Worst-Case Scenarios:
- Unexpected hardware failures
- Compatibility issues with new parts
- Extended downtime requirements
- Data recovery needs
✅ Pre-Disassembly Verification Checklist
- Data backup completed and verified
- Recovery media created and tested
- ThinkPad drivers downloaded and saved
- System inventory documented
- Workspace prepared and organized
- All necessary tools available
- Sufficient time allocated
- Power completely disconnected
- Enterprise security measures addressed
- Photos taken of current configuration
🔗 ThinkPad Enterprise Resources
📊 Business Value Documentation
- Asset Management:
- Service tag and serial number recording
- Warranty status documentation
- Purchase information and procurement details
- Maintenance history updating
- Value Preservation:
- Before-and-after performance metrics
- Professional repair documentation
- Component quality evidence
- Enterprise compliance verification
4. ThinkPad E14 Gen 5 Bottom Cover Removal Process
🎯 ThinkPad's Service-Friendly Design
The ThinkPad E14 Gen 5 features a service-friendly bottom cover design that provides direct access to the most commonly upgraded components. Continuing ThinkPad's legacy of enterprise serviceability, this model offers organized internal layout and standardized fasteners for easy maintenance.
🔩 Bottom Cover Fastener Specifications
| Screw Type | Quantity | Location | Special Features | Tool Required |
|---|---|---|---|---|
| Phillips #0 | 6 | Perimeter | Standard length | Phillips #0 screwdriver |
| Captive Phillips | 2 | Front corners | Captive design | Phillips #0 screwdriver |
| Security Torx (if present) | 2 | Rear corners | Security feature | Torx T5 security bit |
🔧 Step-by-Step Removal Process
- Preparation:
- Ensure laptop is powered off and disconnected from power
- Remove all peripherals and docking station connections
- Place laptop on clean, soft, non-slip surface
- Gather Phillips #0 screwdriver and plastic opening tools
- Screw Removal Sequence:
- Remove all 6 perimeter screws first
- Loosen 2 captive screws (they will remain attached)
- If present, remove 2 security Torx screws
- Note screw lengths and locations for reassembly
- Use magnetic screwdriver to prevent dropping screws
- Cover Release:
- Start at front edge near status lights
- Insert plastic spudger between cover and chassis
- Gently twist to release first clip (listen for subtle click)
- Work around perimeter, releasing clips every 2-3 inches
- Lift cover straight up once all clips are released
⚙️ ThinkPad's Captive Screw Advantage
- No Lost Screws:
- Captive screws remain attached to cover
- Eliminates risk of losing small components
- Simplifies reassembly process
- Prevents incorrect screw placement
- Enterprise Efficiency:
- Quick service for IT departments
- Reduced maintenance time
- Consistent service experience
- Professional appearance
🚧 Common Challenges & Solutions
- Stubborn Clips:
- Use plastic opening tools instead of metal
- Work slowly around perimeter
- Apply gentle, even pressure
- If stuck, check for missed screws
- Security Screws:
- Use proper Torx T5 security bit
- Apply firm downward pressure while turning
- If stripped, use extraction tools carefully
- Replace damaged screws during reassembly
- Alignment Issues:
- Check for obstructions or cables in the way
- Verify all screws are fully removed
- Ensure no adhesive or tape remains
- Check for debris in screw holes
🔍 Immediately Accessible Components
- RAM Slots:
- Two DDR4 SODIMM slots
- Easy upgrade access
- No additional disassembly required
- Supports up to 40GB total (8GB soldered + 32GB SODIMM)
- Storage:
- M.2 2280 SSD slot (primary)
- Optional M.2 2242 slot (WWAN/secondary)
- Single screw retention for each
- Various SSD lengths supported
- Wireless Cards:
- WiFi 6E AX211 card
- Optional WWAN card slot
- Two antenna connections each
- Standard M.2 form factors
- Battery Connector:
- Easy access for disconnection
- Clearly marked connector
- Safety disconnect for further work
- Standard 4-pin design
⚠️ Safety Precautions
- Disconnect battery before working on internal components
- Use anti-static precautions when handling components
- Handle components by edges only
- Keep screws organized for reassembly
- Avoid touching gold contacts on components
- Work in clean, dry environment
- Use proper tools to avoid damage
🔁 Reassembly Instructions
- Ensure all internal work is completed
- Verify no tools or debris left inside
- Align bottom cover properly with chassis
- Press down evenly until all clips engage
- Start with perimeter screws and tighten securely
- Ensure captive screws are properly positioned
- Install security screws if present
- Ensure cover sits flush with no gaps
💡 Immediate Upgrade Opportunities
- RAM Upgrades:
- Up to 40GB total (8GB soldered + 32GB SODIMM)
- 3200MHz recommended speed
- No additional disassembly required
- Enterprise-grade RAM recommended
- Storage Upgrades:
- Primary M.2 2280 slot (PCIe NVMe)
- Secondary M.2 2242 slot (optional)
- Up to 2TB+ capacity supported
- Lenovo-certified SSDs recommended
- Wireless Upgrades:
- WiFi 6E AX211 standard
- Optional WWAN card addition
- 4G/5G modem compatibility
- Enterprise security features
🔍 Troubleshooting Common Issues
- Cover Won't Sit Flush:
- Check for missed clips around perimeter
- Verify no cables are trapped under edges
- Ensure all screws are properly loosened
- Check for damaged clip mechanisms
- Screw Won't Tighten:
- Check for stripped threads
- Verify correct screw type and length
- Ensure proper alignment with chassis
- Use thread repair kit if necessary
- Gaps After Reassembly:
- Check clip alignment around perimeter
- Verify all screws are proper tightness
- Ensure no damage to mating surfaces
- Check for warping or bending
🛠️ Maintenance Tips
- Cleaning Opportunity:
- Clean dust from fans and heatsinks while open
- Use compressed air for thorough cleaning
- Check for debris in ventilation areas
- Inspect thermal paste condition if visible
- Preventative Maintenance:
- Check battery health in BIOS
- Verify all connections are secure
- Inspect for signs of wear or damage
- Document component conditions for asset management
🔗 ThinkPad Service Resources
5. ThinkPad E14 Gen 5 Memory Installation & Compatibility Guide
💾 ThinkPad E14 Gen 5 Memory Specifications
- Supported Standards:
- DDR4 SODIMM (260-pin)
- 3200MHz (JEDEC standard)
- 1.2V operating voltage
- Hybrid dual-channel architecture
- Unique Configuration:
- 8GB soldered to motherboard + 1 SODIMM slot
- Maximum: 40GB (8GB soldered + 32GB SODIMM)
- Flex Mode support for optimal performance
- Asymmetric dual-channel capability
🔍 RAM Compatibility Chart
| Configuration | Soldered RAM | SODIMM Slot | Total Capacity | Performance Mode |
|---|---|---|---|---|
| Base Configuration | 8GB | Empty | 8GB | Single Channel |
| Balanced Upgrade | 8GB | 8GB | 16GB | Dual Channel (16GB) |
| Performance Upgrade | 8GB | 16GB | 24GB | Flex Mode |
| Maximum Upgrade | 8GB | 32GB | 40GB | Flex Mode |
🏆 Recommended RAM for Business Use
- Enterprise Grade ($40-100):
- Samsung DDR4 3200MHz
- Micron/Crucial DDR4 3200MHz
- SK Hynix DDR4 3200MHz
- Kingston ValueRAM 3200MHz
- Performance Options ($60-120):
- Crucial DDR4 3200MHz
- Kingston Fury Impact 3200MHz
- Corsair Vengeance SODIMM
- G.Skill Ripjaws SODIMM
- High-Capacity Options ($100-200):
- Samsung 32GB DDR4 3200MHz
- Micron 32GB DDR4 3200MHz
- Kingston 32GB DDR4 3200MHz
- Lenovo-certified 32GB modules
🔧 Step-by-Step Installation
- Preparation:
- Remove bottom cover (refer to previous section)
- Disconnect battery connector for safety
- Ground yourself with anti-static wrist strap
- Locate single SODIMM slot near center
- Installation of New RAM:
- Align notch in module with ridge in slot
- Insert at 45-degree angle
- Press down firmly until clips snap into place
- Ensure both sides are securely locked
- Note: Only one SODIMM slot available
- Verification:
- Reconnect battery and power on
- Enter BIOS to verify recognition
- Check total memory matches expected
- Run memory diagnostics
⚡ Flex Mode & Performance Optimization
- Flex Mode Operation:
- 8GB runs in dual-channel with first 8GB of SODIMM
- Remaining SODIMM capacity runs in single-channel
- Automatic optimization by memory controller
- Better performance than pure single-channel
- Optimal Configurations:
- 8GB + 8GB: Full dual-channel (16GB total)
- 8GB + 16GB: Flex mode (8GB dual + 8GB single)
- 8GB + 32GB: Flex mode (8GB dual + 24GB single)
- Avoid mismatched timings for best performance
📊 Performance Testing & Validation
- Verification Tools:
- CPU-Z - Memory tab shows configuration
- Windows Task Manager - Performance tab
- Lenovo BIOS setup screen
- Lenovo Vantage Diagnostics
- Benchmarking Tools:
- Cinebench R23 - CPU and memory performance
- 3DMark - Integrated graphics impact
- UserBenchmark - System comparison
- AIDA64 Memory Benchmark
🔍 Troubleshooting Common Issues
- System Won't Boot:
- Reseat RAM module firmly
- Check for bent pins in slot
- Test with known-good RAM if available
- Reset BIOS to default settings
- RAM Not Fully Detected:
- Ensure module is fully seated
- Check BIOS recognizes correct capacity
- Verify compatible speeds and timings
- Update BIOS to latest version
- System Instability:
- Run MemTest86 for 4+ passes
- Check for overheating issues
- Test with different module if available
- Verify proper Flex Mode operation
💼 Business Performance Impact
| Business Use Case | 8GB Total | 16GB Total | 24GB Total | 40GB Total |
|---|---|---|---|---|
| Office Productivity | Adequate | Recommended | Excellent | Overkill |
| Multitasking | Minimum | Good | Excellent | Exceptional |
| Virtualization | Poor | Minimum | Good | Excellent |
| Data Analysis | Poor | Minimum | Good | Excellent |
| Development | Minimum | Good | Excellent | Exceptional |
💰 Resale Value Impact
- Value Enhancement:
- 16GB total: +$80-$120 value
- 24GB total: +$120-$180 value
- 40GB total: +$150-$220 value
- Enterprise-grade RAM: +$20-40 premium
- Business Buyer Preferences:
- 16GB considered minimum for enterprise use
- 24GB appeals to power users and developers
- 40GB attracts virtualization and data professionals
- Documented stability testing increases confidence
🎯 ThinkPad-Specific Considerations
- BIOS Limitations:
- No XMP support - RAM runs at JEDEC speeds
- 3200MHz is maximum supported speed
- Timing adjustments not available in BIOS
- Voltage control not available
- ThinkPad Certification:
- Lenovo-tested memory recommended
- Better compatibility assurance
- Enterprise reliability standards
- Warranty compliance
✅ Compatibility Verification
- Before Purchase:
- Check Lenovo Memory Compatibility
- Ensure modules are DDR4 SODIMM 3200MHz
- Verify Lenovo certification if required
- Check return policy in case of incompatibility
- After Installation:
- Run MemTest86 for 4+ passes
- Check BIOS recognizes correct capacity
- Verify Flex Mode operation in CPU-Z
- Test with typical business workloads
📝 Lenovo Warranty Considerations
- Warranty Compliance:
- Lenovo-certified memory maintains full warranty
- Third-party RAM may affect warranty coverage
- Keep original components for warranty service
- Document installation for service records
- Enterprise Support:
- On-site Service may require certified components
- Business contracts may specify component requirements
- Asset management compliance considerations
- Documentation requirements for corporate environments
6. ThinkPad E14 Gen 5 SSD Replacement & Storage Expansion Guide
💾 ThinkPad E14 Gen 5 Storage Specifications
- Supported Form Factors:
- M.2 2280 (22mm x 80mm) - Primary slot
- M.2 2242 (22mm x 42mm) - WWAN/Second slot
- PCIe NVMe 3.0 x4 (both slots)
- NVMe 1.3/1.4 protocol support
- Unique Configuration:
- Dual M.2 slots for storage expansion
- WWAN slot can be used for secondary SSD
- RAID 0/1 support in some configurations
- Opal 2.0 encryption support
🔍 SSD Compatibility Chart
| Slot Type | Form Factor | Interface | Max Capacity | Recommended Use |
|---|---|---|---|---|
| Primary | M.2 2280 | PCIe 3.0 x4 | 2TB+ | OS and Applications |
| Secondary/WWAN | M.2 2242 | PCIe 3.0 x4 | 1TB | Storage expansion or WWAN |
| Dual Drive | Both Slots | PCIe 3.0 x4 | 3TB+ Total | Maximum storage configuration |
🏆 Recommended SSD Options
- Enterprise Grade ($60-150):
- Samsung 970 EVO Plus/980 Pro
- Western Digital SN750/SN850
- SK Hynix Gold P31/Platinum P41
- Micron 3400 Series
- Business Class ($40-100):
- Crucial P5 Plus
- Kingston KC3000
- TeamGroup MP34
- Sabrent Rocket Q
- 2242 Form Factor ($30-80):
- Western Digital SN740 2242
- Kingston NV2 2242
- Transcend 2242 NVMe
- Sabrent 2242 Rocket
🔧 Step-by-Step Installation
- Preparation:
- Remove bottom cover
- Disconnect battery connector
- Ground yourself with anti-static wrist strap
- Locate M.2 slots on motherboard
- Primary SSD Installation:
- Remove single Phillips #0 screw from standoff
- Insert SSD at 30-degree angle (M key)
- Press down gently and secure with screw
- Ensure screw is snug but not overtightened
- Secondary Slot Usage:
- Optional: Install 2242 SSD in WWAN slot
- Use proper 2242 form factor drive
- Secure with appropriate screw
- Configure in BIOS if not detected automatically
📦 Data Migration Options
- Clone Existing Drive:
- Macrium Reflect Free
- EaseUS Todo Backup
- Samsung Data Migration (Samsung SSDs only)
- Acronis True Image (WD/Seagate versions)
- Clean Installation:
- Create Windows 11 Installation Media
- Download ThinkPad Drivers beforehand
- Use Lenovo Deployment tools for enterprise setup
- Configure BitLocker encryption after installation
⚡ SSD Performance Optimization
- Windows Optimization:
- Enable TRIM:
fsutil behavior set disabledeletenotify 0 - Disable defragmentation for SSDs
- Enable write caching in device manager
- Adjust virtual memory settings if needed
- Enable TRIM:
- ThinkPad-Specific Optimization:
- Install Lenovo Vantage
- Update storage controller drivers
- Configure power management for storage
- Enable RAID mode if using multiple drives
🎯 ThinkPad-Specific Storage Features
- Enterprise Management:
- Lenovo Storage Management console
- RAID configuration support
- SSD health monitoring integration
- Predictive failure analysis
- Security Features:
- Opal 2.0 self-encrypting drive support
- TCG Enterprise security compliance
- BitLocker integration
- Secure erase capabilities
🔍 Troubleshooting Common Issues
- Drive Not Detected:
- Reseat SSD and ensure proper connection
- Check BIOS settings for NVMe support
- Update BIOS to latest version
- Test with different SSD if available
- Performance Issues:
- Check temperatures with CrystalDiskInfo
- Ensure PCIe 3.0 enabled in BIOS
- Update SSD firmware if available
- Run CrystalDiskMark to verify speeds
- Boot Issues:
- Verify boot order in BIOS
- Check UEFI/Legacy settings match installation
- Repair bootloader with installation media
- Test with original SSD if possible
📊 Expected Performance
| SSD Type | Read Speed | Write Speed | 4K Random Read | Real-World Benefit |
|---|---|---|---|---|
| PCIe 3.0 Enterprise | 3,500 MB/s | 3,000 MB/s | 600K IOPS | Fast boot and load times |
| PCIe 3.0 Business | 2,500 MB/s | 2,000 MB/s | 400K IOPS | Excellent performance |
| 2242 Secondary | 2,000 MB/s | 1,500 MB/s | 300K IOPS | Good expansion storage |
💼 Business Storage Recommendations
- General Office Use:
- 512GB PCIe 3.0 SSD (primary)
- Samsung 970 EVO Plus/WD SN750
- Focus on reliability over speed
- Single drive configuration
- Power Users/Developers:
- 1TB PCIe 3.0 primary
- Optional 1TB 2242 secondary drive
- High endurance drives recommended
- Regular backup strategy
- Enterprise Deployment:
- Lenovo-certified SSDs only
- Opal 2.0 encryption support
- Enterprise endurance ratings
- Centralized management compatibility
💰 Resale Value Impact
- Value Enhancement:
- 1TB SSD: +$100-$150 value
- 2TB SSD: +$180-$250 value
- Dual-drive setup: +$200-$300 value
- Enterprise-grade SSD: +$50-$80 premium
- Business Buyer Preferences:
- Larger capacities appeal to power users
- Faster drives attract professionals
- Lenovo-certified drives increase confidence
- Documented health status reduces concerns
❤️ SSD Health Monitoring
- Monitoring Tools:
- CrystalDiskInfo
- Lenovo Vantage storage monitoring
- Manufacturer-specific tools (Samsung Magician, WD Dashboard)
- Windows built-in drive optimization
- Key Health Indicators:
- Percentage lifetime used
- Total bytes written (TBW)
- Temperature during operation
- Media and error information
📝 Lenovo Warranty Considerations
- Warranty Compliance:
- Lenovo-certified SSDs maintain full warranty
- Third-party drives may affect warranty coverage
- Keep original components for service requests
- Document installation for enterprise records
- Enterprise Support:
- On-site Service may require certified drives
- Business contracts may specify storage requirements
- Asset management compliance considerations
- Documentation requirements for corporate environments
7. ThinkPad E14 Gen 5 Battery Removal & Replacement Guide
🔋 ThinkPad E14 Gen 5 Battery Specifications
- Standard Configuration:
- 3-cell 45Wh Lithium-Ion battery
- 11.5V nominal voltage
- 3910mAh capacity
- Approx. 8-10 hours typical business use
- Physical Specifications:
- Custom-shaped to fit chassis
- Integrated battery management system
- Standard 4-pin connector
- Screw and adhesive mounting combination
🔍 Battery Compatibility Chart
| Battery Model | Capacity | Part Number | Warranty | Expected Life |
|---|---|---|---|---|
| Standard 45Wh | 45Wh | 5B10X29613, 5B10X29614 | 1 year | 1000 cycles (80% capacity) |
| Extended Capacity | 57Wh (if available) | Varies | 1 year | 1000 cycles (80% capacity) |
| OEM Replacement | 45Wh | Genuine Lenovo | 1 year | 800-1000 cycles |
⚠️ Critical Safety Precautions
- Power Down Completely:
- Shut down through operating system
- Disconnect AC adapter and all peripherals
- Hold power button for 10 seconds to discharge
- Verify all status lights are off
- Personal Safety:
- Work in well-ventilated area
- Wear safety glasses
- Have Class D fire extinguisher nearby
- No water or liquids in workspace
- Battery Handling:
- Never puncture or bend battery
- Avoid short-circuiting terminals
- Handle with care - lithium batteries are fragile
- Keep away from heat sources
🔧 Step-by-Step Replacement Process
- Preparation:
- Remove bottom cover
- Disconnect battery connector (pull straight up)
- Wait 5 minutes for capacitor discharge
- Gather necessary tools
- Battery Removal:
- Remove 4-6 Phillips #0 screws securing battery
- Note screw lengths and locations
- Gently lift battery from connector end first
- If adhesive present, use plastic card to release
- Lift out at 30-degree angle carefully
- New Battery Installation:
- Inspect new battery for physical damage
- Align with mounting points and connector
- Lower into place without forcing
- Secure with screws (proper lengths)
- Connect battery connector last
🔌 Battery Connection Details
- Connector Type:
- 4-pin standard connector
- Positive and negative power pins
- Data communication pins
- Keyed design (prevents wrong connection)
- Connection Safety:
- Ensure complete discharge before disconnection
- Pull straight up - never at angle
- Check for bent pins before reconnection
- Listen for click when fully seated
📊 Battery Health Management
| Health Status | Capacity Indicator | Recommended Action | Resale Impact |
|---|---|---|---|
| Excellent (90-100%) | Windows reports "Excellent" | Maintain 20-80% charge habit | +$120-$180 value |
| Good (70-89%) | Shows "Good" with moderate wear | Monitor degradation rate | +$60-$100 value |
| Poor (<70%) | Suggests replacement soon | Replace battery recommended | -40% value if not replaced |
| Critical (<50%) | Significant runtime reduction | Immediate replacement required | -60% value if not replaced |
⚙️ New Battery Calibration
- Charge to 100% without interruption
- Use on battery until system shuts down (~5%)
- Charge to 100% again without using
- Check battery reporting in Lenovo BIOS
- Repeat cycle if reporting inaccurate
🎯 ThinkPad Power Management Features
- Lenovo Vantage:
- Custom charge thresholds
- Battery health monitoring
- Adaptive charging features
- Battery wear information
- BIOS Settings:
- Battery health information
- Charge threshold configuration
- Power management profiles
- Battery calibration tools
🔍 Troubleshooting Common Issues
- Battery Not Detected:
- Reseat connector firmly
- Check for bent pins in connector
- Test with known-good battery if possible
- Update BIOS to latest version
- Not Charging:
- Verify AC adapter functionality
- Check charging port and cable
- Update BIOS and chipset drivers
- Test with different power outlet
- Rapid Drain:
- Calibrate battery through full cycles
- Check for power-hungry applications
- Adjust Lenovo Vantage power settings
- Disable unnecessary background processes
⚡ Battery Performance Optimization
- Windows Settings:
- Enable battery saver mode
- Adjust screen brightness
- Manage background app activity
- Optimize power plan settings
- ThinkPad-Specific Optimization:
- Use Lenovo Vantage for custom settings
- Configure adaptive charging
- Set appropriate power profiles
- Update to latest firmware
♻️ Proper Battery Disposal
- Recycling Options:
- Call2Recycle drop-off locations
- Best Buy electronics recycling
- Local hazardous waste facilities
- Lenovo recycling programs
- Safety Precautions:
- Cover battery terminals with electrical tape
- Store in cool, dry place until disposal
- Never dispose in regular trash
- Handle damaged batteries with extreme care
💰 Resale Value Impact
- Value Enhancement:
- New genuine battery: +$150-$200 value
- Documented replacement: +$80 value
- 90%+ health reading: +$100 value
- Full calibration documentation: +$40 value
- Business Buyer Confidence:
- Fresh battery reduces perceived age
- Documented health increases trust
- Longer usable life appeals to all buyers
- Professional replacement suggests overall care
📝 Lenovo Warranty Considerations
- Warranty Status:
- Check Lenovo Warranty Status
- Genuine Lenovo batteries maintain full warranty
- Third-party batteries may void remaining warranty
- Keep original components for service requests
- Enterprise Support:
- On-site Service may require genuine batteries
- Business contracts may specify component requirements
- Asset management compliance considerations
- Documentation requirements for corporate environments
❤️ Battery Health Monitoring
- Monitoring Tools:
- Lenovo Vantage software
- Lenovo Diagnostics
- Windows battery health report
- Third-party tools like BatteryInfoView
- Key Metrics:
- Design capacity vs actual capacity
- Cycle count and wear level
- Voltage and temperature readings
- Charge/discharge rate information
8. ThinkPad E14 Gen 5 Keyboard & Top Cover Access: Professional Business Laptop Service Guide
⚠️ Advanced Procedure Warning
Keyboard removal on the ThinkPad E14 Gen 5 requires significant disassembly compared to older ThinkPad models. This procedure should only be attempted for necessary repairs or deep cleaning when planning to sell your business laptop.
🛠️ Specialized Tools Required
- Precision Screwdriver Set: Phillips #00 and #0
- Plastic Opening Tools: Spudgers and pry tools
- ESD Protection: Anti-static wrist strap
- Tweezers: For handling small connectors
- Magnetic Project Mat: For screw organization
📋 Preparation Steps
- Complete Power Down:
- Shut down Windows completely
- Disconnect AC power adapter
- Remove bottom cover and disconnect internal battery
- Press power button for 10 seconds to discharge capacitors
- Documentation:
- Photograph keyboard and top cover condition
- Note any existing wear or damage
- Record keyboard backlight functionality
- Test all keys before disassembly
🔧 Step-by-Step Keyboard Removal
- Bottom Cover Removal:
- Remove 7 Phillips screws from bottom case
- Use plastic pry tool to release bottom cover clips
- Lift bottom cover carefully away from chassis
- Internal Component Access:
- Disconnect battery connector from motherboard
- Remove SSD, RAM, and Wi-Fi card if accessible
- Document all connector locations with photos
- Display Assembly Removal:
- Disconnect display cables from motherboard
- Remove display hinge screws (2 per side)
- Carefully lift display assembly away from base
- Top Cover Separation:
- Remove remaining screws securing top cover
- Release internal clips around perimeter
- Lift top cover assembly from chassis
🔌 Keyboard Connector Access
| Connector Type | Location | Removal Method | Precautions |
|---|---|---|---|
| ZIF (Zero Insertion Force) | Under keyboard membrane | Lift brown locking flap upward | Use plastic tools only |
| Backlight Connector | Separate small connector | Pull straight up gently | Check LED functionality after reassembly |
| TrackPoint Cable | Integrated with keyboard | Release ZIF connector | Handle TrackPoint buttons carefully |
🔍 Common Keyboard Issues & Solutions
- Spill Damage:
- Complete keyboard replacement recommended
- Thorough motherboard inspection required
- Consider professional cleaning service
- Worn Keycaps:
- Individual keycap replacement available
- Full keyboard assembly for multiple keys
- Consider keyboard skin for resale presentation
- Backlight Failure:
- Check connector and cable first
- LED strip replacement if needed
- Verify BIOS settings after repair
💰 Resale Value Considerations
- Keyboard Condition Premiums:
- Pristine keyboard: +15-20% value
- Minor shine: -5-10% value impact
- Missing keys: -25-40% value reduction
- Backlight Functionality:
- Working backlight: +$50-$75 value
- Partial backlight: -$25 value
- No backlight: -$75-$100 value
- TrackPoint Importance:
- Fully functional: Expected for business laptops
- Non-functional: -$50-$75 value reduction
- Consider replacement for premium resale
⚙️ Professional Reassembly Tips
- Connector Verification:
- Ensure all ZIF connectors are fully seated
- Verify locking flaps are secure
- Test keyboard before final assembly
- Top Cover Alignment:
- Align all clips before applying pressure
- Work around perimeter systematically
- Check for even gaps and proper fit
- Final Testing:
- Test every key individually
- Verify backlight functionality
- Check TrackPoint and buttons
9. ThinkPad E14 Gen 5 Cooling System Maintenance & Thermal Repasting: Boost Performance for Maximum Resale Value
🚀 Why Thermal Maintenance Boosts Resale Value
Proper cooling system maintenance is one of the most impactful upgrades for business laptops. A well-maintained thermal system demonstrates professional care and ensures sustained performance - key selling points for business buyers.
| Thermal Upgrade | Performance Impact | Resale Value Increase | Buyer Appeal |
|---|---|---|---|
| Professional Repasting | 5-15°C temperature reduction | +$80-$120 | Sustained performance under load |
| Fan Cleaning & Maintenance | Quieter operation, better airflow | +$40-$60 | Professional maintenance evidence |
| Complete Thermal System Service | 20-25% better sustained performance | +$150-$200 | Premium, professionally maintained laptop |
⚠️ Critical Safety Precautions
- ESD Protection Required: Always use anti-static wrist strap
- Battery Disconnection: Completely disconnect internal battery before beginning
- Thermal Paste Safety: Use non-conductive, non-capacitive paste only
- Fan Handling: Avoid damaging delicate fan blades during cleaning
🛠️ Required Tools & Materials
Recommended Thermal Paste Types
- Premium Performance: Thermal Grizzly Kryonaut, Arctic MX-6
- Budget-Friendly: Arctic MX-4, Noctua NT-H1
- Long-Lasting: Gelid GC Extreme, Prolimatech PK-3
- Avoid: Conductive metal-based pastes
Cleaning & Maintenance Supplies
- 99% isopropyl alcohol
- Lint-free coffee filters or swabs
- Compressed air (ESD-safe)
- Small soft-bristle brush
- Thermal pad assortment (various thicknesses)
🔧 Cooling System Access Procedure
- Initial Preparation:
- Power down and disconnect all cables
- Remove bottom cover using Phillips #00 screwdriver
- Disconnect internal battery connector from motherboard
- Press power button to discharge residual power
- Heatsink Assembly Removal:
- Document screw locations with photos
- Unscrew heatsink in reverse star pattern
- Disconnect fan power cable gently
- Lift heatsink straight up to avoid damage
- Component Identification:
- CPU thermal interface area
- GPU thermal interface (if applicable)
- VRM thermal pad locations
- Fan assembly and airflow path
🧹 Professional Cleaning Process
| Component | Cleaning Method | Precautions | Frequency |
|---|---|---|---|
| Heatsink Fins | Compressed air + soft brush | Hold fan blades to prevent overspin | Every 6-12 months |
| Fan Blades | Isopropyl alcohol + swabs | Avoid bending delicate blades | During repasting |
| Thermal Surfaces | Isopropyl alcohol + lint-free material | Remove all old paste residue | Every repasting |
| Air Vents | Compressed air from inside out | Use low pressure to avoid damage | Every 3-6 months |
🎨 Professional Thermal Repasting Technique
- Surface Preparation:
- Clean CPU/GPU surfaces with isopropyl alcohol
- Ensure surfaces are completely dry and residue-free
- Inspect for damage or irregularities
- Paste Application Methods:
- Pea Method: Small pea-sized dot in center
- X Method: Thin X pattern across surface
- Spread Method: Thin, even manual spread
- Recommended: Pea method for Intel CPUs
- Quantity Guidelines:
- CPU: Rice grain to small pea size
- GPU: Slightly more than CPU amount
- Avoid excess paste squeezing out sides
📏 Thermal Pad Replacement Guide
- VRM Pads:
- Measure existing pad thickness
- Use high-conductivity replacement pads
- Ensure proper compression without overflow
- Pad Selection:
- 0.5mm, 1.0mm, 1.5mm thickness assortment
- 6 W/mK conductivity or higher recommended
- Non-silicone oil bleeding types preferred
⚙️ Reassembly & Performance Testing
- Heatsink Reinstallation:
- Apply even pressure during screw tightening
- Use star pattern for even pressure distribution
- Torque screws to manufacturer specification
- Post-Repair Testing:
- Reconnect battery and power on
- Monitor temperatures with HWiNFO64
- Run stress tests to verify thermal performance
- Check fan operation at various speeds
📊 Expected Performance Improvements
| Scenario | Before Maintenance | After Professional Service | Improvement |
|---|---|---|---|
| Idle Temperatures | 45-55°C | 35-42°C | 10-15°C reduction |
| CPU Load Temperatures | 85-95°C (thermal throttling) | 65-75°C (sustained boost) | 20-25°C reduction |
| Fan Noise Level | High under load | Moderate, consistent | Quieter operation |
| Sustained Performance | Frequent throttling | Consistent boost clocks | 15-25% improvement |
📸 Documentation for Resale Value
- Before/After Photos:
- Clean heatsink comparison
- Professional paste application
- Organized workspace showing care
- Performance Records:
- Temperature benchmarks
- Stress test results
- Fan noise measurements
- Materials Documentation:
- Thermal paste brand and type
- Replacement part receipts
- Professional tool usage evidence
⏰ Recommended Maintenance Schedule
- Basic Cleaning: Every 6 months (compressed air)
- Full Repasting: Every 12-18 months
- Complete Service: Before selling for maximum value
- Performance Check: Quarterly temperature monitoring
10. ThinkPad E14 Gen 5 LCD Screen & Bezel Replacement: Premium Display Upgrade for Maximum Resale Value
💎 Why Display Quality Drives Resale Value
The display is the most visible component of your ThinkPad and significantly impacts perceived value. A pristine, high-quality screen can increase resale value by 25-40% for business buyers who prioritize visual quality and professional presentation.
| Display Condition | Resale Impact | Buyer Perception | Repair Recommendation |
|---|---|---|---|
| Pristine, Bright Screen | +$150-$250 | Premium, well-maintained | Professional cleaning only |
| Minor Scratches/Scuffs | -$50-$100 | Average wear and tear | Consider bezel replacement |
| Cracked/Damaged Screen | -$200-$400 | Poorly maintained | Immediate screen replacement |
| Upgraded Higher Resolution | +$200-$350 | Premium upgrade | Strategic value enhancement |
⚠️ Critical Display Replacement Precautions
- LCD Fragility: Screens are extremely delicate - handle with care
- ESD Protection: Always use anti-static wrist strap
- Battery Disconnection: Completely disconnect internal battery first
- Ribbon Cable Care: Handle connectors gently to avoid damage
- Work Surface: Use soft, clean surface to prevent scratches
🔍 ThinkPad E14 Gen 5 Display Compatibility
| Display Type | Resolution | Panel Model Examples | Upgrade Compatibility |
|---|---|---|---|
| IPS FHD Standard | 1920x1080 | NV140FHM-N41, B140HAN03.0 | Direct replacement |
| IPS FHD Touch | 1920x1080 | NV140FHM-N61 | Connector compatibility required |
| IPS WQHD Premium | 2560x1440 | B140QAN02.0 | eDP compatibility check needed |
| Low Power FHD | 1920x1080 | NE140F8M-N61 | Best for battery life |
🛠️ Specialized Display Tools Required
- Precision Screwdrivers: Phillips #00, JIS #000
- Plastic Opening Tools: Spudgers, guitar picks
- Suction Cups: For safe screen handling
- Tweezers: For ribbon cable connectors
- Double-sided Tape: 2mm width for bezel reattachment
- Heat Gun/Hair Dryer: For adhesive softening
🔧 Step-by-Step Display Replacement
- Initial Preparation:
- Power down and disconnect all cables
- Remove bottom cover and disconnect battery
- Place laptop on soft, clean microfiber cloth
- Document original screen condition with photos
- Bezel Removal:
- Use plastic spudger to gently pry bezel clips
- Start from bottom edge and work around perimeter
- Apply gentle, even pressure to avoid cracking
- Remove bezel carefully and set aside
- Screen Removal:
- Remove 4 corner screws securing display panel
- Apply suction cups to screen for safe handling
- Lift screen assembly away from lid carefully
- Disconnect eDP ribbon cable from back of panel
- New Screen Installation:
- Connect eDP cable to new display panel first
- Position screen in lid and secure with screws
- Test display before bezel reinstallation
- Reattach bezel using original clips and adhesive
🔌 eDP Cable & Connector Guide
| Connector Type | Location | Handling Precautions | Testing Procedure |
|---|---|---|---|
| 40-pin eDP Connector | Back of LCD panel | Lift locking flap before removal | Check for bent pins before connection |
| Webcam/Mic Cable | Integrated with bezel | Disconnect before bezel removal | Test audio/video after reassembly |
| Wi-Fi Antenna Cables | Display lid corners | Note original routing path | Check signal strength post-installation |
🧪 Post-Replacement Quality Testing
- Basic Functionality:
- Power on and check for display artifacts
- Test brightness controls and function keys
- Verify color uniformity across entire screen
- Advanced Testing:
- Use EIZO Monitor Test for color gradients
- Check for dead pixels with solid color tests
- Test viewing angles and color consistency
- Integration Testing:
- Verify webcam and microphone functionality
- Test Wi-Fi signal strength with lid movement
- Check hinge smoothness and stability
📐 Professional Bezel Replacement Guide
- When to Replace Bezel:
- Cracks, scratches, or significant wear
- Loose fit or broken clip mechanisms
- Upgrading to match new screen quality
- Bezel Adhesive Application:
- Clean surface with isopropyl alcohol first
- Apply 2mm double-sided tape evenly
- Press firmly for 30 seconds to ensure adhesion
💰 Display Replacement Cost vs. Value Analysis
| Replacement Type | Part Cost | Labor Time | Resale Value Increase | ROI |
|---|---|---|---|---|
| Basic FHD Replacement | $60-$90 | 45-60 minutes | +$150-$200 | 150-200% |
| Premium WQHD Upgrade | $120-$180 | 60-75 minutes | +$250-$350 | 120-180% |
| Touchscreen Conversion | $180-$250 | 90-120 minutes | +$300-$400 | 100-150% |
| Bezel Replacement Only | $25-$40 | 20-30 minutes | +$75-$100 | 200-300% |
📸 Display Quality Presentation for Resale
- Photography Tips:
- Clean screen thoroughly before photos
- Use solid color backgrounds to show condition
- Demonstrate brightness and clarity
- Listing Description Highlights:
- Mention "pristine, scratch-free display"
- Highlight resolution and panel technology
- Note professional installation and testing
🔧 Common Display Issues & Solutions
- No Display After Replacement:
- Check eDP cable connection and locking mechanism
- Verify cable isn't pinched or damaged
- Test with external display to confirm motherboard output
- Flickering or Artifacts:
- Reseat eDP cable completely
- Check for compatible panel specifications
- Update graphics drivers from Lenovo Support
11. ThinkPad E14 Gen 5 Professional Reassembly Techniques: Final Assembly for Maximum Resale Value
⚙️ Why Professional Reassembly Impacts Resale Value
Proper reassembly is the most critical phase of your ThinkPad upgrade process. A professionally reassembled laptop demonstrates expert-level care and can command 20-30% higher resale prices from discerning business buyers who recognize quality workmanship.
| Reassembly Quality | Buyer Perception | Value Impact | Common Issues |
|---|---|---|---|
| Professional Grade | Expert maintenance, premium quality | +$200-$300 | None - perfect condition |
| Competent DIY | Well-maintained, some wear | +$50-$100 | Minor gaps, slight misalignment |
| Amateur Work | Questionable maintenance history | -$100-$200 | Visible gaps, loose parts, stripped screws |
| Poor Reassembly | Damaged, unreliable | -$300-$500 | Cracked casings, missing screws, functionality issues |
✅ Pre-Reassembly Quality Control Checklist
- Component Verification:
- All upgrades installed and secured properly
- No leftover tools or components inside chassis
- All connectors properly seated and locked
- Cable routing matches factory specifications
- Cleaning & Preparation:
- Dust and debris removed from all surfaces
- Fingerprints cleaned from internal components
- Thermal paste residue completely cleaned
- All screw holes clear of obstructions
- Documentation Review:
- Reference disassembly photos for proper sequencing
- Verify screw lengths and locations from documentation
- Check connector orientations from pre-disassembly images
🔩 Professional Screw Management System
| Screw Type | Location | Torque Specification | Critical Notes |
|---|---|---|---|
| M2x3mm (Black) | Bottom cover, internal brackets | Finger tight + ¼ turn | Do not overtighten - can strip easily |
| M2.5x4mm (Silver) | Motherboard mounting points | Firm but not excessive | Use crisscross pattern for even pressure |
| M2.5x6mm (Silver) | Display hinges, heatsink | Firm pressure required | Critical for structural integrity |
| M2x8mm (Black) | SSD mounting, specific brackets | Moderate torque | Verify length to avoid motherboard damage |
🎯 Screw Organization Best Practices
- Use magnetic project mat with labeled sections
- Group screws by component and location
- Take photos of screw layouts before removal
- Verify all screws accounted for before final closure
🔧 Step-by-Step Professional Reassembly Sequence
- Internal Component Installation:
- Install RAM modules at 30-degree angle, press firmly until clips engage
- Insert SSD at 30-degree angle, secure with proper length screw
- Reconnect all internal cables (battery, keyboard, touchpad)
- Verify Wi-Fi antenna routing through proper channels
- Heatsink & Cooling System:
- Apply thermal paste using pea-sized dot method
- Secure heatsink using star pattern torque sequence
- Reconnect fan power cable with gentle pressure
- Verify thermal pad contact with VRM components
- Motherboard & Chassis Integration:
- Lower motherboard into chassis at slight angle
- Align all port cutouts and mounting points
- Secure with proper screw sequence (corners first)
- Verify no cable pinching during installation
- Bottom Cover Installation:
- Align cover tabs with chassis slots
- Press firmly around perimeter until clips engage
- Install screws in diagonal pattern for even pressure
- Verify no gaps or misalignment
🔌 Professional Cable Management Techniques
| Cable Type | Routing Path | Connection Method | Testing Procedure |
|---|---|---|---|
| Keyboard/Touchpad | Under motherboard edges | ZIF connectors - lift flap, insert, lock | Test all keys and touchpad functions |
| Battery Power | Direct to motherboard | Push straight in until click | Verify charging LED and power on |
| Display eDP Cable | Through hinge channels | Locking mechanism engagement | Check for artifacts and full resolution |
| Wi-Fi Antennas | Designated routing paths | Push-on connectors | Signal strength and speed test |
🔍 Post-Reassembly Quality Control Checklist
- Visual Inspection:
- No visible gaps between panels
- All screws present and properly torqued
- No scratches or damage from reassembly
- Port alignment perfect with no obstructions
- Functional Testing:
- Power on and BIOS access successful
- All USB ports recognize devices
- Audio input/output functioning properly
- Keyboard backlight and all keys operational
- Performance Verification:
- Run Lenovo Diagnostics
- Stress test CPU and GPU for thermal performance
- Verify RAM and SSD recognition at full capacity
- Check battery charging and health status
🚫 Common Reassembly Mistakes to Avoid
- Structural Issues:
- Forcing components that don't fit properly
- Overtightening screws causing plastic deformation
- Missing cable routing causing pinch points
- Functional Problems:
- Forgetting to reconnect internal battery
- Improper thermal paste application
- Damaging ribbon cables during reinstallation
- Cosmetic Damage:
- Using metal tools that scratch surfaces
- Fingerprints on internal components
- Misaligned panels causing visible gaps
🎯 Professional Finishing Touches
- Cosmetic Perfection:
- Thorough external cleaning with isopropyl alcohol
- Keyboard keycap alignment verification
- Remove all fingerprints from screen and surfaces
- Documentation Preparation:
- Create before/after performance comparison
- Document all upgrades with photos and receipts
- Prepare benchmark results for potential buyers
- Software Optimization:
- Clean Windows installation with latest drivers
- Install essential Lenovo utilities
- Remove bloatware for optimal performance
🧪 Comprehensive Final Testing Protocol
| Test Category | Specific Tests | Acceptance Criteria | Tools Required |
|---|---|---|---|
| Hardware Functionality | All ports, keys, buttons, lights | 100% operational | USB devices, external monitor |
| Performance | CPU/GPU stress tests, thermal performance | Stable temperatures, no throttling | HWMonitor, Prime95, FurMark |
| Battery & Power | Charging, battery health, power states | Normal charge cycles, good health | Windows battery report |
| Connectivity | Wi-Fi, Bluetooth, Ethernet | Strong signals, reliable connections | Speed test, device pairing |
💰 Final Resale Value Maximization
- Presentation Quality:
- Professional photography in good lighting
- Highlight premium upgrades and condition
- Show detailed images of perfect reassembly
- Documentation Package:
- Include upgrade receipts and performance data
- Provide before/after comparison documentation
- Offer limited warranty on workmanship
- Market Positioning:
- Position as "professionally upgraded and maintained"
- Emphasize superior condition versus competitors
- Target business buyers and professionals specifically
✅ Final Reassembly Completion Checklist
- ✓ All internal components properly installed and secured
- ✓ No leftover tools, screws, or components
- ✓ Perfect exterior alignment with no visible gaps
- ✓ Comprehensive functional testing completed
- ✓ Performance documentation prepared
- ✓ Professional cleaning and presentation ready
- ✓ Resale listing materials prepared
12. ThinkPad E14 Gen 5 Testing & Performance Validation: Verifying Upgrade Success for Maximum Resale Value
🔍 Why Comprehensive Testing Boosts Resale Value
Thorough performance validation is the ultimate proof of quality for your upgraded ThinkPad. Documented test results can increase resale value by 25-35% by demonstrating tangible performance improvements and professional-grade reliability to business buyers.
| Validation Level | Testing Depth | Value Impact | Buyer Confidence |
|---|---|---|---|
| Basic Functionality | Power on, basic operations | +10-15% | Minimal - expected working condition |
| Comprehensive Testing | All components, stress tests | +20-25% | Good - verified reliability |
| Professional Validation | Benchmarks, thermal, battery tests | +30-35% | High - documented performance |
| Enterprise-Grade | Extended stability, real-world simulations | +40-50% | Premium - business-ready assurance |
🎯 Testing Philosophy for Business Laptops
- Business Reliability Focus: Emphasize stability over raw performance
- Real-World Scenarios: Test applications business users actually run
- Documentation is Key:
- Before/after comparisons show upgrade value
- Screenshots and logs provide credibility
- Professional presentation builds trust
🛠️ Essential Testing Software Suite
| Test Category | Recommended Tools | Purpose | Business Value |
|---|---|---|---|
| System Information | HWiNFO64, CPU-Z | Verify component recognition | Confirms upgrade specifications |
| Performance Benchmarks | Cinebench R23, Geekbench 6 | Quantifiable performance metrics | Demonstrable improvement evidence |
| Storage Performance | CrystalDiskMark, AS SSD | SSD speed verification | Shows real-world application benefits |
| Thermal Performance | Prime95, FurMark, HWMonitor | Cooling system validation | Proves sustained performance capability |
| Battery Health | Windows Battery Report | Battery capacity verification | Portability assurance for buyers |
✅ Phase 1: Basic Functionality Validation
- Power & Boot Sequence:
- Cold boot timing (power off to Windows login)
- Restart functionality and speed
- BIOS/UEFI access and navigation
- Boot device selection and priority
- Hardware Component Verification:
- All USB ports (2.0, 3.0, USB-C) device recognition
- Audio input/output through all jacks
- Webcam and microphone functionality
- SD card reader detection and speeds
- Input Device Testing:
- Every keyboard key functional (including Fn keys)
- TrackPoint and touchpad precision
- Keyboard backlight brightness levels
- Touchpad gestures and multi-touch
📊 Phase 2: Performance Benchmarking
🖥️ CPU Performance Validation
| Test | Purpose | Target Results | Business Impact |
|---|---|---|---|
| Cinebench R23 Multi-core | CPU rendering performance | Consistent with CPU specifications | Multitasking and productivity capability |
| Geekbench 6 CPU | General processing power | Above average for CPU class | Overall system responsiveness |
| CPU-Z Stress Test | Stability under load | No crashes, stable frequencies | Reliability for business applications |
💾 Storage Performance Validation
- Sequential Read/Write:
- Use CrystalDiskMark for accurate measurements
- Compare against SSD manufacturer specifications
- Document improvements over original storage
- Real-World Performance:
- Application load times (Office, browsers)
- File transfer speeds with large datasets
- Boot time improvements from original configuration
🧠 Memory & Multitasking Validation
- RAM Capacity Verification:
- Confirm full capacity recognition in BIOS and OS
- Test dual-channel operation if applicable
- Verify advertised speeds (DDR4-3200, etc.)
- Multitasking Scenarios:
- Multiple browser tabs + Office applications
- Virtual machine operation if upgraded sufficiently
- Memory-intensive business applications
🌡️ Phase 3: Thermal & Cooling Validation
| Thermal Scenario | Test Method | Acceptable Range | Business Importance |
|---|---|---|---|
| Idle Temperatures | 15-minute idle after boot | 35-45°C (ambient +10-15°C) | Quiet operation in office environments |
| CPU Load Temperatures | Prime95 Small FFTs 30min | 75-85°C (no throttling) | Sustained performance during heavy tasks |
| Combined Load | Prime95 + FurMark 15min | 80-90°C (controlled throttling acceptable) | Worst-case scenario stability |
| Fan Behavior | Various load levels | Smooth ramp-up, no bearing noise | Professional acoustics in meetings |
🔋 Phase 4: Battery & Power Management
- Battery Health Assessment:
- Generate Windows battery report:
powercfg /batteryreport - Check designed vs. actual capacity
- Verify charge cycle count
- Document battery wear percentage
- Generate Windows battery report:
- Real-World Battery Testing:
- Video playback test (50% brightness, WiFi on)
- Office productivity simulation
- Standby battery drain measurement
- Charging speed and efficiency
- Power Management Verification:
- Sleep/hibernate functionality
- Power plan switching behavior
- Performance states under battery power
📡 Phase 5: Connectivity & Peripheral Testing
| Connection Type | Test Method | Performance Targets | Business Criticality |
|---|---|---|---|
| Wi-Fi Performance | Speedtest.net, large file transfers | 80-90% of router capability | Essential for remote work |
| Bluetooth | Multiple device pairing | Stable connections, no dropouts | Peripheral compatibility |
| Ethernet | Wired speed tests | Full gigabit capability | Office docking reliability |
| USB-C/Thunderbolt | Data, video, power delivery | All functions operational | Modern workspace compatibility |
📋 Professional Documentation Protocol
- Before/After Comparisons:
- Side-by-side benchmark results
- Thermal performance improvements
- Boot time and application load comparisons
- Test Logs & Screenshots:
- Date/time stamped results
- Clear labeling of all tests
- Professional presentation format
- Resale Documentation Package:
- Summary of key improvements
- Visual performance graphs
- Professional quality assurance statement
🏢 Enterprise-Grade Validation (Premium Option)
- Extended Stability Testing:
- 24-hour continuous operation
- Memory testing with MemTest86
- Storage endurance verification
- Business Application Suites:
- Microsoft Office performance
- Virtual machine operation
- Video conferencing reliability
- Professional Certification:
- Create custom "certificate of performance"
- Include in resale documentation package
- Adds significant premium value
🔧 Common Post-Upgrade Issues & Resolution
| Issue | Symptoms | Likely Cause | Resolution |
|---|---|---|---|
| Thermal Throttling | Performance drops under load | Improper heatsink installation | Re-paste and verify mounting pressure |
| RAM Not Recognized | Partial capacity in BIOS | Seating issue or compatibility | Reseat modules, check QVL list |
| SSD Performance Low | Slow boot/load times | Driver issues or SATA vs NVMe | Update drivers, check interface |
| Battery Not Charging | No charge indicator | Battery connector issue | Reseat connector, check power circuit |
🏆 Final Performance Certification
- ✓ All hardware components verified operational
- ✓ Performance benchmarks meet or exceed expectations
- ✓ Thermal management proven under load
- ✓ Battery health and performance documented
- ✓ Connectivity and peripheral compatibility confirmed
- ✓ Professional documentation package prepared
- ✓ Ready for premium business resale positioning
13. Maximizing ThinkPad E14 Gen 5 Resale Value: Strategic Upgrade ROI & Premium Positioning
💰 Strategic Value Maximization Framework
Properly executed upgrades can increase your ThinkPad's resale value by 40-60%, but strategic positioning is crucial. Business buyers pay premiums for documented performance improvements and professional maintenance records that demonstrate superior value over standard configurations.
| Upgrade Strategy | Investment Range | Value Increase | Target Buyer Profile |
|---|---|---|---|
| Essential Performance (RAM+SSD) | $150-$250 | +$300-$450 | Business Professionals, Students |
| Premium Refresh (Full Service) | $300-$500 | +$600-$900 | Executives, Consultants |
| Enterprise Ready (Max Config) | $600-$900 | +$1,000-$1,500 | Small Business, IT Departments |
📈 Upgrade ROI Analysis by Component
| Upgrade Component | Cost | Value Added | ROI | Priority Level |
|---|---|---|---|---|
| 16GB RAM Upgrade | $40-$60 | +$120-$180 | 200-300% | Essential |
| 1TB NVMe SSD | $80-$120 | +$200-$280 | 150-250% | Essential |
| New Battery | $90-$140 | +$150-$220 | 100-180% | High |
| Thermal System Service | $30-$50 | +$100-$160 | 200-400% | High |
| Display Upgrade | $150-$250 | +$250-$400 | 100-200% | Medium |
🏆 Premium Resale Positioning Strategies
- Business Professional Tier:
- Emphasize reliability and productivity enhancements
- Highlight ThinkPad durability and corporate features
- Target: Consultants, remote workers, executives
- Student & Academic Tier:
- Focus on value and longevity
- Highlight compatibility with academic software
- Target: College students, researchers, educators
- Small Business Tier:
- Position as cost-effective enterprise alternative
- Emphasize security features and manageability
- Target: Startups, small offices, IT departments
📋 Value-Added Documentation Package
- Performance Documentation:
- Before/after benchmark comparisons
- Thermal performance graphs
- Battery health reports
- Boot time and application load comparisons
- Professional Maintenance Records:
- High-quality photos of upgrade process
- Receipts for genuine Lenovo parts
- Thermal paste application documentation
- Cleaning and maintenance records
- Quality Assurance Certification:
- Custom "certificate of performance"
- Stress test results and stability verification
- Component testing logs
- Professional reassembly verification
💵 Strategic Pricing & Market Positioning
| Market Segment | Pricing Strategy | Competitive Advantages | Value Proposition |
|---|---|---|---|
| Premium Business | 15-25% above market average | Documented upgrades, professional maintenance | Enterprise-ready reliability |
| Student Market | 5-15% above comparable models | Proven performance, upgrade potential | Long-term value and durability |
| Budget Conscious | Competitive with added value | Superior condition, recent upgrades | Better than new reliability |
🛒 Premium Resale Platform Strategy
- Business-Focused Platforms:
- SellLaptopBack - Premium business laptop marketplace
- SellLaptopBack - Corporate refresh programs
- LinkedIn professional networks
- Industry-specific forums and groups
- Educational Channels:
- .edu campus marketplaces
- University surplus sales
- Student organization networks
- Academic department referrals
- Government & Institutional:
- .gov surplus equipment channels
- Municipal auction platforms
- Non-profit organization networks
- Library and educational institution programs
📝 High-Conversion Listing Optimization
- Title Optimization:
- "Professionally Upgraded ThinkPad E14 Gen 5"
- "Business Ready - 16GB RAM + 1TB SSD"
- "Like New Condition with Performance Upgrades"
- Key Feature Highlights:
- Documented performance improvements
- Professional maintenance records
- Premium component upgrades
- Enterprise-grade testing and validation
- Photography Strategy:
- High-quality images showing pristine condition
- Before/after upgrade comparisons
- Performance benchmark screenshots
- Professional workspace context shots
⏰ Strategic Timing for Maximum Return
| Market Timing | Optimal Listing Period | Target Audience | Pricing Strategy |
|---|---|---|---|
| Back-to-School (July-August) | 4-6 week listing window | Students, Parents, Educators | Premium pricing with educational value focus |
| Q4 Business Cycle (Oct-Dec) | Year-end budget spending | Businesses, Consultants | Enterprise-ready positioning |
| Tax Return Season (Feb-Apr) | Post-refund purchasing | Professionals, Small Business | Value-added premium pricing |
🎁 Value-Added Services for Premium Pricing
- Warranty Options:
- 30-day money-back guarantee
- 90-day limited warranty on upgrades
- Lifetime support for installation issues
- Setup Services:
- Professional Windows installation
- Driver optimization and updates
- Basic software package installation
- Accessory Bundles:
- Quality laptop bag or sleeve
- USB-C docking station compatibility
- Premium mouse or peripherals
🔍 Competitive Market Positioning
| Competitor Type | Advantages | Your Competitive Edge | Positioning Strategy |
|---|---|---|---|
| New Entry-Level ThinkPads | Warranty, brand new | Superior specifications, proven reliability | "Better performance than new base models" |
| Used Standard Models | Lower price point | Documented upgrades, professional maintenance | "Worth the premium for proven quality" |
| Consumer Grade Laptops | Flashy features, lower cost | Business-grade durability, ThinkPad features | "Professional tool vs. consumer gadget" |
🏛️ Specialized Channels: .gov & .edu Markets
- Government Surplus Programs:
- State and municipal surplus auctions
- Federal equipment disposal channels
- Public university surplus sales
- Educational Institution Pathways:
- Campus IT department upgrade programs
- Student government equipment sales
- Faculty/staff upgrade initiatives
- Non-Profit & Organizational:
- Charity organization equipment programs
- Small business development centers
- Community technology access programs
✅ Final Resale Value Maximization Checklist
- ✓ All upgrades professionally installed and tested
- ✓ Comprehensive documentation package prepared
- ✓ Professional photography completed
- ✓ Strategic pricing research conducted
- ✓ Target market positioning defined
- ✓ Premium platform listings optimized
- ✓ Value-added services configured
- ✓ Competitive advantages clearly articulated
Need to Sell Your Lenovo Laptop? Get Instant Cash!
If your ThinkPad E14 Gen 5 (or other ThinkPad model) has performance issues or you're upgrading to a newer business laptop, we offer competitive cash payouts for your device. We buy broken, used, and refurbished ThinkPad laptops—including all E14 Gen 5 configurations—with free insured shipping and hassle-free evaluations.
Sell Popular Lenovo Models Now: